Introduction
In a Nutshell:
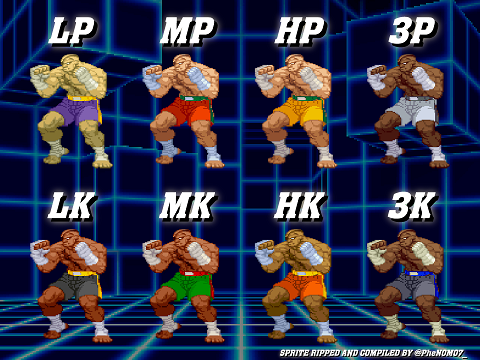
- Sagat is the king of CvS2. If you like a play style of dominating pokes/neutral that can convert into big damage, but also have up close pressure options, Sagat is the character for you. He has nearly everything you'd want in a character.
- Pros:
- - Some of the best normals in the game
- - Excellent array of supers for all needs.
- - Great damage output and health.
- Cons:
- -Slow move speed
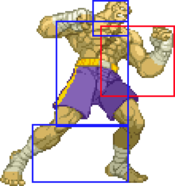
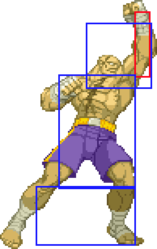
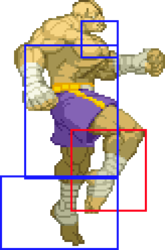
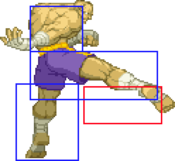
- -Big hurtboxes make him vulnerable to normals and instant overheads that much of the cast can duck
- - Weakness maintaining pressure against short characters that can duck close standing jab.
- - Sub par roll cancels (and specials, generally)
Preferred Grooves
Footsie Sagat generally prefers having stored supers to unleash big damage, so C or P are viable. Rushdown Sagat just needs low jump to be scary, so N and K are viable.
A groove isn't ideal, as Sagat's customs aren't really super damaging and are fairly difficult, but its still Sagat, so it's not a *bad* character. But we won't be focusing much on A-Sagat.
S Sagat is less than ideal because S-Groove isn't good period, but Sagat is definitely on the top 3 S-Groove team. Infinite level 1 Tiger Cannons is no joke.
C Groove-
Advantages-
- Level 2 cancelling- Cancelling Tiger Raid into Fierce Tiger Uppercut is one of the best meter savers. You only lose 100 damage and gain a Tiger Uppercut worth of meter on top of the meter you save compared to the level 3.
- Cheap meters- on top of the level 2 canceling, C-Groove has the fastest building gauge.
- Delayed Get-up- Unpunishable method to mess with setup/safejumps.
- Air Block-
Disadvantages-
- Rush down- You need to earn your way in through footsies and pressure.
K Groove-
Advantages-
- RAGE- When you're red, opponents are terrified. Make sure to throw them a few times and laugh that that's basically a super's worth of damage.
- Low Jump- Sagat's low jump RH is very very good. It also opens up the low jump RH/ empty jump Tiger Raid Mixup
- Safe Supers- Obviously Sagat gets this in all grooves, but K allows for "random" use it or lose it supers. Having 1 safe and 1 mostly safe supers is amazing for this.
- Safe Fall- Quickly get back in the fight, but watch for punishment!
- Just Defense- Get life back AND 1/12 meter for holding back? Great! The goal is to get around 12 JD's a round, so you end up getting 2 or 3 rage opportunities instead of 1 or 2.
Disadvantages-
- No Alpha Counter- This is brutal against A Groove
- Less control over meter usage- An opponent can wait you out, or taunt you before a match to cost your rage.
N Groove-
Advantages-
- Low Jump
- More control over Supers
- Counter Attack/Roll
Disadvantages-
- Need to "pop" for level 3's
- Slower overall functional meter than K or C.
Terms:
Forward = F/f, Backward = B/b, Up = U/u, Down = D/d
Light punch = LP (Jab Punch), Medium Punch = MP (Strong Punch), Hard punch = HP (Fierce Punch), Light kick = LK (Short Kick), Medium Kick = MK (Forward Kick), Hard kick = HK (Roundhouse Kick)
Any Punch = AP, Any Kick = AK
QCF - d,df,f (Hadoken/Tiger shot movement), QCB - d,db,b (Hurricane Kick movement), DP - f,df,f (Dragon punch/Tiger Uppercut movement)
Normal Moves
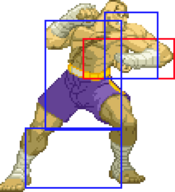
5LP
| Damage | Stun | Cancel | Guard | Parry | Startup | Active | Recovery | Total | Adv Hit | Adv Block | Invul |
|---|---|---|---|---|---|---|---|---|---|---|---|
| 500 | 4 | SP/SU | H/L | H/L | 2 | 3 | 6 | 11 | +6 | +6 | - |
| |||||||||||
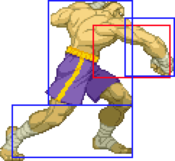
5MP
| Damage | Stun | Cancel | Guard | Parry | Startup | Active | Recovery | Total | Adv Hit | Adv Block | Invul |
|---|---|---|---|---|---|---|---|---|---|---|---|
| 1100 | 10 | SP/SU | H/L | H/L | 4 | 3 | 24 | 31 | -7 | -7 | - |
| |||||||||||
5MP
| Damage | Stun | Cancel | Guard | Parry | Startup | Active | Recovery | Total | Adv Hit | Adv Block | Invul |
|---|---|---|---|---|---|---|---|---|---|---|---|
| 1600 | 14 | SU | H/L | H/L | 6 | 8 | 20 | 34 | -4 | -4 | - |
| |||||||||||
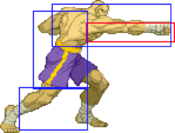
5MP
| Damage | Stun | Cancel | Guard | Parry | Startup | Active | Recovery | Total | Adv Hit | Adv Block | Invul |
|---|---|---|---|---|---|---|---|---|---|---|---|
| 1300 / 1100 | 13/14 | SP/SU (1st Hit Only) | H/L | H | 3 | 8 | 27 | 38 | -13 | -13 | - |
| |||||||||||
5LP
| Damage | Stun | Cancel | Guard | Parry | Startup | Active | Recovery | Total | Adv Hit | Adv Block | Invul |
|---|---|---|---|---|---|---|---|---|---|---|---|
| 200/400 | 2/3 | SP/SU (1st Hit Only) | H/L | H/L | 5 | 8 | 10 | 23 | -1 | -1 | - |
| |||||||||||
5LP
| Damage | Stun | Cancel | Guard | Parry | Startup | Active | Recovery | Total | Adv Hit | Adv Block | Invul |
|---|---|---|---|---|---|---|---|---|---|---|---|
| 400/900 | 9/10 | SP/SU (1st Hit Only) | H/L | H/L | 5 | 11 | 24 | 40 | -12 | -12 | - |
| |||||||||||
5LP
| Damage | Stun | Cancel | Guard | Parry | Startup | Active | Recovery | Total | Adv Hit | Adv Block | Invul |
|---|---|---|---|---|---|---|---|---|---|---|---|
| 500/1300 | 13/14 | SP/SU (1st Hit Only) | H/L | H/L | 6 | 10 | 24 | 40 | -7 | -7 | - |
| |||||||||||
5LP
| Damage | Stun | Cancel | Guard | Parry | Startup | Active | Recovery | Total | Adv Hit | Adv Block | Invul |
|---|---|---|---|---|---|---|---|---|---|---|---|
| 400 | 4 | SP/SU | H/L | H/L | 5 | 4 | 8 | 17 | +3 | +3 | - |
| |||||||||||
5LP
| Damage | Stun | Cancel | Guard | Parry | Startup | Active | Recovery | Total | Adv Hit | Adv Block | Invul |
|---|---|---|---|---|---|---|---|---|---|---|---|
| 1000 | 9 | SP/SU | H/L | H/L | 6 | 4 | 12 | 22 | +4 | +4 | - |
| |||||||||||
5LP
| Damage | Stun | Cancel | Guard | Parry | Startup | Active | Recovery | Total | Adv Hit | Adv Block | Invul |
|---|---|---|---|---|---|---|---|---|---|---|---|
| 1500 | 14 | SU | H/L | H/L | 7 | 8 | 14 | 17 | +2 | +2 | - |
| |||||||||||
Normal Moves Data Table
| Button | Position | Buffers: | Itself | Specials | Supers | Hit | Block | Startup | Active | Recovery | Damage |
|---|---|---|---|---|---|---|---|---|---|---|---|
| Jab | Standing | n | y | y | +6 | +6 | 2 | 3 | 6 | 500 | |
| Crouching | n | y | y | +3 | +3 | 5 | 4 | 8 | 400 | ||
| Jumping | - | - | - | - | - | 4 | 22 | - | 600 | ||
| Strong | Standing | n | y | y | -7 | -7 | 4 | 3 | 24 | 1100 | |
| Crouching | n | y | y | +4 | +4 | 6 | 4 | 12 | 1000 | ||
| Jumping | - | - | - | - | - | 4 | 10 | - | 1100 | ||
| Fierce | Close | n/n | y/n | y/y | -13 | -13 | 3 | 8 | 27 | 1300,1100 | |
| Far | n | n | y | -4 | -4 | 6 | 8 | 20 | 1600 | ||
| Crouching | n | n | y | +2 | +2 | 7 | 8 | 14 | 1500 | ||
| Jumping | - | - | - | - | - | 6 | 8 | - | 1600 | ||
| Short | Standing | n,n | y,n | y,y | -1 | -1 | 5 | 2+6 | 10 | 200+400 | |
| Crouching | n | y | y | +5 | +5 | 3 | 4 | 6 | 400 | ||
| Jumping | - | - | - | - | - | 5 | 22 | - | 600 | ||
| Forward | Standing | n/n | y/n | y/n | -12 | -12 | 5 | 3+8 | 24 | 400+900 | |
| Crouching | n | y | y | -2 | -2 | 4 | 5 | 17 | 1000 | ||
| Jumping | - | - | - | - | - | 6 | 8 | - | 1000 | ||
| Roundhouse | Standing | n/n | y/n | y/n | -7 | -7 | 6 | 3+7 | 24 | 500+1300 | |
| Crouching | n | n | y | down | -7 | 7 | 8 | 23 | 1500 | ||
| Jumping | - | - | - | - | - | 5 | 8 | - | 1400 |
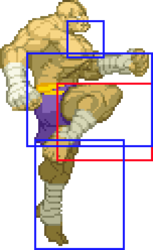
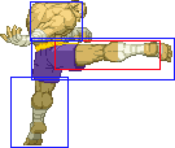
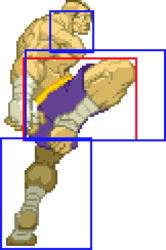
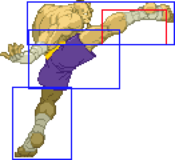
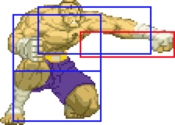
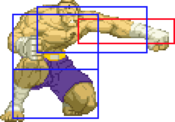
Moves with detached/invincible hitboxes:
-j.HK (tip of foot)
-far s.HP and d.HP (tip of fists, VERY small)
-far s.MK (tip of foot)
Throws
Tiger Carry
- Forward or Back + Fierce
Tiger Rage
- Forward or Back + Roundhouse (Mashable)
Special Moves
Tiger Shot
- Quarter Circle Forward + Punch
- LP 800 -11/-11 10/44
- MP 900 -12/-12 10/45
- HP 1000 -13/-13 10/46
Ground Tiger Shot
- Quarter Circle Forward + Kick
- LK 700 -12/-12 12/45
- MK 800 -13/-13 12/46
- HK 900 -14/-14 12/47
Tiger Uppercut
- Forward, Down, Down-Forward + Punch
- LP 1800,900 down/-35 3/15/35
- 3 frames full body, 4 frames lower body
- MP 1900,900 down/-43 3/19/39
- 3 frames full body, 4 frames lower body
- HP 700+500+400+200x2 down/-35 3/[4]/[5]/[5]/[5]/[5]/42
- 7 frames full body
- LP 1800,900 down/-35 3/15/35
Tiger Crush
- Forward, Down, Down-Forward + Kick
- LK 400+1100 down/-10 6/[6]/[5]/23
- MK 500+1200 down/-12 5/[6]/[6]/24
- HK 600+1300 down/-15 4/[6]/[7]/26
Super Combos
High Tiger Cannon
- Double Quarter Circle Forward + Punch
- High Tiger Cannon super has one frame less startup before the super flash than Ground Tiger Cannon super. It makes a difference when punishing another Sagat's whiffed far s.HP with far s.HP xx High Tiger Cannon as opposed to far s.HP xx Ground Tiger Cannon.
Ground Tiger Cannon
- Double Quarter Circle Back + Punch
- LP down/-2
- MP down/+1
- HP down/+4
Tiger Raid
- Double Quarter Circle Back + Kick
Tiger Genocide
- Double Quarter Circle Forward + Kick
Bread and Butter Combos
s.jabx2, tiger uppercut/tiger knee
cr.short, s.jab, tiger uppercut/tiger knee
s.jab, s.fierce, tiger uppercut
cr.shortx2, tiger uppercut/tiger knee
C-Groove Combos
Crossover lk, 2 standing lp, crouching mk ~ lvl. 2 Ground Tiger Cannon ~ lvl. 1 Tiger Cannon
The Basics
Advanced Strategy
Edited By: Haaris Abbasi & Markudea
