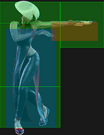
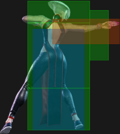
Note: {{clr|L|2LP}}, {{clr|L|5LP}}, {{clr|L|5LK}} ranges are quite close to each other.
Note: {{clr|L|5LP}}, {{clr|L|2LP}}, {{clr|L|5LK}} ranges are quite close to each other.
A.K.I. does very well when she is right up close to her opponent. She has a wide variety of tools to reset her pressure or to open up the opponents with frame traps.
A.K.I. does very well when she is right up close to her opponent. She has a wide variety of tools to reset her pressure or to open up the opponents with frame traps.
* Her {{clr|L|5LP}}~{{clr|L|LP}} target combo combos on hit and frame-traps on block, making it a good option to use. The second hit of the target combo also moves her forward slightly, making it more consistent to hit compared to two {{clr|L|2LP}}s.
* Her {{clr|L|2LP}} and {{clr|L|2LK}} chain into each other, and {{clr|L|2LK}} has a decent range. On hit, {{clr|L|2LP}} can be canceled into {{clr|H|236HP}}, giving her access to {{clr|H|236HP}} knockdown setups.
* Her {{clr|L|2LP}} and {{clr|L|2LK}} chain into each other, and {{clr|L|2LK}} has a decent range. On hit, {{clr|L|2LP}} can be canceled into {{clr|H|236HP}}, giving her access to {{clr|H|236HP}} knockdown setups.
* Her {{clr|L|5LP}}~{{clr|L|LP}} target combo combos on hit and frame-traps on block, making it a good option to use.
* {{clr|L|5LK}} has slightly more range than {{clr|L|2LP}}/{{clr|L|5LP}} and is special cancelable. This can be a good tool for interrupt opponent's buttons or used for checking their walk forwards with little risk due to the low recovery of the move.
* {{clr|L|5LK}} has slightly more range than {{clr|L|2LP}}/{{clr|L|5LP}} and is special cancelable. This can be a good tool for interrupt opponent's buttons or used for checking their walk forwards with little risk due to the low recovery of the move.
* {{clr|M|5MP}} is similar in that sense, but links to {{clr|L|2LP}} or 2PP~K on counterhit, making it more rewarding. {{clr|M|5MP}} also moves A.K.I. closer to the opponent, and provides more blockstun allowing for better options off a drive rush cancel.
* {{clr|M|5MP}} is similar in that sense, but links to {{clr|L|2LP}} or 2PP~K on counterhit, making it more rewarding. {{clr|M|5MP}} also moves A.K.I. closer to the opponent, and provides more blockstun allowing for better options off a drive rush cancel.
* {{clr|H|6HK}} is A.K.I.'s pressure reset tool, as it is +2 on block, and links into {{clr|L|2LP}} on hit. It is relatively slow compared to her other options, so use it when the opponent has shown to respect A.K.I's pressure.
Outside of these options, A.K.I. can also use {{clr|M|3MP}} for an overhead option that is +3 on hit for a pressure reset or to close out the round. It is best used sparingly, as the reward isn't great and is reactable.
Outside of these options, A.K.I. can also use {{clr|M|3MP}} for an overhead option that is +3 on hit for a pressure reset or to close out the round. It is best used sparingly, as the reward isn't great and is reactable.
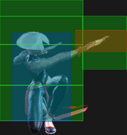
Note: {{clr|M|2MK}}, {{clr|M|5MK}}, {{clr|M|2MP}}, and {{clr|H|5HK}} ranges are very close to one another.
Note: {{clr|M|2MP}} and {{clr|H|5HK}} have the same range. The first hit of {{clr|H|6HK}} and {{clr|H|2HK}} also have the same range.
A.K.I. somewhat struggles at this range, as a lot of her normals are not special-cancelable making it very susceptible to Drive Impacts, and their reward on hit is not that great.
A.K.I. somewhat struggles at this range, as a lot of her normals are not special-cancelable making it very susceptible to Drive Impacts, and their reward on hit is not that great.
* {{clr|M|2MK}} links to {{clr|L|2LP}} at closer ranges. On counter-hit, it links into {{clr|M|5MP}}. It is super cancelable, but isn't easy to hit confirm (14f window). Nevertheless, it is an important tool for checking walk backs even if it does not convert to much.
* {{clr|M|2MK}} links to {{clr|L|5LK}} at closer ranges. On counter-hit, it links into {{clr|M|5MP}}, and on punish counter, it links into {{clr|H|5HK}}. It is super cancelable, but isn't easy to hit confirm (14f window). It is an important tool for checking walk backs, and is plus on block on top of all this.
* {{clr|M|2MP}} and {{clr|H|5HK}} are both special cancelable with a similar range. Both of these are easily whiff punishable, so be careful with whiffing them. These buttons are good to drive rush cancel off of to extend her pressure. {{clr|H|5HK}} > {{clr|L|236LP}} is also a true blockstring that combos on hit and depletes one drive gauge on block if the opponent does not parry, making it a good poking string.
* {{clr|M|5MK}} has a good, disjointed hitbox that functions very well as a poke. Doesn't convert to much unless close range (links to {{clr|M|5MP}}) or on PC (links to {{clr|H|2HP}} or Level 3). One of her best pokes.
* {{clr|M|5MK}} has a good, disjointed hitbox that functions very well as a poke. Doesn't convert to much unless close range (links to {{clr|M|5MP}}) or on PC (links to {{clr|H|2HP}} or Level 3). One of her best pokes.
* {{clr|M|2MP}} and {{clr|H|5HK}} are both special cancelable with a decent range. {{clr|H|5HK}} has a significant recovery on whiff, so A.K.I. should use that sparingly. These buttons are good to drive rush cancel off of to extend her pressure.
* {{clr|H|2HK}} knocks the opponent down on punish counters and is safe on block. It is super cancelable, and is much easier to hit confirm compared to {{clr|M|2MK}} (19f window). Additionally, it also cannot be low crushed, making it a good tool against moves like Zangief's {{clr|M|6MK}}.
* {{clr|H|2HK}} knocks the opponent down on punish counters and is safe on block. It is super cancelable, and is much easier to hit confirm compared to {{clr|M|2MK}} (19f window).
* {{clr|H|6HK}} is A.K.I.'s pressure reset tool, as it is +2 on block, and links into {{clr|L|2LP}}/{{clr|L|5LK}} on hit. It is relatively slow compared to her other options, especially at a range where only the 2nd hit connects, so use it when the opponent has shown to respect A.K.I's pressure. {{clr|H|6HK}} does low crush later in its startup, so it could be good to use when calling out lows.
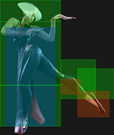
A.K.I. has some decent options at this range. They are mostly pokes that harass the opponent from further out. At ranges further than {{clr|L|236LP}}, A.K.I. can quickly reach the opponent with some drive rush normals, leading to good reward on hit and good pressure on block. Outside of these ranges, A.K.I. can also start setting up her fireballs before approaching.
A.K.I. has some decent options at this range. They are mostly pokes that harass the opponent from further out. Keep in mind that these tools are quite susceptible to Drive Impacts. At ranges further than {{clr|L|236LP}}, A.K.I. can quickly reach the opponent with some drive rush normals, leading to good reward on hit and good pressure on block. Outside of these ranges, A.K.I. can also start setting up her fireballs before approaching.
* At further ranges, {{clr|H|5HP}} is one of A.K.I.'s better tools as it is hit-confirmable into a knockdown or toxic blossom. It is a good whiff punish tool, reaching further than expected. Up close, however, it is very punishable on block up close, so make sure to space it well.
* At further ranges, {{clr|H|5HP}} is one of A.K.I.'s better tools as it is hit-confirmable into a knockdown or toxic blossom. It is a good whiff punish tool, reaching further than expected. Up close, however, it is punishable on block up close, so make sure to space it well.
* {{clr|H|2HP}} moves A.K.I. forward and knocks the opponent down on hit, but is punishable on block.
* {{clr|H|2HP}} moves A.K.I. forward and knocks the opponent down on hit, but is punishable on block.
* {{clr|H|6HP}} is a good poke option that moves A.K.I. significantly forward. It is super cancelable with a 17f window, which means that it is hit confirmable and a good option against the opponent's drive impact. On counter-hit, it links into {{clr|L|5LK}} > {{clr|L|236LP}} if A.K.I. is close enough to the opponent.
* {{clr|H|6HP}} is a good poke option that moves A.K.I. significantly forward. It is super cancelable with a 17f window, which means that it is hit confirmable and a good option against the opponent's drive impact. On counter-hit, it links into {{clr|L|5LK}} > {{clr|L|236LP}} if A.K.I. is close enough to the opponent.
* {{clr|L|236LP}} recovers faster than A.K.I.'s fireball and beats characters' anti-fireball tools (such as Cammy's spin knuckle or Marisa's Phalanx). It is a good option, because she usually recovers in time to block opponent's jump-ins (unless they perform it preemptively). Applies poison on hit, which further incentivizes opponents to approach A.K.I.
* {{clr|L|236LP}} recovers faster than A.K.I.'s fireball and beats characters' anti-fireball tools (such as Cammy's spin knuckle or Marisa's Phalanx). It is a good option, because she usually recovers in time to block opponent's jump-ins (unless they perform it preemptively). Applies poison on hit, which further incentivizes opponents to approach A.K.I.
* Drive Rush {{clr|L|2LK}}/{{clr|M|2MK}} are both amazing options that are still relatively fast (11+5f for {{clr|L|2LK}} and 11+7f for {{clr|M|2MK}}). Because A.K.I.'s drive rush travels very far and is quite fast, this makes it a scary option to close the gap between A.K.I. and her opponent, especially if the opponent back walks often. On hit, both options link into {{clr|M|5MP}} > {{clr|H|236HP}}, although {{clr|M|5MP}} can whiff if A.K.I. is too far from the opponent. They are +2 and +1 on block, respectively, meaning that even if the opponent blocks them, A.K.I. is still able to pressure the opponent on block.
* Drive Rush {{clr|L|2LK}}/{{clr|M|2MK}}/{{clr|M|5MP}} are all great options that are still relatively fast (11+5f for {{clr|L|2LK}} and 11+7f for {{clr|M|2MK}}). Because A.K.I.'s drive rush travels very far and is quite fast, this makes it a scary option to close the gap between A.K.I. and her opponent, especially if the opponent back walks often. While drive rush {{clr|M|2MK}} is slower than the other two options, it is +5 on block, making it extremely threatening as A.K.I. can safely continue her pressure after.
}}
}}
</tabber>
</tabber>
Line 328:
Line 326:
A.K.I.'s offense greatly benefits from drive rushes. Her drive rush is quite fast and covers a lot of distance, which enables her to be able to open up the opponent from afar into a combo and knockdown. Additionally, she is able to quickly approach the opponent by drive rushing behind her fireball ({{clr|L|214LP}}/214PP), which makes for an extremely powerful offensive option.
A.K.I.'s offense greatly benefits from drive rushes. Her drive rush is quite fast and covers a lot of distance, which enables her to be able to open up the opponent from afar into a combo and knockdown. Additionally, she is able to quickly approach the opponent by drive rushing behind her fireball ({{clr|L|214LP}}/214PP), which makes for an extremely powerful offensive option.
Here are some good options for A.K.I. to use out of drive rushes (either performed raw or behind a fireball):
Drive Rush {{clr|H|6HK}} is an extremely powerful tool as it is +6 on block and +8 on hit. Since the duration is relatively long, players can hit confirm into {{clr|M|2MP}}/{{clr|M|5MP}} on hit, {{clr|H|5HK}} on counterhit, and other options on block. As it is +6 on block, A.K.I. can safely link into {{clr|M|5MP}} for a true blockstring, or she can go for frame trap options with {{clr|M|2MP}} (leaves a 2f gap) and {{clr|H|5HK}} (leaves a 3f gap). She can even reset the pressure again with another {{clr|H|6HK}} if the opponent has shown to respect her pressure too much.
This is an excellent option to open up opponents that walk back a lot. Both Drive Rush {{clr|L|2LK}} and {{clr|M|2MK}} links to {{clr|M|5MP}} on hit if A.K.I. is close enough to the opponent. On block, Drive Rush {{clr|L|2LK}} is +2, and Drive Rush {{clr|M|2MK}} is +1, meaning that linking into {{clr|M|5MP}} leaves a big enough gap (4f and 5f, respectively) for the opponents to successfully mash out of the string. It is possible to hit confirm the initial Drive Rush hit and opt for a safer blockstring option such as {{clr|L|2LP}} instead. Overall, Drive Rush {{clr|L|2LK}} is a better option as it is faster and has better frame advantage compared to {{clr|M|2MK}}, but {{clr|M|2MK}} reaches further and has an easier link window on hit. It is also important to note that if the opponent Drive Impacts A.K.I.'s Drive Rush {{clr|L|2LK}}, she will likely be able to recover and counter DI. It is less likely that she will be able to do this with Drive Rush {{clr|M|2MK}}.
| Oneliner = Plus frames...
* {{clr|4|PDR}} {{clr|M|5MP}}, {{clr|M|5MP}}...
| Difficulty =
Another good option, especially if the opponent has shown to use DI a lot as {{clr|M|5MP}} is special cancelable, meaning A.K.I. can cancel it into DI on reaction. On hit, A.K.I. can link it into another {{clr|M|5MP}} before special canceling. Her reward on block is less, as she is +1, meaning that another {{clr|M|5MP}} will leave a 5f gap for the opponent to mash through.
Drive Rush {{clr|H|6HK}} is an extremely powerful tool as it is +6 on block and +8 on hit. Since the duration is relatively long, players can hit confirm into {{clr|M|2MP}}/{{clr|M|5MP}} on hit and {{clr|H|5HK}} on counter-hits. As it is +6 on block, A.K.I. can safely link into {{clr|M|5MP}} for a true blockstring, or she can go for frame trap options with {{clr|M|2MP}} (leaves a 2f gap) and {{clr|H|5HK}} (leaves a 3f gap), or simply opt for a throw if the opponent keeps on blocking. She can even reset the pressure again with another {{clr|H|6HK}} if the opponent has shown to respect her pressure too much.
{{clr|3|Be careful, as this option will lose to Drive Impacts and leave her very vulnerable for punishes if she whiffs!}}
Here are some example strings she can use:
* On hit: <code>{{clr|4|PDR}} {{clr|H|6HK}}, {{clr|M|5MP}} > Ender</code>
Drive Rush {{clr|M|2MK}} is an excellent tool for opening up opponents, especially those that walks back often. {{clr|M|2MK}}'s range is quite long, and will link into {{clr|H|5HK}} on hit, giving A.K.I. a full BnB conversion. It is +5 on block, allowing A.K.I. to safely frametrap with {{clr|M|5MP}}, or continue on with her lights for a true blockstring. {{clr|H|5HK}} will also frametrap, but since there is a 4f gap there, opponents' jabs will trade with A.K.I., leaving her able to continue on with at trade combo. If done from further ranges, A.K.I. may have to walk up slightly to be able to threaten the opponent with a throw on block.
{{clr|3|Be careful, as this option usually loses to Drive Impacts.}}
This functions similarly to A.K.I.'s {{clr|4|PDR}} {{clr|M|2MK}}. It has less range and gives her less reward on hit and block, but is much faster and is better for catching opponents off guard. Additionally, it will lose to Drive Impacts much less often compared to Drive Rush {{clr|M|2MK}} because she will recover sooner.
A.K.I. will be +7 on hit, allowing her to link into {{clr|M|5MP}} (although, not at max range). On counter-hits, she can combo into {{clr|H|5HK}} just like with {{clr|M|2MK}}. She is +2 on block, meaning that {{clr|M|5MP}} will trade and give her a trade combo with opponents' 4f buttons. For a safer blockstring, she can continue her pressure with {{clr|L|2LP}}/{{clr|L|5LP}}, although this may be difficult to confirm.
Here are some example strings she can use:
* On hit: <code>{{clr|4|PDR}} {{clr|L|2LK}}, {{clr|M|5MP}} > Ender</code>
Since {{clr|M|5MP}} moves A.K.I. forward, this option can allow A.K.I. to reach quite far quickly. Since it is special cancellable, this is also safe to Drive Impacts. It is a good, relatively low-risk option to start pressure with A.K.I. that has a deceptively far-reaching range.
On a regular hit, A.K.I. can link into another {{clr|M|5MP}}. On counter hits, she is able to link into {{clr|H|5HK}} for her regular BnB. She is usually +1 on block, which means she can safely continue her pressure on block with 4f buttons (e.g. {{clr|L|2LP}}), or trade with opponents' 4f buttons with {{clr|L|5LP}}/{{clr|L|2LK}}. Again, if the opponent has shown to be respectful of A.K.I.'s pressure, she can opt for other options on block such as {{clr|M|2MK}} to catch walk backs.
In certain knockdown situations, such as a corner throw or a punish counter throw, A.K.I. can drive rush {{clr|M|5MP}} for an auto-timed meaty {{clr|M|5MP}} that can be up to +4 on block and +10 on hit, allowing her to combo into {{clr|H|5HK}} on normal hit.
Here are some example strings she can use:
* On hit: <code>{{clr|4|PDR}} {{clr|M|5MP}}, {{clr|M|5MP}} > Ender</code>
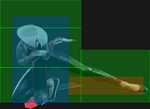
One of A.K.I.'s best jump-in buttons and is her go-to option for jump-ins. Hits extremely deep and from extremely high up, allowing A.K.I. to easily punish a lot of characters in their whiff recovery when she is in the air. For example, if A.K.I. jumps in anticipation of a delayed throw tech from the opponent, she can consistently punish their recovery with {{clr|H|j.HP}} when most other characters will not be able to. When used high up in the air, it can also be difficult for the opponent to react and cleanly anti-air this button without an air invincible move. Combos into her BnB on hit, and gives great frame advantage on block.
{{clr|H|j.HP}} will not hit cross-up, so do be careful if A.K.I. jumps and ends up crossing up her opponent because she will whiff the {{clr|H|j.HP}}.
Works very similarly to {{clr|H|j.HP}}, though the vertical reach isn't as good. The advantage to using this button is that it is faster compared to {{clr|H|j.HP}}, which makes it consistent to use as part of a combo, or for beating out air-to-air attempts, especially since its hurtbox is fairly retracted.
A.K.I.'s dedicated cross-up button. {{clr|H|j.2HP}} will only hit crossup, so use it if A.K.I.'s jump will end up crossing over the opponent. This button will always whiff in the corner. This is also A.K.I.'s go-to button for when her safejumps will cross over the opponent.
This button can hit cross-up, but has a lower hitstun and blockstun value compared to {{clr|H|j.2HP}} and {{clr|H|j.HP}}. It is best used when the player is not certain if A.K.I. will cross over the opponent or not.
}}
</tabber>
=== Okizeme ===
=== Okizeme ===
Line 501:
Line 666:
<big>'''Midscreen & Corner'''</big>
<big>'''Anywhere'''</big>
These are setups that work both midscreen and near the corner. Doing it in the corner may require some minor adjustments to the setup.
These are setups that work both anywhere on the screen. Doing it in the corner may require some minor adjustments to the setup.
'''Safe jump option'''. Allows A.K.I. to continue pressure without much risk. Requires reacting to the opponent's wakeup option. If the opponent normal rises, then A.K.I will have to do {{clr|H|j.2HP}}. If the opponent back rises or is put in the corner, {{clr|H|j.HP}} is used.
'''Meaty/Shimmy option'''. Using {{clr|M|236MK}} will put A.K.I. right next to the opponent with +5 frames of advantage, allowing her to continue her offense with a meaty throw or a meaty normal. Keep in mind that A.K.I. will trade with the opponent's 4f button if she uses {{clr|H|5HK}}. If the opponent back rises, A.K.I. has time to walk back to shimmy, and [[Street_Fighter_6/A.K.I./Combos#Reversal/-9_Punish_(No_Poison)-2|punish]] the throw whiff with {{clr|H|5HK}}. However, if the opponent normal rises, then A.K.I. will not be able to shimmy after {{clr|M|236MK}}. If A.K.I expects a throw tech from the opponent, she should opt for a meaty {{clr|L|2LP}} instead in this case. It is also possible to shimmy by using {{clr|L|236LK}} instead of {{clr|M|236MK}} if the opponent normal rises, as {{clr|L|236LK}} has a similar animation to {{clr|M|236MK}}, but does not move A.K.I. forward. This spaces her well enough for the opponent to whiff their throw, allowing her to punish with {{clr|H|5HK}}. Near the corner, A.K.I. should also use {{clr|L|236LK}} to shimmy instead of {{clr|M|236MK}}. One last thing to note is A.K.I. will not be able to chain {{clr|L|2LK}} into other buttons if the opponent back rises.
'''Closer Meaty/"Shimmy" option'''. Dashing forward twice will put A.K.I. closer to the opponent than the {{clr|M|236MK}} option, and leaves her +6, which means the opponent cannot use normal moves to interrupt her {{clr|H|5HK}}. With this option, A.K.I. can meaty the opponent with {{clr|L|2LK}} and be able to chain into her other normals without whiffing, unlike the previous option (if the opponent back rises). She can also choose to throw the opponent on wakeup. The downside to this option is that A.K.I. does not have a "good" shimmy option, in that walking backwards will not leave enough space for the opponent to whiff their throw. She can, however, backdash if she expects the opponent to throw, but this will lose to reversals. A good option to partially cover both reversals and throws is to jump. If A.K.I. jumps, she is able to punish the opponent's throw whiff with {{clr|H|j.HP}} as it hits from quite high up. On the other hand, if the opponent uses their invincible reversal, A.K.I. may be able to avoid getting hit depending on the character.
| content = Allows A.K.I. to continue pressure without much risk. Requires reacting to the opponent's wakeup option. If the opponent normal rises, then A.K.I will have to do {{clr|H|j.2HP}}. If the opponent back rises or is put in the corner, {{clr|H|j.HP}} is used.
Note that there are specific setups that allow safejumps without having to react to the opponent's wakeup options. In that scenario, only {{clr|H|j.HP}} will work.
| content = Using {{clr|M|236MK}} will put A.K.I. right next to the opponent with +5 frames of advantage, allowing her to continue her offense with a meaty throw or a meaty normal. Keep in mind that A.K.I. will trade with the opponent's 4f button if she uses {{clr|H|5HK}} (A.K.I. will be +11 here, meaning she can follow-up with a trade combo such as {{clr|H|5HK}} > 2PP~K, {{clr|L|5LK}} > {{clr|H|236HP}}). If the opponent back rises, A.K.I. has time to walk back to shimmy, and [[Street_Fighter_6/A.K.I./Combos#Poisoned_Routes|punish]] the throw whiff with {{clr|H|5HK}}. However, if the opponent normal rises, then A.K.I. will not be able to shimmy after {{clr|M|236MK}}. Instead, if A.K.I expects a throw tech from the opponent, she can backdash for a guaranteed punish, or neutral jump {{clr|H|j.HP}}, which will only punish delayed throw techs (but not immediate throw techs). Near the corner, A.K.I. can also use {{clr|L|236LK}} to shimmy instead of {{clr|M|236MK}}.
| content = Dashing forward twice will put A.K.I. closer to the opponent than the {{clr|M|236MK}} option, and leaves her +6, which means the opponent cannot use normal moves to interrupt her {{clr|H|5HK}}. She can also choose to throw the opponent on wakeup, however, if she inputs the throw immediately, this will whiff. She will have to delay the throw by at least 1 frame. The downside to this option is that A.K.I. does not have a "good" shimmy option, in that walking backwards will not leave enough space for the opponent to whiff their throw. She can, however, backdash if she expects the opponent to throw, but this will lose to reversals. A good option to partially cover both reversals and throws is to jump. If A.K.I. jumps, she is able to punish the opponent's throw whiff with {{clr|H|j.HP}} as it hits from quite high up. If the opponent uses their invincible reversal, A.K.I. may be able to avoid getting hit depending on the character.
A.K.I.'s usual midscreen safejump setups require reacting to the opponent's rise option (if they normal rise, she has to use {{clr|H|j.2HP}}, back rise, she has to use {{clr|H|j.HP}}). This can be difficult, and often times, she gets punished for reacting wrongly.
The setups listed below help to prevent this problem from happening as it guarantees a same-side safejump with {{clr|H|j.HP}} regardless of the opponent's rise option. Most of these setups require the opponent to be poisoned before (with some character-specific exceptions), so when the opponent is not poisoned, A.K.I. will have to still react to the opponent's rise option for the safejump, or go for a different setup.
| content = A.K.I.'s most basic and drive-efficient option for setting up a rise independent safejump {{clr|H|j.HP}}. This option only works if A.K.I. is relatively close to the opponent before {{clr|M|236MP}}!, which means that it is best to immediately go into {{clr|L|5LK}} > {{clr|M|236MP}}! from her stance kicks.
}}
|-|
236MP! Corner Carry=
{{TheoryBox
| Title = {{clr|M|236MP}}! Corner Carry ({{drive sf6}}{{drive sf6}})
| content = This route gives A.K.I. the best corner carry and uses up two drive gauge bars. This setup is most consistent when A.K.I. is closer to her opponent before {{clr|M|236MP}}!. It is possible to perform this setup even when A.K.I. is further away from her opponent before {{clr|M|236MP}}!, she will just have to delay her {{clr|H|5HK}} during the drive rush to maximize the distance she travels to ensure that she is close enough to the opponent for the {{clr|H|5HK}}.
| content = Unlike the previous two setups, for this setup to work, A.K.I. has to be relatively far away from the opponent before {{clr|H|236HP}}!. This setup is more inconsistent compared to the previous two due to the difficulty in judging whether or not A.K.I. is far enough from the opponent before the {{clr|H|236HP}}!. If A.K.I. is in range to connect three lights ({{clr|L|2LP}} > {{clr|L|2LP}}, {{clr|L|5LK}}), then the same-side safejump is always guaranteed. However, often times, she will not be in range for that, and it is up to the player to judge whether or not A.K.I. is sufficiently far enough from the opponent for the same-side safejump.
}}
|-|
Character-specific 236HP=
{{TheoryBox
| Title = Character-specific {{clr|H|236HP}} Setup
| content = If A.K.I. gets the right spacing before the {{clr|H|236HP}}, she can get a guaranteed same-side safejump against certain characters without requiring the opponent to be poisoned.
Currently, this only works against:
* Marisa
* E. Honda
* Blanka
* Zangief
}}
</tabber>
Line 551:
Line 819:
|-
|-
| SA3 || 🟩 Yes || -
| SA3 || 🟩 Yes || -
|-
| rowspan="4" | Akuma || {{clr|10|623PP}} || rowspan="4" | Corner || 🟨 Yes* || No Super freeze to react to (236KK to avoid reversal is a risky hard read)<br>Trades hits, with A.K.I. having +3 KD Advantage after wakeup
|-
| SA2 || 🟩 Yes || Akuma is only {{sf6-adv|VM|-8}} after A.K.I.'s 236KK (stricter punish timing)
|-
| SA3 || rowspan="2" | 🟥 No || Akuma gets hit by projectile, and can '''Throw''' punish A.K.I. 236KK in the corner {{sf6-adv|VM|(-7)}}
|-
| CA (Demon) || A.K.I. cannot jump out or escape Demon with 236KK
|-
|-
| Blanka || SA3 || Corner || 🟩 Yes || -
| Blanka || SA3 || Corner || 🟩 Yes || -
Line 565:
Line 841:
|-
|-
| SA3 || Dee Jay is only {{sf6-adv|VM|-8}} after A.K.I.'s 236KK (less optimal punish)
| SA3 || Dee Jay is only {{sf6-adv|VM|-8}} after A.K.I.'s 236KK (less optimal punish)
|-
| Ed || SA3 || Corner || 🟩 Yes || -
|-
|-
| rowspan="2" | E. Honda || SA2 || rowspan="2" | Corner || rowspan="2" | 🟩 Yes || A.K.I. can only punish with her own SA2 (HP)
| rowspan="2" | E. Honda || SA2 || rowspan="2" | Corner || rowspan="2" | 🟩 Yes || A.K.I. can only punish with her own SA2 (HP)
Line 595:
Line 873:
|-
|-
| Luke || SA3 || Corner || 🟩 Yes || -
| Luke || SA3 || Corner || 🟩 Yes || -
|-
| M. Bison || SA3 || Corner || 🟩 Yes || M. Bison is {{sf6-adv|VM|-27}} after 236KK but recovers a little far away<br>Microwalk + {{clr|H|5HK}} > 2PP~P for a strong crumple punish, or {{clr|4|Drive Rush}} for a closer start
|-
|-
| Manon || SA2 || Corner || 🟥 No* || Manon trades with projectile, landing only 1 hit of SA2<br>If A.K.I. cancels to 236KK, she is cornered and punishable at -9
| Manon || SA2 || Corner || 🟥 No* || Manon trades with projectile, landing only 1 hit of SA2<br>If A.K.I. cancels to 236KK, she is cornered and punishable at -9
A.K.I.'s neutral is at her strongest when she is able to approach behind her slow moving fireball 214LP/214PP. However, unless she is quite far out from the opponent, it is very risky to use her fireball, as there is a significant recovery allowing opponents to jump-in on her for a huge punish. Therefore, it is often best to play footsies with the opponent at midrange, until she is able to pressure the opponent up close, or until the opponent moves back enough for A.K.I. to be able to set up her fireball safely.
Footsies
Close RangePlenty of options
Some of her good close range buttons, ordered according to their range:
5LP Hitbox
2LP Hitbox
5LK Hitbox
2LK Hitbox
5MP Hitbox
Note: 5LP, 2LP, 5LK ranges are quite close to each other.
A.K.I. does very well when she is right up close to her opponent. She has a wide variety of tools to reset her pressure or to open up the opponents with frame traps.
Her 5LP~LP target combo combos on hit and frame-traps on block, making it a good option to use. The second hit of the target combo also moves her forward slightly, making it more consistent to hit compared to two 2LPs.
Her 2LP and 2LK chain into each other, and 2LK has a decent range. On hit, 2LP can be canceled into 236HP, giving her access to 236HP knockdown setups.
5LK has slightly more range than 2LP/5LP and is special cancelable. This can be a good tool for interrupt opponent's buttons or used for checking their walk forwards with little risk due to the low recovery of the move.
5MP is similar in that sense, but links to 2LP or 2PP~K on counterhit, making it more rewarding. 5MP also moves A.K.I. closer to the opponent, and provides more blockstun allowing for better options off a drive rush cancel.
Outside of these options, A.K.I. can also use 3MP for an overhead option that is +3 on hit for a pressure reset or to close out the round. It is best used sparingly, as the reward isn't great and is reactable.
Mid RangeA bit of a struggle
Some of her good mid range buttons, ordered according to their range:
2MK Hitbox
2MP Hitbox
5HK Hitbox
5MK Hitbox
2HK Hitbox
6HK Hitbox
Note: 2MP and 5HK have the same range. The first hit of 6HK and 2HK also have the same range.
A.K.I. somewhat struggles at this range, as a lot of her normals are not special-cancelable making it very susceptible to Drive Impacts, and their reward on hit is not that great.
2MK links to 5LK at closer ranges. On counter-hit, it links into 5MP, and on punish counter, it links into 5HK. It is super cancelable, but isn't easy to hit confirm (14f window). It is an important tool for checking walk backs, and is plus on block on top of all this.
2MP and 5HK are both special cancelable with a similar range. Both of these are easily whiff punishable, so be careful with whiffing them. These buttons are good to drive rush cancel off of to extend her pressure. 5HK > 236LP is also a true blockstring that combos on hit and depletes one drive gauge on block if the opponent does not parry, making it a good poking string.
5MK has a good, disjointed hitbox that functions very well as a poke. Doesn't convert to much unless close range (links to 5MP) or on PC (links to 2HP or Level 3). One of her best pokes.
2HK knocks the opponent down on punish counters and is safe on block. It is super cancelable, and is much easier to hit confirm compared to 2MK (19f window). Additionally, it also cannot be low crushed, making it a good tool against moves like Zangief's 6MK.
6HK is A.K.I.'s pressure reset tool, as it is +2 on block, and links into 2LP/5LK on hit. It is relatively slow compared to her other options, especially at a range where only the 2nd hit connects, so use it when the opponent has shown to respect A.K.I's pressure. 6HK does low crush later in its startup, so it could be good to use when calling out lows.
Far Range
Some of her good far range options, ordered according to their range:
5HP Hitbox
2HP Hitbox
6HP Hitbox
236LP Hitbox
A.K.I. has some decent options at this range. They are mostly pokes that harass the opponent from further out. Keep in mind that these tools are quite susceptible to Drive Impacts. At ranges further than 236LP, A.K.I. can quickly reach the opponent with some drive rush normals, leading to good reward on hit and good pressure on block. Outside of these ranges, A.K.I. can also start setting up her fireballs before approaching.
At further ranges, 5HP is one of A.K.I.'s better tools as it is hit-confirmable into a knockdown or toxic blossom. It is a good whiff punish tool, reaching further than expected. Up close, however, it is punishable on block up close, so make sure to space it well.
2HP moves A.K.I. forward and knocks the opponent down on hit, but is punishable on block.
6HP is a good poke option that moves A.K.I. significantly forward. It is super cancelable with a 17f window, which means that it is hit confirmable and a good option against the opponent's drive impact. On counter-hit, it links into 5LK > 236LP if A.K.I. is close enough to the opponent.
236LP recovers faster than A.K.I.'s fireball and beats characters' anti-fireball tools (such as Cammy's spin knuckle or Marisa's Phalanx). It is a good option, because she usually recovers in time to block opponent's jump-ins (unless they perform it preemptively). Applies poison on hit, which further incentivizes opponents to approach A.K.I.
Drive Rush 2LK/2MK/5MP are all great options that are still relatively fast (11+5f for 2LK and 11+7f for 2MK). Because A.K.I.'s drive rush travels very far and is quite fast, this makes it a scary option to close the gap between A.K.I. and her opponent, especially if the opponent back walks often. While drive rush 2MK is slower than the other two options, it is +5 on block, making it extremely threatening as A.K.I. can safely continue her pressure after.
Zoning
A.K.I. has access to some far-range pokes that enables her to harass the opponent at a distance. However, over-reliance on these tools can lead to A.K.I. getting punished for it, as these tools have a significant recovery, allowing the opponents to jump-in on her with relative ease (as A.K.I. does not have access to a meterless frame 1 air invincible move, unlike some other characters). Despite this, they are still essential to A.K.I.'s overall gameplan, as it adds to her overall damage and allows her to safely approach the opponent in some cases.
236LP (L Serpent Lash)
236LP Hitbox
236LP is A.K.I.'s main "fireball" tool. It has a good range, and poisons the opponent on hit, encouraging the opponent to either approach A.K.I. or is forced to take the damage from the poison. It also allows A.K.I. to get more damaging combo extensions if A.K.I. hits the opponent soon after. At a distance, it is safe on block, and if the opponent jumps in on A.K.I., the recovery is not as bad as 214LP, meaning she will likely be able to block or parry the jump-in. If the opponent is already poisoned, Toxic Blossom will activate on hit, the opponent will be knocked down and A.K.I. will be able to pressure the opponent easily. In the corner, this will allow A.K.I. to perform a safe jump.
Another advantage 236LP has over traditional fireballs is that it will beat projectile-invincible moves, as 236LP is not really a projectile. For example, Cammy's Spin Knuckle will lose out to this move.
214LP Nightshade PulseA.K.I.'s "Neutral"
214LP Hitbox
214LP~6P Hitbox
A.K.I.'s actual fireball. It is very slow moving, allowing A.K.I. to safely approach the opponent behind the fireball, making it an extremely powerful tool for A.K.I.'s neutral and offense. However, it does not come without its risks. 214LP has a significant recovery, allowing the opponents to easily jump-in on her at closer ranges. A.K.I. can cancel into her follow-up (214LP~6P) to increase the size of the hitbox, which could hit the opponent jumping above the projectile, but this is extremely unreliable. She can also cancel the later frames into 236KK (OD slide), allowing her to escape from getting hit by the opponent's jump-in, but it comes at a cost of 2 Drive Gauge bars. Canceling into 236KK can also be used offensively to quickly approach the opponent.
This move, on its own, is best used unpredictably and at a good distance from the opponent. Otherwise, it can be used as part of her oki options or as part of a frame trap blockstring.
214PP (OD Nightshade Pulse)
214PP Hitbox
214PP~6P Hitbox
Her OD fireball is a better version of her regular fireball. It serves almost the same function as the regular fireball, but has less recovery making it safer to use in most cases. The lower recovery frames also allows A.K.I. to approach the opponent while being much closer to the fireball than the regular version, giving her access to offensive options that would not be viable when used with the regular version (such as dash up 3MP).
214MP (Orchid Spring)
214MP Hitbox
214MP poisons the opponent if they walk over the puddle. This can be used when the opponent has shown to be playing extremely passively, as it may encourage them to approach A.K.I. in a predictable way, such as jumping, which allows her to easily counter their offense. It also passively damages the opponent, which could add up throughout the match, so this may be worth using from time to time to get in some extra damage.
Outside of that, the total number of frames of this move is a bit lower than A.K.I.'s 214LP, so this could be safer to use in certain situations (for example, after an anti-air 5HK or certain knockdowns).
Anti-Projectile
A.K.I. has access to a wide arsenal of situational anti-projectile tools, each best used under a specific circumstance. Most of her anti-projectile tools will work best when performed preemptively, as they all have a significant startup.
236PP (OD Serpent Lash)
236PP Hitbox
236PP is one of A.K.I.'s more rewarding anti-projectile tool, allowing her to link into 2LP on hit. If the opponent is not poisoned, it will apply poison to the opponent on hit. If the opponent is already poisoned, the opponent will be put into a crumple state, leading to higher damage routes.
However, it comes with several caveats. 236PP cleanly beats meterless projectiles, but loses to multi-hitting OD projectiles. The range is also more limited than it seems, requiring A.K.I. to be somewhat closer to the opponent for the tip to reach. She is also not strike-invincible during the startup animation, meaning she can be hit out of it. The final caveat is that the startup for this move is quite significant at 21f, which means A.K.I. has to preemptively use this in order to beat the opponent's projectiles. If she uses it on reaction to the opponent's projectile, it will still destroy the opponent's projectile but may be too slow to actually land a hit during the opponent's recovery.
214PP OD Nightshade Pulse
214PP Hitbox
Like other characters' OD projectiles, OD Nightshade Pulse shuts down the opponent's attempts at beating A.K.I.'s projectile without using meter, requiring them to use their own OD projectile to counter 214PP. Much like the regular version, OD Nightshade Pulse allows A.K.I. to safely advance behind the slow-moving projectile, which makes it a good option for her to approach opponents that attempt to zone from afar with projectiles.
214K (Cruel Fate)
214LK Hitbox
Cruel Fate is a low crush, anti-projectile tool. The LK version is faster, but has a shorter range, while the HK version is slower, but has a further reach. The EX version allows A.K.I. to be able to steer between the shorter LK range and the further HK range, with M version's startup.
As an anti-projectile tool, it is mostly too slow to be used on reaction. It is safe on block, so it is not too risky to throw it out preemptively on a read. The EX version is +2 on block, making it an excellent tool to sometimes throw out midscreen. All the versions allow A.K.I. to link into 2LP on counter-hit (the EX version leaves the opponent knocked down on a clean hit).
2PP (Sinister Slide)
22P Hitbox
A.K.I.'s character-defining stance that puts her into a low-profile state that ducks under most projectiles, as well as a lot of other moves. The upper-body invincibility starts on frame 10, meaning A.K.I. is able to use this on reaction and duck under opponent's projectiles. This is similar to jumping projectiles, as it leaves the opponent's projectile on screen longer rendering them unable to throw out another projectile. It also does not drain A.K.I.'s drive gauge, unlike simply blocking the opponent's projectile.
The caveat to this is Sinister Slide has a significant recovery when exiting the stance, so it is important to use this when A.K.I. is far away from the opponent enough to not get punished on exit, or be sure to use of her follow-ups to avoid the exit recovery. It is important to note that her K follow-up (Heel Strike) does not have any projectile-invincible property, and A.K.I. will get hit out of it by a projectile.
2PP~P (Venomous Fang)
22P~P Hitbox
A.K.I.'s only anti-projectile follow-up from her Sinister Slide stance. Like many of her anti-projectile tools, this move has a slow startup, especially combined with the startup with 2PP. It is best used when A.K.I. is already in her Sinister Slide stance, expecting for the opponent to throw out a projectile. While in her stance, it is possible to hit the opponent with Venomous Fang on reaction. It works particularly well against faster moving projectiles, such as Luke's sandblast (236P). It also works decently well against Ryu and Ken's projectiles at closer ranges, but mistiming can lead to death as A.K.I. is -25 on block. This move only has upper body projectile invulnerability from frame 1 to frame 19, so it is important to use it in the right situations. Note that because of its upper body projectile invulnerability property, it will not be able to avoid ground projectiles like Juri's fireball.
236K (Snake Step)
236LK Hitbox
236MK Hitbox
236KK Hitbox
Snake Step is similar to A.K.I.'s 2PP (Sinister Slide) stance, allowing her to low profile underneath projectiles for a set duration. The LK version leaves A.K.I. at the same spot, making it useful in making projectiles whiff without having to jump, though the timing may be tight against slower moving projectiles. If she mistimes it, she will recover from Snake Step and will be forced to block the projectile. The other versions move A.K.I. forward a set distance, potentially allowing A.K.I. to punish the opponent's recovery after using a fireball. The OD version is strike invulnerable, allowing her to potentially move through the opponent's other moves, leaving them for a whiff punish. This is better against characters that attack from afar, such as JP, Dhalsim, or Guile.
With the exception of the LK version, the other versions are best used sparingly and preemptively as the total duration is too long for it to be used on reaction. A.K.I. is also in counter-hit state during the slide, so it is important to be careful when using this move in neutral.
Offense
Drive Rush
Approaching with Drive Rushes
A.K.I.'s offense greatly benefits from drive rushes. Her drive rush is quite fast and covers a lot of distance, which enables her to be able to open up the opponent from afar into a combo and knockdown. Additionally, she is able to quickly approach the opponent by drive rushing behind her fireball (214LP/214PP), which makes for an extremely powerful offensive option.
PDR6HKPlus frames...
6HK Hitbox
Drive Rush 6HK is an extremely powerful tool as it is +6 on block and +8 on hit. Since the duration is relatively long, players can hit confirm into 2MP/5MP on hit and 5HK on counter-hits. As it is +6 on block, A.K.I. can safely link into 5MP for a true blockstring, or she can go for frame trap options with 2MP (leaves a 2f gap) and 5HK (leaves a 3f gap), or simply opt for a throw if the opponent keeps on blocking. She can even reset the pressure again with another 6HK if the opponent has shown to respect her pressure too much.
Be careful, as this option will lose to Drive Impacts and leave her very vulnerable for punishes if she whiffs!
Drive Rush 2MK is an excellent tool for opening up opponents, especially those that walks back often. 2MK's range is quite long, and will link into 5HK on hit, giving A.K.I. a full BnB conversion. It is +5 on block, allowing A.K.I. to safely frametrap with 5MP, or continue on with her lights for a true blockstring. 5HK will also frametrap, but since there is a 4f gap there, opponents' jabs will trade with A.K.I., leaving her able to continue on with at trade combo. If done from further ranges, A.K.I. may have to walk up slightly to be able to threaten the opponent with a throw on block.
Be careful, as this option usually loses to Drive Impacts.
This functions similarly to A.K.I.'s PDR2MK. It has less range and gives her less reward on hit and block, but is much faster and is better for catching opponents off guard. Additionally, it will lose to Drive Impacts much less often compared to Drive Rush 2MK because she will recover sooner.
A.K.I. will be +7 on hit, allowing her to link into 5MP (although, not at max range). On counter-hits, she can combo into 5HK just like with 2MK. She is +2 on block, meaning that 5MP will trade and give her a trade combo with opponents' 4f buttons. For a safer blockstring, she can continue her pressure with 2LP/5LP, although this may be difficult to confirm.
Since 5MP moves A.K.I. forward, this option can allow A.K.I. to reach quite far quickly. Since it is special cancellable, this is also safe to Drive Impacts. It is a good, relatively low-risk option to start pressure with A.K.I. that has a deceptively far-reaching range.
On a regular hit, A.K.I. can link into another 5MP. On counter hits, she is able to link into 5HK for her regular BnB. She is usually +1 on block, which means she can safely continue her pressure on block with 4f buttons (e.g. 2LP), or trade with opponents' 4f buttons with 5LP/2LK. Again, if the opponent has shown to be respectful of A.K.I.'s pressure, she can opt for other options on block such as 2MK to catch walk backs.
In certain knockdown situations, such as a corner throw or a punish counter throw, A.K.I. can drive rush 5MP for an auto-timed meaty 5MP that can be up to +4 on block and +10 on hit, allowing her to combo into 5HK on normal hit.
When canceling a normal into Drive Rush on block and following it up with another normal, there may be an interruptible gap in the blockstring. The following table lists these blockstring gaps when performed at the fastest possible timing.
Gap Value
Meaning
0
True Blockstring (no gap) if input with fastest button timing; can still lose to Drive Reversal
1 to 4
Small blockstring gap; opponent can interrupt with an invincible reversal; a 4f gap can trade with 4f normal attack
5+
Large blockstring gap; opponent can interrupt without an invincible attack
The following table lists the general BnB combo routes when canceling a button into Drive Rush on hit.
Drive Rush Cancel - Combo Routes
Starter
Hit Adv.
Combo Route
5LP~DR
+3
No combo without CH/PC
5LK~DR
+5
2LP/5LK, 2MP/5MP ...
2LP~DR
5LP~LP~DR
5MP~DR
+11
5HK > 2PP~P ... 5MK, 5HK ...
2MP~DR
+12
5HK~DR
+16
Frame Traps
Some commonly used frame traps are listed in the table below. Any frame trap with at least a 4f gap is mashable with the opponent's 4f button. The smallest possible gap is listed for special cancel frame traps. It is often possible to increase the gap by manually delaying the special cancel further.
Frame Trap Table
String
Gap
Notes
5LP~LP
3f
Can safely cancel into 214HP on block without any gap.
6HK, 5MP
4f
If the opponent mashes, A.K.I. can combo back into 5MP on trade except for E.honda, Manon, and JP
2LP > 214HP
4f
If the opponent mashes, A.K.I. is usually +9 to +10 on trade, so she can continue the combo with 5HK or 5MP
214LP~6P
1f
Does not frame trap at further ranges.
PDR2LK, 5MP
4f
5MP > 214LP
3f
Can continue to frame trap with ~6P follow-up.
2MP > 2PP~K
5f
PDR5MP/2MP, 2LP
4f
5HK > 2PP~K
3f
6HK, 2LP
2f
j.HP, 6HK
2f
j.HP is assumed to hit as deep as possible
PDR6HK, 5HK
3f
Jump-ins
j.HPAmazing jump-in button
j.HP Hitbox
One of A.K.I.'s best jump-in buttons and is her go-to option for jump-ins. Hits extremely deep and from extremely high up, allowing A.K.I. to easily punish a lot of characters in their whiff recovery when she is in the air. For example, if A.K.I. jumps in anticipation of a delayed throw tech from the opponent, she can consistently punish their recovery with j.HP when most other characters will not be able to. When used high up in the air, it can also be difficult for the opponent to react and cleanly anti-air this button without an air invincible move. Combos into her BnB on hit, and gives great frame advantage on block.
j.HP will not hit cross-up, so do be careful if A.K.I. jumps and ends up crossing up her opponent because she will whiff the j.HP.
j.HK
j.HK Hitbox
Works very similarly to j.HP, though the vertical reach isn't as good. The advantage to using this button is that it is faster compared to j.HP, which makes it consistent to use as part of a combo, or for beating out air-to-air attempts, especially since its hurtbox is fairly retracted.
j.2HPCross-up button
j.2HP Hitbox
A.K.I.'s dedicated cross-up button. j.2HP will only hit crossup, so use it if A.K.I.'s jump will end up crossing over the opponent. This button will always whiff in the corner. This is also A.K.I.'s go-to button for when her safejumps will cross over the opponent.
j.LK
j.LK Hitbox
This button can hit cross-up, but has a lower hitstun and blockstun value compared to j.2HP and j.HP. It is best used when the player is not certain if A.K.I. will cross over the opponent or not.
Okizeme
Knockdown Advantage Table
All scenarios assume that opponent will Back Rise midscreen when possible, unless otherwise stated.
Knockdown
KD Adv.
Oki/Notes
Forward Throw
+19
Gives corner throw loops by walking forward with 16-17f manual timing
Midscreen, oki is fairly weak even with Drive Rush (unless Punish HKD)
Back Throw
+27
After back throwing opponent into corner, walk/dash and manually time oki
Midscreen, oki is fairly weak even with Drive Rush (unless Punish HKD)
Drive Impact (No Crumple)
+35
?
Drive Reversal
+23
?
2HP
HKD +27 HKD +49 (CH/PC)
On normal hit:
+6 after Forward Dash for point blank oki
On Punish Counter:
+11 after Forward Dash x2, or +10 after 236MK for easy oki
5HP~HP
KD +34
?
214HP
KD +40
?
... > 236HP
KD +44
Sets up a safe jump. Just hold up forward and meaty with j.HP or j.2HP. You'll have to react to the opponent's recovery direction midscreen. Works on a grounded opponent, no Toxic Blossom (TB).
... > 236MP
KD +44
Another safe jump setup. Only works near the corner on a grounded opponent, no Toxic Blossom (TB).
... > 236LP TB
KD +44
Safe jump near corner
... > 236HP TB, PDR 2MP > 236HP
KD +44
Safe jump setup for Toxic Blossom routes. As demonstrated with this example, 236HP can also setup a safe jump in a juggle if the opponent is at a specific height.
... > 236MP TB, PDR 5MP > 2PP~K, PDR 5MP > 236HP
KD +44
Safe jump setup for Toxic Blossom routes. You can end the combo early with PDR 5MP > 236HP instead of 2PP~K for a cheaper safe jump, but the extra damage and corner carry is usually worth one more bar of drive gauge.
... > 2PP~P TB > 5MP > 236HP
KD +44
Another safe jump setup. The 236MP TB route above can also work with 2PP~P TB.
... > 236PP TB > 5MP > 236HP
KD +44
Another safe jump setup. The 236MP TB route above can also work with 236PP TB.
SA1 - 236236K (Deadly Implication)
+30
?
Meaty 214LP grants strong frame advantage, and can cancel to 236KK if opponent uses reversal Super
SA2 - 214214P (Tainted Talons)
+30
?
SA3 - 236236P (Claws of Ya Zi)
HKD +30
Leaves opponent full screen away:
Drive Rush for a ranged meaty strike, but no true throw oki
Can block to bait fast reversals
CA - 236236P (Claws of Ya Zi)
HKD +21
Leaves the opponent a bit closer than SA3:
DR~6HK trades with 4f normals (approx. +14/+6 for pressure or a trade combo)
No true throw oki
236HP Setups
A.K.I.'s 236HP (Heavy Serpent Lash) is an extremely useful combo ender that gives A.K.I. a lot of setup options, especially in the corner. Midscreen, her setups will depend on the opponent's wake-up option. If her opponent is poisoned and the 236HP hit triggers Toxic Blossom, A.K.I. can DR2MP > 236HP to gain access to the same setups as she would have without Toxic Blossom.
Anywhere
These are setups that work both anywhere on the screen. Doing it in the corner may require some minor adjustments to the setup.
Allows A.K.I. to continue pressure without much risk. Requires reacting to the opponent's wakeup option. If the opponent normal rises, then A.K.I will have to do j.2HP. If the opponent back rises or is put in the corner, j.HP is used.
Note that there are specific setups that allow safejumps without having to react to the opponent's wakeup options. In that scenario, only j.HP will work.
Using 236MK will put A.K.I. right next to the opponent with +5 frames of advantage, allowing her to continue her offense with a meaty throw or a meaty normal. Keep in mind that A.K.I. will trade with the opponent's 4f button if she uses 5HK (A.K.I. will be +11 here, meaning she can follow-up with a trade combo such as 5HK > 2PP~K, 5LK > 236HP). If the opponent back rises, A.K.I. has time to walk back to shimmy, and punish the throw whiff with 5HK. However, if the opponent normal rises, then A.K.I. will not be able to shimmy after 236MK. Instead, if A.K.I expects a throw tech from the opponent, she can backdash for a guaranteed punish, or neutral jump j.HP, which will only punish delayed throw techs (but not immediate throw techs). Near the corner, A.K.I. can also use 236LK to shimmy instead of 236MK.
Dashing forward twice will put A.K.I. closer to the opponent than the 236MK option, and leaves her +6, which means the opponent cannot use normal moves to interrupt her 5HK. She can also choose to throw the opponent on wakeup, however, if she inputs the throw immediately, this will whiff. She will have to delay the throw by at least 1 frame. The downside to this option is that A.K.I. does not have a "good" shimmy option, in that walking backwards will not leave enough space for the opponent to whiff their throw. She can, however, backdash if she expects the opponent to throw, but this will lose to reversals. A good option to partially cover both reversals and throws is to jump. If A.K.I. jumps, she is able to punish the opponent's throw whiff with j.HP as it hits from quite high up. If the opponent uses their invincible reversal, A.K.I. may be able to avoid getting hit depending on the character.
Corner Only
Note that these options only work in the corner or near the corner. The options presented above for midscreen are also usable here.
236HP, 66, 3MP, 5LP~LP > 236HP
Overhead option. Dashing forward frame kills to allow for a meaty +5 on hit 3MP, allowing A.K.I. to link the hit into 2LP/5LP > 236HP. Ending in 236H can allow A.K.I. to loop these setups in the corner. Also works midscreen if the opponent normal rises.
236HP, (whiff) 5LP, 2PP~LPLK
Meaty command throw option. 5LP frame kills. The opponent can only get out of this by jumping or using an invincible reversal. A.K.I. can mix up her options by going for a meaty button if the opponent expects a command throw and jumps.
236MP Setups
In general, A.K.I. does not have as many options after a normal hit 236MP compared to 236HP. In the corner, since it is still a +44 knockdown from 236MP, she gains her usual 236HP setup.
Near Corner
236HP!, PDR5HK > 236MP, 236HK
Meaty option that is agnostic to the opponent's tech (normal rise/back rise) option. This leaves A.K.I. at a +5 advantage, allowing her to safely throw or use lights as a meaty option. Also gives a slightly better corner carry compared to the usual 2MP > 236HP route, especially if the opponent chooses to normal rise there.
236MP!, PDR5HK > 214LK, 2LP > DI
Corner meaty DI reset option. This is one of A.K.I.'s few tricky corner DI reset options.
Rise Independent Safejump Setups
A.K.I.'s usual midscreen safejump setups require reacting to the opponent's rise option (if they normal rise, she has to use j.2HP, back rise, she has to use j.HP). This can be difficult, and often times, she gets punished for reacting wrongly.
The setups listed below help to prevent this problem from happening as it guarantees a same-side safejump with j.HP regardless of the opponent's rise option. Most of these setups require the opponent to be poisoned before (with some character-specific exceptions), so when the opponent is not poisoned, A.K.I. will have to still react to the opponent's rise option for the safejump, or go for a different setup.
A.K.I.'s most basic and drive-efficient option for setting up a rise independent safejump j.HP. This option only works if A.K.I. is relatively close to the opponent before 236MP!, which means that it is best to immediately go into 5LK > 236MP! from her stance kicks.
This route gives A.K.I. the best corner carry and uses up two drive gauge bars. This setup is most consistent when A.K.I. is closer to her opponent before 236MP!. It is possible to perform this setup even when A.K.I. is further away from her opponent before 236MP!, she will just have to delay her 5HK during the drive rush to maximize the distance she travels to ensure that she is close enough to the opponent for the 5HK.
Unlike the previous two setups, for this setup to work, A.K.I. has to be relatively far away from the opponent before 236HP!. This setup is more inconsistent compared to the previous two due to the difficulty in judging whether or not A.K.I. is far enough from the opponent before the 236HP!. If A.K.I. is in range to connect three lights (2LP > 2LP, 5LK), then the same-side safejump is always guaranteed. However, often times, she will not be in range for that, and it is up to the player to judge whether or not A.K.I. is sufficiently far enough from the opponent for the same-side safejump.
If A.K.I. gets the right spacing before the 236HP, she can get a guaranteed same-side safejump against certain characters without requiring the opponent to be poisoned.
Currently, this only works against:
Marisa
E. Honda
Blanka
Zangief
SA1 into Meaty 214LP
A.K.I.'s Level 1 Super sends the opponent flying far away if used midscreen, and around 1/3 screen away if used on a cornered opponent. A common oki setup after SA1 is to lock down the opponent with Nightshade Pulse (214LP). This puts A.K.I. at around +12 on Block in the corner, and severely limits the opponents movements midscreen (though it gives plenty of time for them to reposition before the projectile connects). However, some characters can punish this projectile on reaction, especially near the corner.
A.K.I. can cancel the end of her 214LP into OD Snake Step (236KK), which is strike and projectile invincible. If the opponent tries to punish your meaty fireball with a Super, this will usually keep A.K.I. safe or even allow a punish, though there are some exceptions. The following table lists all wakeup reversals that can punish a meaty 214LP, and whether or not OD Snake Step can keep A.K.I. safe.
Opponent's Character
Wakeup Special/Super
Location
236KK Avoids Reversal Punish?
Notes
A.K.I.
SA2 (HP)
Midscreen
🟩 Yes
SA2 (HP) whiffs against A.K.I. if too close to the corner
SA2 (LP)
Corner
🟥 No
236KK recovers directly into LP Super active frames
SA3
🟩 Yes
-
Akuma
623PP
Corner
🟨 Yes*
No Super freeze to react to (236KK to avoid reversal is a risky hard read) Trades hits, with A.K.I. having +3 KD Advantage after wakeup
SA2
🟩 Yes
Akuma is only -8 after A.K.I.'s 236KK (stricter punish timing)
SA3
🟥 No
Akuma gets hit by projectile, and can Throw punish A.K.I. 236KK in the corner (-7)
CA (Demon)
A.K.I. cannot jump out or escape Demon with 236KK
Blanka
SA3
Corner
🟩 Yes
-
Cammy
SA2
Corner
🟩 Yes
A.K.I. cannot punish Cammy's SA2 escape
SA3
A.K.I. cannot punish Cammy's SA3 escape; If Cammy attempts SA3 midscreen, gets hit by projectile (can be juggled with Drive Rush > delayed 2HP)
Chun-Li
SA2
Corner
🟩 Yes
-
SA3
🟥 No
Chun-Li gets hit by projectile, and can punish A.K.I. 236KK in the corner (-9)
Dee Jay
SA2
Corner
🟩 Yes
A.K.I. cannot punish Dee Jay's SA2 escape
SA3
Dee Jay is only -8 after A.K.I.'s 236KK (less optimal punish)
Ed
SA3
Corner
🟩 Yes
-
E. Honda
SA2
Corner
🟩 Yes
A.K.I. can only punish with her own SA2 (HP)
SA3
-
Guile
[2]8KK
Corner
🟨 Yes*
No Super freeze to react to (236KK to avoid reversal is a risky hard read); Even on a successful read, A.K.I. is cornered at only +4 with an awkward punish timing
SA3
🟩 Yes
-
Jamie
236KK (DL2)
Corner
🟨 Yes*
No Super freeze to react to (236KK to avoid reversal is a risky hard read)
SA3
🟩 Yes
After A.K.I. 236KK, the spacing makes the punish slightly awkward; A.K.I. can reach with a punish 5HP~HP launch, 6HK > 2MP, or Drive Rush 5MP > 5HK
JP
SA3
Anywhere
🟩 Yes
-
Juri
SA3
Corner
🟩 Yes
-
Ken
623HP
Corner
🟨 Yes*
No Super freeze to react to (236KK to avoid reversal is a risky hard read)
623PP
Kimberly
SA2
Corner
🟩 Yes
A.K.I. cannot punish Kimberly's SA2 escape
SA3
-
Lily
236KK (Windclad)
Corner
🟨 Yes*
No Super freeze to react to (236KK to avoid reversal is a risky hard read); A.K.I. cannot punish Lily's Windclad OD Condor Spire escape; Midscreen, Lily will fly through projectile but won't reach AKI (-24 on whiff)
SA2 (Windclad)
🟩 Yes
Without Windclad stock, hitbox does not reach far enough to punish A.K.I.
Luke
SA3
Corner
🟩 Yes
-
M. Bison
SA3
Corner
🟩 Yes
M. Bison is -27 after 236KK but recovers a little far away Microwalk + 5HK > 2PP~P for a strong crumple punish, or Drive Rush for a closer start
Manon
SA2
Corner
🟥 No*
Manon trades with projectile, landing only 1 hit of SA2 If A.K.I. cancels to 236KK, she is cornered and punishable at -9
Marisa
SA3
Corner
🟩 Yes
-
Rashid
236PP
Corner
🟨 Yes*
No Super freeze to react to (236KK to avoid reversal is a risky hard read); Trades with projectile for only 1 hit, so it's better to accept this small risk than to attempt a 236KK cancel
SA3
🟩 Yes
-
Zangief
SA2
Corner
🟩 Yes
-
Opponent's Character
Wakeup Special/Super
Location
236KK Avoids Reversal Punish?
Notes
Note: Dhalsim and Ryu do not have a reversal that can avoid meaty 214LP
vs. Burnout
TO-DO
Defense
Reversals
A.K.I. has limited access to invincible reversal options, requiring meter to be able to use her strike and throw invincible options. Nevertheless, she has decent tools that can be used to catch opponents off-guard when they don't respect A.K.I.'s defensive options.
236KK - "OD Slide" is A.K.I.'s situational reversal that can be extremely good for escaping the corner. While it is strike-invincible, it is not throw-invincible, meaning the opponent is able to punish counter throw her during the animation. Additionally, the opponent is able to perform an option select on A.K.I.'s wakeup that will either perform a meaty jab or throw if she decides to use 236KK. Having said that, it is still plenty strong and has its uses. For starters, if the opponent chooses to perform the option select, their okizeme's strength is quite weak if A.K.I. simply blocks the jab. Another safe situation to use 236KK is if the opponent jumps or performs a move with longer startup. Outside of that, it is still worth using, especially if the opponent is not ready for it, as it's extremely good at allowing A.K.I. to escape corner pressure without much consequences.
236236K - is A.K.I.'s level 1 super that is both strike and throw invincible. It is, however, not projectile invincible, so be careful when using it against characters with a good projectile game. It is fairly slow at a 10f startup, but is otherwise a decent reversal option. It is also able to anti-air quite well.
236236P - is A.K.I.'s level 3 super that is fully invincible on startup. Similar uses to 236236K, except this is also a good option against characters that choose to throw a fireball on A.K.I.'s wakeup, as she travels a decent distance while being projectile invincible on startup.
2LP/2LK - while not a "true reversal", these are good options to catch opponents trying to shimmy, or performing a move that does not hit meaty on A.K.I.'s wakeup. 2LP is her fastest option, at 4f startup, and 2LK is 5f, but is able to catch opponents walking backwards.
236KK Hitbox
236236K Hitbox
236236P Hitbox
2LP Hitbox
2LK Hitbox
Anti-Airs
A.K.I. has access to some decent anti-air tools. If the opponent jumps in at certain ranges (e.g. cross-up range), A.K.I. may find it difficult to anti-air them consistently due to her anti-air tools having a limited range/hitbox or slower air-invulnerable frames.
5HK - A.K.I.'s main anti-air option. It has disjointed upward and forward hitboxes with a good range, making it an all-around good option to deal with jump-ins. It is also special cancelable, allowing for rewarding combo extensions in certain situations, or to set up a meaty 214LP (Nightshade Pulse). The main downsides are that it has 9f of startup, meaning A.K.I. will have to react to the jump-in relatively early, and that it does not hit behind, so it will whiff if the opponent crosses up behind her.
2HK - Better horizontal distance compared to 5HK, which makes it a better option in certain situations. It is super cancelable. Punish counters hits leave a very generous window to hit-confirm into a super or Drive Rush combo extensions. It has air invulnerable frames on 10f - 14f. Much like 5HK, it will whiff if the opponent crosses up behind her.
236HP - A.K.I's other anti-air option, with air invulnerability from 6f - 16f. 236HP applies poison on hit or triggers Toxic Blossom, which makes it one of the more rewarding anti-air options. The downside is that it is quite slow, meaning it requires fast reactions. The horizontal hitbox is also quite small, and will not hit on more ambiguous cross-up jump-ins.
236MP - This may be used as a situational anti-air for opponents jumping further away, or for neutral jumps and jump backs. The hitbox is quite narrow and specific, so it is easy to whiff this move.
j.LK/j.MP - These are good air-to-air options for A.K.I. j.MP is a 7f disjointed button that will knock the opponent down on hit. Meanwhile, j.LK has a longer range and is faster at 5f, but will not knock the opponent down on hit. They are good options for when A.K.I. wants to keep the opponent in the corner, or when the opponent performs an ambiguous jump-in.