Drive Gauge
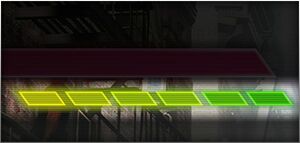
A meter arguably more important than the health bar, the Drive Gauge is the main mechanic that each fighter has access to, regardless of their other options. Both players start each round with 6 bars of Drive Gauge, which can be spent on various offensive, defensive, and movement techniques. When the gauge is not full, it automatically regenerates over time.
Drive Gauge management is fundamental to the game's strategy; players with better management will have a huge advantage over those who manage it poorly. It allows for playstyles from slow and conservative to reckless gambling, making the Drive system a vehicle for player self-expression.
Spending meter on Drive moves is not the only way for the gauge to decrease. Blocking attacks will cause some Drive meter to be chipped away. The weakest attacks can chip around 5% of a Drive bar, while some can drain a full bar on their own. This weakens passive, defensive playstyles significantly; defensive-minded players will have to focus more on their positioning, and using techniques like Drive Parry to mitigate this disadvantage. Some attacks like Drive Impact, Super Arts, and any Punish Counter also drain the Drive Gauge when they hit.
| Drive Move | Drive Gauge Cost |
|---|---|
| Drive Impact | |
| Drive Parry | |
| Drive Rush (from Parry) | |
| Drive Rush (cancel) | |
| Overdrive Specials | |
| Drive Reversal |
It's important to note that any Drive action can be performed, even if only a pixel of the Drive Gauge remains. This is great for securing a KO at the end of a round, since the Burnout penalty does not carry over into the following round.
| Increases Drive Gauge | Decreases Drive Gauge |
|---|---|
| Attacking opponent (Hit/Block/Parry/Armor) |
Blocking attacks |
| Passive Regen over time | Getting hit by Super, Drive Impact, or Punish Counter (Super cinematic also stops passive regeneration) |
| Successful Drive Parry (especially useful vs. Supers) |
Using Drive actions |
| Walking Forward (stacks with passive regen) |
Burnout
Burnout state happens when the player's Drive gauge becomes fully depleted. Burnout gives the player several negative effects:
- All blocked attacks have 4 additional frames of blockstun
- This allows for much stronger pressure sequences; many more attacks become safe on block
- Hitstun is not affected, so combo routes remain unchanged on burned out opponents
- Blocking special moves or supers results in Chip Damage
- This is usually 25% of the move's normal damage, with some exceptions (especially on multi-hit moves)
- Can lose the round to a Chip K.O.
- Corner Drive Impact wall splat causes Stun on hit or block
- Can no longer use any Drive options until gauge is fully replenished
Being in Burnout creates situations that are extremely difficult to escape, like looping corner sequences that are plus on block. If a cornered player is stunned by Drive impact while in Burnout, their Drive Gauge will be fully replenished after recovering from stun. The usual methods of building Drive Gauge also help decrease the Burnout recovery time. While it may be tempting to play passively while in Burnout, it may actually be more effective to mount a strong offense, as you still gain Drive meter from hitting the opponent. Playing an aggressive, offensive style can also make it harder for the opponent to push you back into the corner, where Burnout becomes much more dangerous.
Drive Impact
Costs 1 Drive Stock. Input ![]() +
+![]() (HP+HK) to perform.
(HP+HK) to perform.
| St | Act | Rec | Blk Adv | Dmg |
|---|---|---|---|---|
| 26(27) | 2 | 35 | -3 | 800 |
Drive Impact (DI) is a forward-lunging strike with 2 hits of armor during the startup and active frames, allowing it to absorb and counter an opponent's attacks. If DI absorbs an attack or hits as a Punish Counter, the opponent will be left in a crumple state on hit. The threat of DI makes it risky to throw out mid-range projectiles or uncancelable pokes in neutral, but this generally requires a prediction rather than a reaction.
Midscreen, Drive Impact has massive pushback on block; this can be used to fight your way out of the corner if the opponent isn't expecting it. This blockstun causes a stagger state that prevents Drive Reversal unless the DI is parried. On a non-crumple midscreen hit, DI causes a regular knockdown; if the opponent is airborne, they instead go into a floaty spinning juggle state that allows plenty of time to set up a juggle.
| on Block | on Hit | on Counterhit | on Punish/Crumple |
|---|---|---|---|
| 0.5 Bar | 1 Bar | 1.2 Bars | 1.5 Bars |
Wall Splat: occurs if Drive Impact connects near the corner on hit or block, allowing a guaranteed followup juggle
- While stuck to wall, the opponent is in a free juggle state where followup attacks will also juggle (similar to Force Knockdown state)
- example: Ryu can juggle 2HP > 623HP, or Luke can juggle 5LP~MP~HP > Super without the opponent falling out
- If the DI hits an airborne opponent, the splat occurs higher on the wall; may allow stronger juggle followups
- Wall Splat will not occur if performing a true combo or blockstring into DI
- "LOCK" will appear on the screen after a true blockstring into DI; the opponent will bounce away as though it happened midscreen
- Combo damage scaling after Wall Splat:
- On Hit: DI acts as 2 hits of the combo (100 -> 80 -> 70 -> 60...)
- On Block: followup has 80% multiplier on standard scaling formula (80 -> 80 -> 64 -> 56 -> 48...)
Stun/Dizzy: occurs when Drive Impact connects on a cornered opponent while in Burnout state. Like Wall Splat, this works on hit or block. The opponent is left vulnerable to a huge punish combo, and may also allow time for actions such as Ryu charging Denjin, Kimberly reloading a spraycan, Juri gaining Fuha stocks, etc.
- If the DI itself forces the opponent into Burnout, the Stun will still occur
- Does not occur if DI connects in a true combo/blockstring (same as Wall Splat)
- Because burned out opponents have no Drive options, their only counter to Drive Impact cancels is usually a reversal Super Art
- A blockstring gap of 6f or more can be thrown, while 9f can be jumped out of (10f for Lily/Zangief)
- Combos on dizzy opponents begin at 80% damage scaling, then continue to decrease by 10% per hit as usual
- The opponent can be hit for the next 195 frames from the moment they hit the wall; if untouched, they fall over into a Hard Knockdown state
- Note: It is possible to "combo" into a Stun by making the opponent block a Drive Impact wall splat while being slightly out of the corner. The defender's stumbling animation gives more time for the first Drive Impact to recover, allowing the second one to hit. If the defender starts with under 1.5 Drive bars, the blocked DI plus the followup DI will cause a Burnout and immediately stun the opponent. This works because the blocked DI does not count as part of a combo, so there is no LOCK preventing the stun. This may be an unintended bug and could be patched in the future.
Drive Impact does have a few downsides:
- Can be broken by Armor Break moves such as Super Arts or Drive Reversal, or by quick chained attacks
- A common tactic is to use a poke canceled into Fireball, then cancel into Lv. 3 Super on reaction to beat Drive Impact
- Against projectiles, there are 6 frames of armor hit-freeze that slow down your Drive Impact without affect the opponent's recovery
- This makes it difficult or impossible to use on reaction to fireballs unless they have very long recovery
- Multi-hit OD fireballs have hit-freeze on each hit, making it even harder to armor through them
- You take recoverable damage when absorbing an attack, which will KO if you don't have enough HP to survive
- The opponent can react with their own Drive Impact, which hits as a Punish Counter
If two Drive Impacts clash simultaneously, they will clash with each other and reset to neutral. When this happens, both players are refunded the 1 Drive bar that was spent. If one player enters Burnout in this scenario, they will remain in Burnout while recovering an equivalent amount of their Burnout gauge. Drive Impact startup becomes 1f slower after absorbing an attack. As a result, a clash can occur if a normal connects on the opponent's first DI armor frame, and is then immediately canceled into DI.
As a side note, Drive moves take priority over special moves (but not Super Arts), so something like Ryu's 236HP+HK would result in Drive Impact rather than Hadoken.
All Drive Impacts have the same pushback on block; however, the forward movement during startup varies between characters. As a result, a close range Drive Impact can push the opponent farther into the corner as their collision boxes overlap. The following table lists the forward movement of all Drive Impacts on frame 27, as well as the total maximum range when combined with the strike hitbox.
| Character | Forward Movement (Startup) |
Maximum Range (2nd Active Frame) |
|---|---|---|
| A.K.I. | 1.400 | 2.500 |
| Blanka | 1.373 | 2.523 |
| Cammy | 1.644 | 2.544 |
| Chun-Li | 1.406 | 2.506 |
| Dee Jay | 1.480 | 2.520 |
| Dhalsim | 1.558 | 2.258 |
| Ed | 1.495 | 2.545 |
| E. Honda | 1.739 | 2.539 |
| Guile | 1.321 | 2.481 |
| Jamie | 1.670 | 2.490 |
| JP | 1.455 | 2.535 |
| Juri | 1.461 | 2.511 |
| Ken | 1.390 | 2.470 |
| Kimberly | 1.843 | 2.543 |
| Lily | 1.489 | 2.389 |
| Luke | 1.510 | 2.450 |
| Manon | 1.200 | 2.500 |
| Marisa | 1.537 | 2.527 |
| Rashid | 1.419 | 2.579 |
| Ryu | 1.491 | 2.541 |
| Zangief | 1.506 | 2.396 |
Drive Reversal
Costs 2 Drive Stocks. Press ![]() +
+![]() +
+![]() (6HPHK) during blockstun to perform.
(6HPHK) during blockstun to perform.
| St | Act | Rec | Blk Adv | Dmg |
|---|---|---|---|---|
| 20 | 3 | 26(31) | -8 | 500 (Rec) |
Note: Chun-Li and Dhalsim have 2-hit Drive Reversals, with active frames 3(10)3 and 3(6)3 respectively.
Recovery on hit is 5f longer (6f for Dhalsim, 7f for Chun-Li)
Marisa has 4f less hitstop on her blocked Drive Reversal, which shifts the punish timing to be earlier than usual.
Drive Reversal (DRev) is similar to Alpha Counter or V-Reversal from previous Street Fighter games, being used to counterattack after blocking an opponent's attack. DRev is fully invincible from frames 1-22, and deals a small amount of recoverable damage on hit. Drive Reversals break armor, so you don't have to worry that the opponent may cancel into Drive Impact as a counter.
All Drive Reversals are punishable at -8 on block, and are slow enough that quick attacks will recover before the Drive Reversal connects. DRev immediately ends the blockstun of the opponent's attack, so inputting it earlier increases the chance of successfully punishing the opponent's move. The blockstun of a successful Parry can also be canceled with Drive Reversal, and this is the only way to use it against Drive Impact. It is impossible to win a round with the damage from Drive Reversal.
One of the strongest uses for Drive Reversal may be to prevent the opponent's corner escape; if they try to force some offense to push you back, simply knock them back into the corner for 2 Drive bars. It's important to learn which of the opponent's moves recovery quickly enough to block DRev, however, or you may end up getting punished and cornered yourself. DRev can also be used to punish a blocked normal canceled into Drive Rush; the opponent would have to predict your DRev and use a delayed invincible move to avoid it.
Drive Parry
Consumes ~1/2 Drive gauge upon activation, continues draining while held. Hold ![]() +
+![]() (MP+MK) to perform. Becomes a Perfect Parry if it successfully parries an attack within 2 frames of being input.
(MP+MK) to perform. Becomes a Perfect Parry if it successfully parries an attack within 2 frames of being input.
| St | Act | Rec |
|---|---|---|
| 1 | 8~ [2] | 29 [1] |
Note: [] refers to Perfect Parry
Regular Parry:
Active Effects:
- Active for 8f before entering recovery; active period can be extended by holding Parry
- Parries all strikes and projectiles (from any direction) starting on frame 1
- Successful parry results in the same frame advantage as blocking the move
- Parry recovery lasts 29f after releasing the buttons
- Can still block during this time, but cannot perform any other action
- Also enters recovery immediately if the Drive cost causes a Burnout state
- Parry blockstun can be canceled into Drive Reversal
- From active frame 3 onward, Parry is cancelable into Drive Rush using a Forward Dash input (66)
- Often referred to as "Parry Drive Rush (PDR)", "Raw Drive Rush", "Drive Rush in neutral"
- To input more quickly from neutral, input as 6, 6+MP+MK (Forward Dash with a Parry timed simultaneously with the 2nd forward input)
- After holding a successful Parry, Drive Rush can be input immediately after Parry blockstun ends; useful for punishing some moves like Blanka Ball
- Parry cannot be canceled into Drive Rush if the initial activation causes a Burnout state
Drive Cost/Gain:
- Costs 5000 Drive gauge upon activation, plus 50 per frame starting on frame 4
- Minimum cost of 5250 for a whiffed parry due to meter drain on active frames 4-8
- Awards 5000 Drive (1/2 bar) for parrying a Projectile (except Super Art projectiles)
- This essentially means the defender breaks even, rather than losing Drive meter for blocking the projectile
- Awards 10000 Drive (1 bar) for parrying a Normal, Special Move, or Drive Reversal
- Target Combos or Rekka strings (e.g. Jamie 236P~6P~6P) are considered separate attacks, so they award 10000 Drive per hit
- Awards 20000 Drive (2 bars) for parrying a Super Art, Critical Art, or Drive Impact
- This makes it significantly better than blocking, unless attempting a Parry would cause Burnout
- It's important to practice holding Parry on reaction to the opponent's Super freeze, and to learn how the Super connects vs. Parry (number of hits, pushback, blockstring gaps, etc.)
- Multi-hit attacks usually split the Drive gain between each hit, so you won't build extra meter when parrying them
- The opponent also builds some Drive gauge for having their attack parried, the same as if the attack was blocked
Countering Parry:
- Throws (including Command Throws) hit as a Punish Counter, dealing high damage and draining 1 Drive bar
- This applies to all active and recovery frames of the Parry; the throw cannot be escaped
- Parry recovery does not automatically block, so left/right or high/low mixups can be applied
- Drive Impact connecting during Parry recovery can lead to an unavoidable wall splat
- Switching between fast and slow projectiles makes it harder for the opponent to time the Parry
- May input too late, or waste Drive gauge by inputting too early
- Using a limited-range projectile (Luke LP/MP Sand Blast, Chun-Li LP Kikoken) just outside its range may bait the opponent into whiffing Parry and wasting Drive meter
Pushback Differences (compared to Blocking)
- Projectiles cause 1/2 the usual pushback distance
- Drive Impact has dramatically lower pushback, with no stagger animation or wall splat
- The pushback on Strikes is evenly distributed between both characters, rather than just pushing back the defender
- If one character is cornered, all pushback will be transferred to the non-cornered character
Perfect Parry:
- Occurs only on the first 2 Parry active frames
- Perfect Parry cannot be buffered by holding the buttons (must be timed properly)
- Attempting a Perfect Parry with under 1/2 a Drive bar requires frame-perfect timing (will enter Burnout immediately)
- This may be required to survive against a corner Drive Impact if you do not have enough HP to absorb it with your counter-DI
- In general, Perfect Parry rewards the same amount of Drive gauge as a regular Parry
- In some cases, the invincibility of Perfect Parry causes some hits to whiff, which may reduce the total Drive gain
- A 50% damage scaling multiplier is applied to any punish after a Perfect Parry (including vs. projectiles)
- Delaying your punish, or Perfect Parrying only the first hit of a multi-hit move, does not change this; you cannot avoid the scaling on a true punish
- Because of this harsh scaling, it may be worth optimizing the punish for screen position or Drive Gauge damage instead (e.g. Heavy Normal > Drive Impact to drain ~2 bars)
vs. Strikes:
- A successful Perfect Parry causes a zoomed-in screen freeze, giving 60f (1 second) to react with a punish
- This freeze has only 1f recovery, and prevents the opponent from canceling their attack in any way (Target Combo, Special, Super, Drive Impact, etc.)
- During the freeze, you can buffer any attack by holding the button; this ensures it will come out at the earliest possible timing
- Multi-hit moves like Jamie 5HP or Lily Windclad 236KK still play out their remaining active frames after being Perfect Parried
- Perfect Parrying a deep jump-in does not always guarantee a punish; can be as safe as -2 at the latest possible timing
- Similarly, some fast light attacks are safer than usual (~-7); alternative punish combos may be required against these moves
- Fully invincible for 6f after screen freeze; this carries through any buffered attack
- This ensures that an attack 5f or faster will successfully punish the opponent, even if their attack has more active frames remaining
vs. Projectiles:
- There is no screen freeze when Perfect Parrying a projectile; instead, causes a fixed 11f recovery (1f Parry + 10f extra recovery)
- During this 11f recovery, characters are Throw invincible, and any further strikes will be automatically parried
- You can hold the Parry input up to 13 additional frames without incurring the standard 29f parry recovery afterward
- Buffering an immediate Drive Rush allows for projectile punishes at midscreen against many characters
- This is less useful against slow projectiles, as the opponent will likely recover before it even makes contact
- Perfect Parrying a simultaneous strike + projectile combines the effects of both
- The screen freeze of a strike occurs, but results in 11f recovery like a projectile
Drive Rush
Costs 1 Drive Stock (after Parry) or 3 Stocks (after a cancelable normal).
Tap ![]()
![]() (66) during Parry to perform a Parry Drive Rush.
(66) during Parry to perform a Parry Drive Rush.
During a cancelable normal, tap ![]()
![]() (66) or
(66) or ![]() +
+![]() (MP+MK) to perform a Drive Rush cancel on hit or block. Light normals will also cancel on whiff.
(MP+MK) to perform a Drive Rush cancel on hit or block. Light normals will also cancel on whiff.
| St | Act | Rec | |
|---|---|---|---|
| DR (Cancel) | 9 | [~45] | 24 |
| DR (Parry) | 11 | [~46] | 23 |
* Note: Ken's Drive Rush has a shorter active period of 38f (cancel) / 39f (Parry).
* Active frames [] refers to the part of the dash that can be canceled into a normal for the +4 bonus
Drive Rush (DR or DRush) begins with a green flash of light and a 10-frame screen freeze, followed by a quick dash across the screen. Any Normal or Command Normal used during this dash gains +4 advantage on Hit or Block, making it useful in a variety of offensive situations. They may also have improved juggle properties, allowing for long extended juggle sequences. The DR dash can be canceled early by any attack while maintaining the forward momentum, allowing the user to stay close for tick throws, blockstrings, and combo extensions.
The initial screen freeze gives the user extra time to confirm the opponent's status and decide on the next action. At the same time, the defender has more time to react to a raw Drive Rush in neutral, or punish a blocked DR cancel with Drive Reversal. During this freeze, the defender's directional inputs will not come out, but attacks and dashes will be buffered. If multiple attack buttons are input during the freeze, the one with higher priority will come out (e.g. LP+MP+HP will give HP; 4MP+HP will give 4MP if it exists as a command normal)
When Drive Rush is used mid-combo, an extra 15% damage scaling penalty applies (multiplied by any other existing damage scaling); this only applies once per combo, and does not occur when beginning a combo with a raw Parry Drive Rush. When this scaling occurs, you are locked out of passive Drive Gauge regeneration until the combo ends; however, you can still build some Drive by walking forward mid-combo, and entering the cinematic of a Level 3 Super will restart the Drive regeneration.
The Drive Rush must be active for 23 frames (from Parry) or 24 frames (from a 3-bar cancel) before it can be canceled with a directional input like crouch, block, or jump; it is also impossible to use Parry during the run, as MK will come out instead. This makes Drive Rush a somewhat committal offensive tool, as you can't simply defend mid-dash while observing the opponent's response. If you want to input a crouching normal or command normal late in the Drive Rush animation, you must hit the direction and button within a 3f window, otherwise the Drive Rush status will end and the normal will not receive the +4 bonus advantage.
Because a raw Drive Rush begins with a Parry, it cannot be done with under 1/2 a Drive bar, as the initial cost of the Parry drains your gauge immediately and puts you into Burnout. This limitation does not apply to the 3-bar Drive Rush cancels. Because light normals can be DR canceled even on whiff, you can use this to set up a raw Drive Rush from farther ranges with a nearly empty gauge. This is a high-risk, high-reward strategy that can be useful for securing one final mixup to end the round. The whiffed light normal makes the Drive Rush a bit more reactable and the extra startup time makes it less useful in most oki scenarios, so it is not a pure replacement for Parry Drive Rush.
| Character | Min. Distance (Immediate Throw) |
Min. Distance (Crouch Block) |
Max Distance (No Input) |
|---|---|---|---|
| A.K.I. | 0.9067 | 2.4369 | 4.0492 |
| Blanka | 0.4756 | 2.0821 | 2.8671 |
| Cammy | 0.6030 | 2.0265 | 2.7956 |
| Chun-Li | 1.0437 | 2.2219 | 3.1634 |
| Dee Jay | 0.7629 | 2.5347 | 2.7132 |
| Dhalsim | 0.4708 | 1.7873 | 2.7000 |
| Ed | 0.9100 | 2.1895 | 3.3736 |
| E. Honda | 0.2125 | 1.7686 | 3.3748 |
| Guile | 0.8053 | 1.8979 | 3.4613 |
| Jamie | 0.9883 | 2.0295 | 3.0019 |
| JP | 0.5246 | 1.8572 | 3.6282 |
| Juri | 0.6407 | 2.4790 | 3.9994 |
| Ken | 0.7453 | 2.4492 | 3.5902 |
| Kimberly | 0.8165 | 2.4790 | 3.5649 |
| Lily | 0.4337 | 1.8997 | 3.0437 |
| Luke | 0.8167 | 2.4992 | 3.4609 |
| Manon | 0.5060 | 1.4170 | 2.3472 |
| Marisa | 0.5437 | 1.9030 | 3.0810 |
| Rashid | 0.7964 | 2.2528 | 2.9978 |
| Ryu | 0.5246 | 1.8776 | 3.6282 |
| Zangief | 0.3272 | 1.4553 | 3.0395 |
* Throw stops all forward DR momentum; using a normal instead will cause the character to continue moving forward during the attack startup
* Maximum distance refers to the distance on the final DR dash frame; however, some characters continue moving forward even after DR is no longer active
Overdrive
Costs 2 Drive Stocks. Press 2 Punches or 2 Kicks while inputting a special move to perform the Overdrive Art version.
Overdrive (OD) moves are similar to EX Special Moves from previous titles; by spending some Drive Meter, you can get an enhanced move with useful properties. Because OD Specials use the Drive Gauge, they can combo into Super Arts.
- OD Specials that are Super-cancelable can go into Level 2 Super Art (unlike meterless specials which only cancel to Level 3/CA)
- OD Specials generally have benefits like extra damage, faster startup, better frame advantage, and may even have invincibility or armor
- In some cases, OD Specials combine the benefits of the various meterless versions of the attack
- e.g. Kimberly OD Vagabond Edge has the launch of the HP version with the fast startup and juggle potential of the MP version
- OD Specials often put the opponent in a juggle state, or have higher juggle potential than meterless versions
- OD Specials can be performed with less than 2 Drive bars, but the player is immediately put into a Burnout state
Advanced Drive Info
Drive Regeneration
The Drive meter automatically restores itself over time, but the rate it which it regenerates can change based on several factors. Recall that 1 Drive bar is 10,000 units of Drive meter, and that 1 frame equals 1/60 of a second.
The Drive Gauge works the same in Burnout, except that it must be fully restored before it can be used again. Landing your own attacks during Burnout builds some Drive meter, so playing offensively is a good way to reduce your Burnout time. Instead of taking Drive Damage to your meter when blocking, you instead build the same amount of Drive that the opponent builds for connecting their attack. When blocking a Super Art, you will instead build 1/2 the usual Drive Damage amount.
| Regen/Frame %Bar/Sec |
Notes | ||
|---|---|---|---|
| Standard Drive Regen | 40 / 24% [50 / 30%] |
In Burnout, blocking adds to Drive Gauge rather than depleting it | |
| In Hitstun | 20 / 12% [25 / 15%] |
Applies to any hitstun, including grounded hits, knockdowns, air resets, air juggles, throws, etc.
| |
| Jumping | 20 / 12% | Includes airborne frames of attacks, such as Chun-Li or Kimberly 6HK
| |
| Walking Forward | +20 / +12% | Stacks with Passive Regeneration (60/frame); works even during Drive Regen Cooldown
| |
| Note: if no difference is specified for Burnout, it follows the standard rules | |||
Drive Regeneration Cooldown
Certain actions will stop the automatic regeneration of Drive meter for a certain period of time:
| Cooldown Time (Frames) |
Notes | |
|---|---|---|
| Blocking Attacks Getting Punish Countered |
90 | Cooldown Timer counts down from the start of Blockstun or Punish Hitstun
|
| Getting Hit by Super Art | 90 | Cooldown Timer counts down after Super Hitstun ends; resets every time Hitstun is applied
|
| OD Special Drive Impact Drive Reversal |
120 | After using any of these moves, the timer counts down after all recovery frames have finished |
| Drive Rush (Cancel) | 120 | Timer starts counting down when the DR dash active frames are canceled
|
| Parry (whiff) Parry Drive Rush |
240 | Timer counts down from the moment Parry recovery ends
|
| Parry (success) | 60 | After parry freeze/blockstun; applies to both Regular and Perfect parries
|
Super Gauge
The Super Gauge is only used to perform Super Arts. Characters gain Super meter when an attack connects on hit or block; unlike in many previous games, no meter is built for whiffing an attack. Both players start the match with an empty Super Gauge, and can build up to 3 bars total. The Super meter carries over between rounds, so there is more to consider when deciding whether or not to spend meter to finish a round.
As a general rule, Super Gauge build on hit/block works as follows:
| on Hit | on Block | on Armor Absorb | |
|---|---|---|---|
| Attacker | (Base) | 50% | (Base) |
| Defender | 70% | 25% | 35% |
The amount of Super Gauge built from an attack is not affected by Counterhit or Punish Counter status, and is also not subject to combo scaling. Drive Impact, Drive Reversal, and Super Arts do not build additional Super Gauge for the attacker or defender, although any followup combo can still build meter.
Super Art
A Super Art is essentially a more powerful type of Special move, requiring Super meter and a more complex input. In addition to damage, Supers often have improved properties like armor break, invincibility, juggle potential. Some Level 2 Super Arts are not attacks, but a powerup like Juri's Feng Shui Engine; this is known as an "install" Super. Install Supers turn the meter into a timer that ticks down until empty, at which point the character returns to normal. When a character is under 25% health, their Level 3 Super turns into a "Critical Art", which deals a bit more damage and may change the knockdown advantage/spacing afterwards.
canceling an attack into a Super Art works differently than other moves:
- Lv. 1 Super can be canceled from Normals only.
- Lv. 2 Super can be canceled from Normals and OD Specials.
- Lv. 3 Super/CA can be canceled from Normals and Specials.
- Not all Normals and Specials are cancelable into Super Arts; refer to the "cancel" column in the move's frame data.
Super Arts are an important tool for Drive Gauge management; they can drain the opponent's Drive Gauge and prevent passive regeneration, while using the time to allow your own gauge to passively recover. You can stall for time to prevent Burnout, or ensure the opponent enters Burnout after they overextend in their Drive Gauge usage. During Burnout, invincible Supers are the primary way to avoid being stunned by corner Drive Impact blockstrings, which would otherwise be unavoidable after blocking a cancelable heavy normal.
| Lv.1 Super | Lv.2 Super | Lv.3 Super | Critical Art |
|---|---|---|---|
| 0.5 Bar | 1 Bar | 1.5 Bar | 2 Bar |
Note: this can vary somewhat, especially for non-cinematic variations of Supers
