|
|
| Line 1: |
Line 1: |
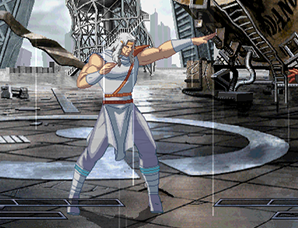
| [[File:Tokiportrait.jpg|right]]
| | {{Infobox Character HNK |
| ==Introduction==
| | |name=Toki |
| | | }} |
| {| style="width:100%" cellpadding=10 border="0"
| |
| |-
| |
| | [[Image:Tokiportrait.png|left]]
| |
| | If you are even a little familiar with [[Hokuto no Ken]], Toki probably needs no introduction. His ability to teleport around with no recovery allows for over-the-top mixups and pressure, and he has an answer to any situation, being fully equipped with two of the best reversal supers in the game, zero-startup low/high/air counter moves, a projectile, and a projectile reflector move. As his 2B has a long startup and he possesses no other low moves, Toki's mixup is centered more on confusing the opponent into guarding the wrong way than the usual high/low or low/throw styles. This makes for a fairly unique play-style, which can take some getting used to. However if you are playing to win and are willing to put in the effort, Toki is likely the best pick for you.
| |
| | |
| That being said, let us start this section off by listing Toki's main strengths and weaknesses.
| |
| |}
| |
| | |
| | |
| '''Strengths:'''
| |
| * Positive matchups against all characters; has ''two'' 9:1 matchups
| |
| * Can teleport all over the place at high speed with no recovery at all.
| |
| * Has three 1-frame startup counter moves which can be followed up with huge no gauge combos
| |
| * Throw causes wall bounce, and can be followed up with huge no gauge combos
| |
| * Has two of the best reversal supers in the game
| |
| * Great star reducing abilities
| |
| * Best FKO in the game
| |
| | |
| | |
| '''Weaknesses:'''
| |
| * 2B is his only low attack, and comes out quite slow
| |
| * 3-star FKO combos are fairly difficult to pull off
| |
| * People may hold a grudge against you for using him
| |
| | |
|
| |
|
| Before diving right into the combos be sure to familiarize yourself with Toki's special/super moves and important normals. | | Before diving right into the combos be sure to familiarize yourself with Toki's special/super moves and important normals. |
| Line 298: |
Line 274: |
| <br> | | <br> |
| Toki sits down to relax for a moment, then shoots lazers from his hands and kills his opponent. Hits downed opponents. The lazer beams will also go through other projectiles, although this doesn't have much use except as a gimmick. | | Toki sits down to relax for a moment, then shoots lazers from his hands and kills his opponent. Hits downed opponents. The lazer beams will also go through other projectiles, although this doesn't have much use except as a gimmick. |
|
| |
| ==Combos==
| |
| ==Basic Combos==
| |
|
| |
| Note: In order to connect a grave shoot after 2CC you must kara cancel his 2D.
| |
|
| |
| 2CC > Grave Shoot (A+C) = 2CC > 2D~A+C
| |
|
| |
| '''Starters'''
| |
|
| |
| {| style="width:100%" cellpadding=10 border="1"
| |
| |
| |
| 2A > 2A > 2D
| |
|
| |
| 2A > 2C > 2D
| |
|
| |
| 2B > 2CC
| |
|
| |
| 2A > 2CC
| |
| |}
| |
|
| |
| ==Mid Screen to Corner Combos==
| |
|
| |
| '''Version 1'''
| |
|
| |
| {| style="width:100%" cellpadding=10 border="1"
| |
| |
| |
| 2D > 623+B > 2C > c.5D (or 2C) > 623+B > 2A > 2CC > A+C > j.B > j.C > 236+C (1 to 3 hits) > 236+A > Ender
| |
| |}
| |
|
| |
| Note: Fairly stable BnB from mid screen to corner. If you think you are too far for c.5D use the variation bellow.
| |
|
| |
| Note: Works on every character in the corner, but 2C>5D whiffs easily against jagi, raoh, heart
| |
|
| |
| ''Version 2'''
| |
|
| |
| {| style="width:100%" cellpadding=10 border="1"
| |
| |
| |
| 2D > 623+B > 2C > delay 2D > 623+B > 2A > 2CC > A+C > j.B > j.C > 236+C (1 to 3 hits) > 236+A > Ender
| |
| |}
| |
|
| |
| '''Version 3'''
| |
|
| |
| {| style="width:100%" cellpadding=10 border="1"
| |
| |
| |
| 2D > 623+B > 2C > A+C > j.C > 236+A > 2C > A+C > j.A > 236+C (1 to 4 hits) > 236+A > Ender
| |
| |}
| |
|
| |
| '''Enders'''
| |
|
| |
| {| style="width:100%" cellpadding=10 border="1"
| |
| |
| |
| 1. CD (2 stars)
| |
|
| |
| 2. Hikou Sekkatsukou (236236+B) (3 stars)
| |
|
| |
| 3. 2A > 2CC > (2D > HSC) > Hokuto Ujou Danjinken (236236+C) (2 stars)
| |
|
| |
| 4. 2A > 2CC > 623+B > Hikou Sekkatsukou (236236+B) (3 stars)
| |
|
| |
| 5. 2A > 2CC > 623+B > 5B > 2B > Chase Jump Cancel Toukei Kohou (632147+D) (2 stars)
| |
|
| |
| 6. 2A > 2CC > FKO (1 star > FKO combo)
| |
|
| |
| 7. 2A > 2C > CD+E > E~(2A) > 2C > 2C > FKO ( 2 stars > FKO combo)
| |
| |}
| |
|
| |
| Note: For ender #7 with too many hits before this ender, the opponent may fall, so it's really advised to omit the second 2C before grave shoot or to reduce the number of tensho hits
| |
|
| |
| ==Mid Screen Combos==
| |
|
| |
| '''Version 1'''
| |
|
| |
| {| style="width:100%" cellpadding=10 border="1"
| |
| |
| |
| 2D > 623+D > A+C > j.B > j.C > 236+A > 2C > A+C > j.B > j.C > 236+C (1 to 3 hits) > 236+A > Ender
| |
| |}
| |
|
| |
| '''Version 2'''
| |
|
| |
| {| style="width:100%" cellpadding=10 border="1"
| |
| |
| |
| 2D > 623+D > A+C > j.D > 236+A > A+C > j.B > 236+C (1 hit) > 236+A > 2C > A+C > j.B > j.D > 236+C (2 to 3 hits) > Ender
| |
| |}
| |
|
| |
| '''Enders'''
| |
|
| |
| {| style="width:100%" cellpadding=10 border="1"
| |
| |
| |
| 1. CD (2 stars)
| |
|
| |
| 2. Hikou Sekkatsukou (236236+B) (3 stars)
| |
|
| |
| 3. 2A > 2CC (or 2D > HSC) > Hokuto Ujou Danjinken (236236+C) (2 stars)
| |
|
| |
| 4. 2A > 2A > 5B > 2CC > 236236+C or 61234+D (meaty projectile for oki)
| |
| |}
| |
|
| |
| ==Corner Combos==
| |
|
| |
|
| |
| {| style="width:100%" cellpadding=10 border="1"
| |
| |
| |
| Instant Tenshou Hyakuretsuken (2369+C - 4 hits) > land > A+C > j.D > 236+A > A+C > j.D > 236+C (1) > 236+A > 2CC > A+C > j.B > j.D > 236+C (1~3 hits) > 236+A > Ender
| |
| |}
| |
|
| |
| Nice instant overhead starter.
| |
|
| |
| ==FKO Combos==
| |
|
| |
| '''0 Star'''
| |
|
| |
| {| style="width:100%" cellpadding=10 border="1"
| |
| |
| |
| 1. 2D > FKO
| |
| |}
| |
|
| |
|
| |
| {| style="width:100%" cellpadding=10 border="1"
| |
| |
| |
| 2. 2CC > FKO
| |
| |}
| |
|
| |
|
| |
| '''1 Star'''
| |
|
| |
| {| style="width:100%" cellpadding=10 border="1"
| |
| |
| |
| 1. 2D > 623+B > 2C > c.5D (or 2C) > 623+B > 2A > 2CC > A+C > j.B > j.C > 236+C (2 to 3 hits) > 236+A > (2A > 2CC) > FKO
| |
| |}
| |
|
| |
|
| |
| {| style="width:100%" cellpadding=10 border="1"
| |
| |
| |
| 2. 2D > 623+D > A+C > j.B > j.D > 236+A > 2C > A+C > j.B > j.D > 236+C (1 to 3 hits) > 236+A > (2A > 2CC) > FKO
| |
| |}
| |
|
| |
|
| |
| {| style="width:100%" cellpadding=10 border="1"
| |
| |
| |
| 3. 2A > 2A > 2C > CD+E > 6 > FKO
| |
| |}
| |
|
| |
|
| |
| '''2 Stars'''
| |
|
| |
| {| style="width:100%" cellpadding=10 border="1"
| |
| |
| |
| 1. 2D > 623+B > 2C > c.5D > 623+B > 2A > 2C > CD+E > AC+E > j.B > 236+C (1 hit) > 236+A > 2A > 2CC > FKO
| |
| |}
| |
|
| |
| Note:need to be in the corner by the time the banishing strike hits ; doesn't work on toki
| |
|
| |
| {| style="width:100%" cellpadding=10 border="1"
| |
| |
| |
| 2. 2D > 623+B > 2C > CD+E > AC+E > j.B > j.C > 236+C (2 to 3 hits) > 236+A > 2A > 2CC > FKO
| |
| |}
| |
|
| |
| Note: Not reliable
| |
|
| |
| {| style="width:100%" cellpadding=10 border="1"
| |
| |
| |
| 3. 2D > 214214+B > E~2C > 5D > 623+B > 2A > 2C > A+C > j.B > j.D > 236+C (2 to 3 hits) > 236+A > 2A > 2CC > FKO
| |
| |}
| |
|
| |
|
| |
| {| style="width:100%" cellpadding=10 border="1"
| |
| |
| |
| 4. 2D > 623+D > A+C > j.B > j.D > 236+A > 2C > A+C > j.B > j.D > 236+C (2 hits) > 236+A > CD > E~FKO (236+E~CD)
| |
| |}
| |
|
| |
| Note: midscreen route ; need to delay FKO against kenshiro, raoh and juda
| |
|
| |
| {| style="width:100%" cellpadding=10 border="1"
| |
| |
| |
| 5. 2A > E~2A > 2C > CD+E > AC+E > 2369+E~C > 2D > FKO
| |
| |}
| |
|
| |
|
| |
| {| style="width:100%" cellpadding=10 border="1"
| |
| |
| |
| 6. 2A > 2C > CD+E > 6 > CD > AC+E > j.B > j.D > 236+A > 2C > A+C > j.B > j.D > 236+C (2 hits) > 236+A > (2A > 2D) > FKO
| |
| |}
| |
|
| |
|
| |
| '''3 Stars'''
| |
|
| |
| {| style="width:100%" cellpadding=10 border="1"
| |
| |
| |
| 1. Counter Hit Hikou Sekkatsukou (236236+B) > FKO
| |
| |}
| |
|
| |
|
| |
| {| style="width:100%" cellpadding=10 border="1"
| |
| |
| |
| 2. 2D > 214214+B > E~2C > c.5D > 623+B > 2A > 2C > CD+E > AC+E > j.B > 236+C (1 hit) > 236+A > 2A > 2CC > FKO
| |
| |}
| |
|
| |
| Note: need to be in the corner by the time the banishing strike hits
| |
|
| |
| {| style="width:100%" cellpadding=10 border="1"
| |
| |
| |
| 3. 2A > 2A > 2C > CD+E > Charged CD > E~2C > A+C > j.C > 236+A > 2C > A+C > j.B > j.D > 236+C (2 to 3 hits) > 236+A > 2A > 2CC > FKO
| |
| |}
| |
|
| |
| Note: charged CD may not hit depending on the distance to the corner
| |
|
| |
| {| style="width:100%" cellpadding=10 border="1"
| |
| |
| |
| 4. 2A > E~2A > 2C > CD+E > 6 > 236236+B > 2D > FKO
| |
| |}
| |
|
| |
|
| |
| {| style="width:100%" cellpadding=10 border="1"
| |
| |
| |
| 5. 2A > 2C > c.5D > f.5D > CD > 6 > 236236+B > 2D > FKO
| |
| |}
| |
|
| |
| Note: doesn't work on heart
| |
|
| |
| {| style="width:100%" cellpadding=10 border="1"
| |
| |
| |
| 6. 2D > 623+B > 2C > 5D > CD > E~5B > 2CC > A+C > j.B > j.D > 236+C (2 to 3 hits) > 236+A > 2A > 2CC > Charged CD+E > E~FKO (236+E~CD)
| |
| |}
| |
|
| |
| Note: need the opponent to be in the corner by the time you do 623B and to have 1.2 boost by the time you hit with the banishing strike ; doesn't work on toki and raoh
| |
|
| |
| '''4 Stars'''
| |
|
| |
| {| style="width:100%" cellpadding=10 border="1"
| |
| |
| |
| 1. Opponent Dizzy after Chikuseki > CD > 623+E~B > A+C > 9E (chase boost) > j.D > 236+C (1 hit) > 236+A > 236236+B > 2D > FKO
| |
| |}
| |
|
| |
| ==Throw Loop==
| |
|
| |
| This is the basic formula for Toki's corner throw loop. His throw combos are usually divided into 3 stages after the back throw or counter.
| |
|
| |
| '''Starter'''
| |
|
| |
| {| style="width:100%" cellpadding=10 border="1"
| |
| |
| |
| Back throw in the corner or Hokuto Haryuushou (214+A)
| |
| |}
| |
|
| |
|
| |
| '''Initial 7-8 hits'''
| |
|
| |
| {| style="width:100%" cellpadding=10 border="1"
| |
| |
| |
| 1. 623+B > 2A > [5D > 6D > 623+B] 2x > 5D > 6D
| |
|
| |
| 2. 623+B > 2A > 5C > 5D > 6D > 623+B > 5C > 5D > 6D
| |
|
| |
| 3. 623+B > 2CC > j.D > 236+C (1 hit) > 236+A > 5C > 5D > 6D (Rei / Shin / Juda on P2 side)
| |
|
| |
| 4. 623+B > 2A > 5D > 6D > 623+B > A+C > 9236+C (1 hit) > 236+A > 5C > 6D
| |
| |}
| |
|
| |
| Note: You may use any of those variations. However, if you want to reach 100% by the end of the loop make sure to pick the most damaging version.
| |
|
| |
|
| |
| '''Followup from 9 hits'''
| |
|
| |
| {| style="width:100%" cellpadding=10 border="1"
| |
| |
| |
| 1. 623+A > AD > j.A > j.B > 236+C (1 hit) > 236+A > j.A > AD > j.A > j.B > 236+C (1 hit) > 236+A > j.A > AD > j.A > 236+A
| |
|
| |
| 2. 623+A > AD > j.A > j.B > 236+C (1 hit) > f.5C > 623+A > AD > j.A > j.B > 236+C (1 hit) > 236+A > j.A > AD > j.A > 236+A
| |
|
| |
| 3. 623+B > 2C > 5D > [623+B > 2C > 2D] 2x (old loop)
| |
|
| |
| 4. 623+B > CD > AC+E > j.D > 236+A > 2CC > A+C > j.B > j.D > 236+C (2 hits) > 236+A > 2CC (2D > HSC) > 236236+C or FKO (End of combo)
| |
|
| |
| 5. 623+D > A+C > 9E (Chase Boost) > j.D > 236+C (1 hit) > 236+A > 236236+B > 2D > FKO (End of combo)
| |
|
| |
| 6. 623+A > AD > j.A > j.B > 236+C (1 hit) > 236+A > j.A > AD > j.A > j.B > 236+C (1 hit) > 236+A > f.5D > 623+B > 2D > 6D (cross up) > [623+D > 623+D > 2D > 6D] 2x (Coast 2 Coast)
| |
| |}
| |
|
| |
|
| |
| '''Enders'''
| |
|
| |
| {| style="width:100%" cellpadding=10 border="1"
| |
| |
| |
| 1. [2D > 623+B] 3-4x > 2D > HSC >236236+C
| |
|
| |
| 2. [2D > 623+B] 3-4x > 623+E~B > CD > AC+E > j.D > 236+A > 2CC > A+C > j.B > j.D > 236+C (2 hits) > 236+A > 2CC > (2D > HSC) > 236236+C
| |
|
| |
| 3. [2D > 623+B] 3-4x > 623+E~B > CD > E~5B > 2CC > j.D > 236+C (1) > 236+A > 2CC > A+C > j.B > j.D > 236+C (3) > 236+A > 236236+C
| |
|
| |
| 4. 623+D > CD > HSC > E > c.5C > c.5D > 623+B > 2A > 2C > AC > j.BD > 236+C (4 hits) > 236+A > 2Ax4 > A~E > 2Ax6 > 2A~E > 2Ax7 > 236236+C
| |
|
| |
| 5. [2D > 623+B] 3-4x > 623+E~B > CD > E~5B > 2CC > AC> hj.BCD > 236+C (2 hits) > 236+A > 2CC > j.A > 236+C (4 hits) > 236+E~C (3 hits) > 236+E~C (3 hits) > 236+A > 2A > 236236+C
| |
| |}
| |
|
| |
| Note: Feel free to pick any of those variations.
| |
|
| |
| Note: AD = Air Dash
| |
|
| |
| ==Basket Combos==
| |
|
| |
| {| style="width:100%" cellpadding=10 border="1"
| |
| |
| |
| Shin / Mr.Heart
| |
|
| |
| 2A > 2C > 2D > 623+B > 2C > c.5D > 623+B > 2A > 2CC > A+C > j.B > j.D > 236+C (1 to 3 hits) > 236+A > 2A > 2C > 2C > 2D > HSC 236236+C > 5B > 2A > 2A > (E~2A > 2Ax7) x5 > 2A > 2A > 2D > Basket
| |
| |}
| |
|
| |
| Basketball setup for Shin / Mr.Heart.
| |
|
| |
| Note: 5B can be replaced with 2A against heart
| |
|
| |
| ==Dribble Combos==
| |
|
| |
|
| |
| {| style="width:100%" cellpadding=10 border="1"
| |
| |
| |
| Rei / Shin / Juda
| |
|
| |
| 2A > 2C > 2D > 623+B or (623+A > j.D > 236+A) > 2C > 5D > 623+B > 2A > 2CC > hj.ABCD > 236+C (4 hits) > E~j.B > 236+C (3 hits) > [236+E~C (3 hits)]x2 > 236+A > 236236+C > 2A > d.2A > Dribble
| |
| |}
| |
|
| |
| Basic dribble setup for Rei / Shin / Juda.
| |
|
| |
|
| |
|
| |
| {| style="width:100%" cellpadding=10 border="1"
| |
| |
| |
| Jagi
| |
|
| |
| 2A > 2C > 2D > 623+B > 2C > AC > j.D > 236+A > 2CC > hj.ABCD > 236+C (4 hits) > E~j.B > 236+C (3 hits) > [236+E~C (3 hits)]x3 > 236+A > 236236+C > 2A > d.2A > Dribble
| |
| |}
| |
|
| |
|
| |
| {| style="width:100%" cellpadding=10 border="1"
| |
| |
| |
| Kenshiro / Raoh
| |
|
| |
| 2A > 2C > 2D > 623+B > 2C > 5D > 623+B > 2A > 5A (or 2A) > 2CC > hj.ABCD > 236+C (4hits) > E~j.AB > 236+C (3hits) > E~j.B > 236+C (3 hits) > E~j.B > 236+C (3 hits) > [236+E~C (3 hits)]x2 > j.A > j.A > 236+A > 2A > d.2A > Dribble
| |
| |}
| |
|
| |
| Dribble setup for Raoh / Ken at the cost of one extra boost bar.
| |
|
| |
|
| |
| {| style="width:100%" cellpadding=10 border="1"
| |
| |
| |
| Mr.Heart
| |
|
| |
| 2A (1~3 hits) > 2D > 623+B > 2C > AC > j.BD > 236+A > 2A > 2CC > hj.ABC > 236+C (4 hits) > E~j.AB > 236+C (3 hits) > E~j.B > 236+E~C > [236+E~C (3 hits)]x3 > 236+A > j.A > j.A > 236+A > 2A > 2A > d.2A > Dribble
| |
| |}
| |
|
| |
|
| |
| {| style="width:100%" cellpadding=10 border="1"
| |
| |
| |
| Toki
| |
|
| |
| 2A (1~3 hits) > 2D > 623+B > 2CC > j.C > 236+A > 2A > 2CC > hj.ABCD > 236+C (4 hits) > E~j.B > 236+C (3 hits) > E~j.B > 236+C (3 hits) > E~j.B > 236+C (3 hits) > [236+E~C (3 hits)]x2 > 236+A > j.A > j.A > 236+A > 2A > d.2A
| |
| |}
| |
|
| |
| ==Low Cost Dribble Setups==
| |
|
| |
| {| style="width:100%" cellpadding=10 border="1"
| |
| |
| |
| Rei / Shin / 1 Boost + 1Aura
| |
|
| |
| 2A > 2C > 2D > 623+A > j.D > 236+A > 2CC > 623+B > 2A > 2CC > hj.ABCD > 236+C (4hits) > 236+E~C (3 hits) > E~j.AB > 236+C (3 hits) > 236+A > 236236+C > 2A > d.2A > Dribble
| |
| |}
| |
|
| |
|
| |
| {| style="width:100%" cellpadding=10 border="1"
| |
| |
| |
| Shin / 1.2 Boost + 1 Aura
| |
|
| |
| 2A > 2C > 2D > 623+B > 2C > j.D > 236+A > 2A > 2C > 2C > hj.ABC > 236+C (4 hits) > E~j.AB > 236+C (3 hits) > E~j.B > 236+C (3 hits) > 236+E~C (3 hits) > 236+A > 5D > 236236+C > 2A > 2A > 2A > d.2A > Dribble
| |
| |}
| |
|
| |
| Note: The timing for the first 2A's after the super to start the dribble is slightly faster than usual. It could also be replaced by 2A > 2CC > 623+B > 2A or 2A > 5C > 5D > 2D > 623+B > 2A.
| |
|
| |
|
| |
| {| style="width:100%" cellpadding=10 border="1"
| |
| |
| |
|
| |
| Rei / Shin / 1 Boost+ 1 Aura / Mid Screen
| |
|
| |
| 2A > 2A > 2D > 623+D > AC > j.D > 236+A > 2C > AC > j.BCD > 236+C (4 hits) > 236+A > 2Ax3 > 2A~E > 2Ax6 > 2A~E > 2Ax4 > HSC 236236+C > 2A > 2A > 2A > d.2A > Dribble.
| |
| |}
| |
|
| |
|
| |
| {| style="width:100%" cellpadding=10 border="1"
| |
| |
| |
| Shin / 1.2 Boost + 1 Aura
| |
|
| |
| 2A > 2C > 2D > 623+A > j.D > 236+A > 2C > 5D > 623+B > 2A > 2CC > hj.ABCD > 236+C (4 hits) > E~j.AB > 236+C (3 hits) > 236+E~C (3 hits) > 236+E~C (3 hits) > 236+A > 5D > 236236+C > 2A > 2A > 2A > d.2A > Dribble
| |
| |}
| |
|
| |
|
| |
| {| style="width:100%" cellpadding=10 border="1"
| |
| |
| |
| Jagi / 1 Boost + 1 Aura
| |
|
| |
| 2A > 2A > 2D > 623+A > AD j.D > 2CC > j.D > 236+C (1 hit) > 236+A > 2CC > hj.ABD > 236+C (4 hits) > E~j.B > 236+C (3 hits) > E~j.A > j.B > 236+C (3 hits) > 236+A > 236236+C > 2A > d.2A > Dribble
| |
| |}
| |
|
| |
|
| |
|
| |
| {| style="width:100%" cellpadding=10 border="1"
| |
| |
| |
| Juda / 1 Boost + 1 Aura
| |
|
| |
| 2A > 2A > 2D > 623+B > 2C > A+C> j.D > 236+A > 2A > 2CC > hj.ABCD > 236+C (4 hits) > E~j.B > 236+C (3 hits) > E~j.B > 236+C (3 hits) > 236+A > 236236+C > 2A > 2A > d.2A > Dribble
| |
| |}
| |
|
| |
| or
| |
|
| |
| {| style="width:100%" cellpadding=10 border="1"
| |
| |
| |
| 2A > 2A > 2D > 623+A > j.D > 236+A > 2CC > j.D > 236+C (1 hit) > 236+A > 2CC > hj.ABD > 236+C (4 hits) > E~j.B > 236+C (3 hits) > E~j.B > 236+C (3 hits) > 236+A > 236236+C > 2A > 2A > d.2A > Dribble
| |
| |}
| |
|
| |
|
| |
| {| style="width:100%" cellpadding=10 border="1"
| |
| |
| |
| Kenshiro / 1.5 Boost
| |
|
| |
| 2A > 2A > 2D > 623+AE > j.D > 236+AE > 2D > 6D > 623+B > 2Ax26 > 2A~E > CD > E~2A > CD > E~2A > 2Ax5 > 2D > 623+B > 2A > Dribble
| |
| |}
| |
|
| |
|
| |
| {| style="width:100%" cellpadding=10 border="1"
| |
| |
| |
| Kenshiro / 0.5 Boost / Left Corner / Player 1
| |
|
| |
| 2A > 2A > 2D > delay > 623+A > air dash backwards > j.C > 2D > 6D > 623+B > 2Ax26 > CDE > E~2A > CD > E~2A > 2Ax4 > d.2A > Dribble
| |
| |}
| |
|
| |
| Note: 623+B could be replaced by E~2A at the cost of 1 extra boost bar for both of those setups.
| |
|
| |
|
| |
|
| |
| {| style="width:100%" cellpadding=10 border="1"
| |
| |
| |
|
| |
| Kenshiro / 1 Boost + 1 Aura / Full Screen
| |
|
| |
| 2A > 2D > 623+D > AC > j.BD > 236+A > 2C > AC > j.BCD > 236+C (4 hits) > 236+A > 2Ax6 > 2A~E > 2Ax6 > 236236+C > 2A > E > 2A > E~2A > 2A > 2A > d.2A > Dribble
| |
| |}
| |
|
| |
| or
| |
|
| |
| {| style="width:100%" cellpadding=10 border="1"
| |
| |
| |
|
| |
| 2A > 2D > 623+B > 2C > AC > j.BD > 236+A > 2C > AC > j.BCD > 236+C (4 hits) > 236+A > 2Ax6 > 2A~E > 2Ax6 > 236236+C > 2A > E > 2A >E~2A > 2A > 2A > d.2A > Dribble
| |
| |}
| |
|
| |
| Note: Good low cost dribble setup when Toki has his back close to the corner.
| |
|
| |
|
| |
|
| |
| {| style="width:100%" cellpadding=10 border="1"
| |
| |
| |
| Raoh / 1.5 Boost
| |
|
| |
| 2A > 2C > 2D > 623+B > 2C > c.5D > 623+B > 2A > 2CC > AC > hj.BD > 236+C (3 hits) > 236+A > 2A > 2CC > 6D~E > E~2A > 2Ax15 > 623+B >2A > E~2A > 2Ax4 > A~E > 2A > Dribble
| |
| |}
| |
|
| |
| or
| |
|
| |
| {| style="width:100%" cellpadding=10 border="1"
| |
| |
| |
| 1 Boost
| |
|
| |
| 2A > 2C > 2D > 623+B > 2C > c.5D > 623+B > 2A > 2CC > AC > hj.BD > 236+C (3 hits) > 236+A > 2A > 2CC > 6D~E > E~2A > 2Ax16 > 623+B > 5B > 623+B > 2A > d.2A > Dribble
| |
| |}
| |
|
| |
| Slightly harder but this setup consumes less meter.
| |
|
| |
|
| |
| {| style="width:100%" cellpadding=10 border="1"
| |
| |
| |
| Raoh / 1.2 Boost / Mid Screen
| |
|
| |
| 2A > 2C > 2D > 623+D > A+C > j.B > j.D > 236+A > 2C > A+C > j.B > j.D > 236+C (2 hits) > 236+A > 2A > 2CC > 6D~E > delay > 2Ax18 > delay > 5B~E > CD > E~2A > 2A > 2A~E > 2Ax4 > d.2A > Dribble
| |
| |}
| |
|
| |
| Note: Make sure to delay the banishing strike after 5B~E.
| |
|
| |
| ==Dribble Pattern==
| |
|
| |
| This is Toki's basic pattern once he starts the dribble.
| |
|
| |
|
| |
| {| style="width:100%" cellpadding=10 border="1"
| |
| |
| |
| [2A > 2A > 2A > 2D > 623+B]xn > (around 55 hits) > [2A > 5D > 2D > 623+B]xn > (around 70 hits) > [2A > 2C > 2D > 623+B] xn > (around 100) > [2Axn > 2D > 623+B] xn > 623+B > 2A > 2C > CD (or charged) > 2D > 623+B > AC > j.B xn
| |
| |}
| |
|
| |
| xn = times a number
| |
|
| |
| ==Matchups==
| |
| ===Kenshiro===
| |
| X
| |
|
| |
| ===Raoh===
| |
| X
| |
|
| |
| ===Toki===
| |
| X
| |
|
| |
| ===Shin===
| |
| X
| |
|
| |
| ===Rei===
| |
| X
| |
|
| |
| ===Juda===
| |
| X
| |
|
| |
| ===Thouther===
| |
| X
| |
|
| |
| ===Jagi===
| |
| X
| |
|
| |
| ===Mr. Heart===
| |
| X
| |
|
| |
| ===Mamiya===
| |
| X
| |
|
| |
|
| {{Navbox-HNK}} | | {{Navbox-HNK}} |
| [[Category:Hokuto no Ken]] | | [[Category:Hokuto no Ken]] |
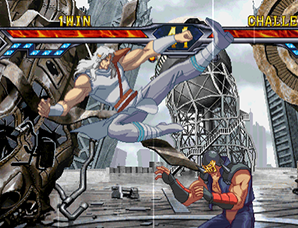
Introduction
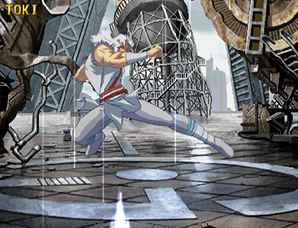
If you are even a little familiar with Hokuto no Ken, Toki probably needs no introduction. His ability to teleport around with no recovery allows for over-the-top mixups and pressure, and he has an answer to any situation, being fully equipped with two of the best reversal supers in the game, zero-startup low/high/air counter moves, a projectile, and a projectile reflector move. As his 2B has a long startup and he possesses no other low moves, Toki's mixup is centered more on confusing the opponent into guarding the wrong way than the usual high/low or low/throw styles. This makes for a fairly unique play-style, which can take some getting used to. However if you are playing to win and are willing to put in the effort, Toki is likely the best pick for you.
That being said, let us start this section off by listing Toki's main strengths and weaknesses.
|
|
| Pros |
Cons |
- Positive matchups against all characters; has two 9:1 matchups
- Can teleport all over the place at high speed with no recovery at all.
- Has three 1-frame startup counter moves which can be followed up with huge no gauge combos
- Throw causes wall bounce, and can be followed up with huge no gauge combos
- Has two of the best reversal supers in the game
- Great star reducing abilities
- Best FKO in the game
|
- 2B is his only low attack, and comes out quite slow
- 3-star FKO combos are fairly difficult to pull off
- People may hold a grudge against you for using him
|
Before diving right into the combos be sure to familiarize yourself with Toki's special/super moves and important normals.
Normal Moves
Standing
Close A
9F Startup, 4F Active, -3 on block
A weak-looking jab. Mostly useless.
Far A
9F Startup, 4F Active, +3 on block
A straight jab to the face. Mostly useless
Close B
9F Startup, 4F Active, -3 on block
A shin kick. Useful for hitting downed opponents.
Far B
6F Startup, 4F Active, -7 on block
A straight kick. Cancelable into itself. Its long range and fast startup make it very good for footsies. Can also be used against low air-dashing opponents.
Close C
13F Startup, 4F Active, -14 on block
An underhand palm attack. Mostly used in combos.
Far C
13F Startup, 6F Active, -8 on block
An upward punch. Slow startup, not very useful.
Close D
13F Startup, 4F Active, -6 on block
A downward chop. Used in some combos.
Far D
16F Startup, 4F Active, -6 on block
A backhand punch. Stuns opponent when it hits on the ground, can follow up with a Banishing Strike except vs Mr. Heart. Not very useful outside of combos.
Crouching
A

5F Startup, 3F Active, +5 on block
A low jab. Best move ever. Fast startup, advantage on guard. If at any point you aren't sure what to do, just hold down and mash A! Hits quite high so it will lose to some low moves like Shin's 2B.
B
16F Startup, 4F Active, -13 on block
A sweep kick that sends the opponent flying into the air. Toki's only low move. Its slow startup makes it somewhat less attractive than most of Toki's other mixup options, but it is important to throw it in every once in a while to keep your opponent crouching.
C
First hit: 9F Startup, 4F Active, -9 on block
Second hit: 5F Startup, 4F Active, -2 on block
A stylish upward jab. Can follow up with another crouching C on hit or guard, which can be Jump Canceled. Used in combos or as an anti-air.
D
11F Startup, 4F Active, -7 on block
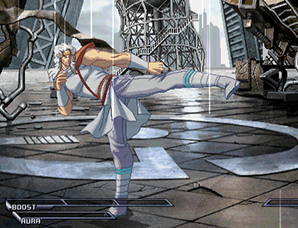
A two-handed forward thrust. Its long reach, quick startup, and small hitbox make this Toki's main rushdown move. Hits quite high so it will lose to some low moves like Shin's 2B.
Air
A
5F Startup, 8F Active
A downward jab. Mostly used in combos.
B
5F Startup, 8F Active
An upward kick. Used as an air vs air and in combos.
C
10F Startup, 6F Active
A two-handed downward chop. Wide horizontal range makes it useful as a cross-up in some situations.
D
9F Startup, 24F Active
A downward kick. Insanely long active time. Can be used as a cross-up
Other
6A
29F Startup, 4F Active, -2 on block
An overhead thrust that knocks the opponent into the air. Overhead attack. Not very useful when you consider Toki's other overhead options, but you can throw it in every once in a while to mix things up.
6B
17F Startup, 4F Active, -6 on block
A jump kick that knocks the opponent into the air. Can dodge low-hitting attacks. Not very useful except as a gimmick.
6D

17F Startup, 4F Active, -2 on block
A fancy-looking straight chop. Upper body invulnerability makes it useful for countering high-hitting attacks and as an anti-air. Hits overhead on Raoh and Heart, but won't hit other crouching characters.
Throw
5F Startup, 4F Active
Toki grabs his opponent and blasts them away from him. Opponent is thrown in the opposite direction of the lever, so for example if you input forward C, they will be thrown behind you. Causes wall bounce and can cancel into a teleport, allowing for no-gauge follow ups. Hands-down the best throw in the game.
Grave Shoot

13F Startup, 3F Active, -6 on block
A big upward kick that launches the opponent into the air. Can cancel into a teleport. Mostly used in combos.
Heavy Strike
41F Startup, 4F Active
A strong low thrust. Fairly short range but still useful in some situations. About middle-of-the-road as far as Heavy Strikes go.
Banishing Strike
19-39F Startup, 4F Active, -10 on block
Toki puts his hands together and unleashes a blast of energy. Mostly used in combos.
Special Moves
Hokuto Ryuukojin
214C
1F Startup
1 frame startup projectile reflector with Super Armor. Reflected projectiles take a star on hit. Toki becomes completely invulnerable on a successful reflection, and is able to act during this time. Cannot reflect beam-type projectiles.
Toukei Kohou
63214D
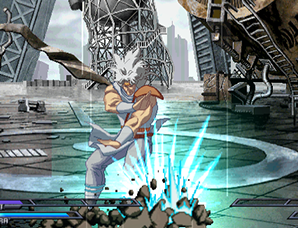
13F Startup
A slow-moving projectile that slides along the ground. Takes off one star on Counter Hit. Has short recovery and no limit to how many you can have on screen at one time. Can be used in combination with a teleport as a great wakeup option.
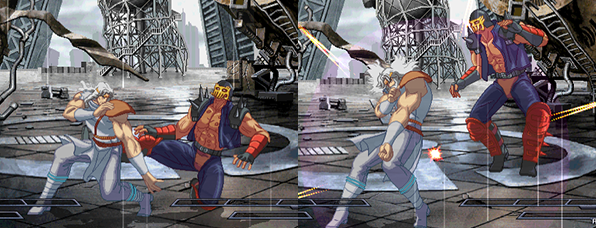
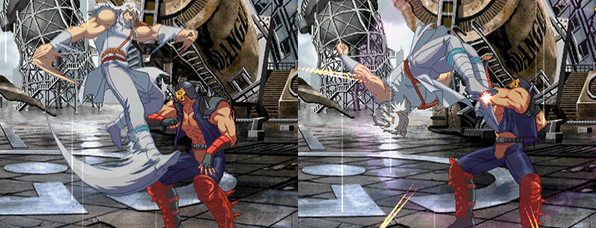
Tenshou Hyakuretsuken
(Air) 236C
9F Startup
Toki rapidly punches downward at his opponent. Takes off one star on Counter Hit. Cancelable into a teleport, except when low in the air. Very important in combos. Can also be used as an overhead after an air dash or by itself.
Hokuto Haryuushou
214A
1F Startup
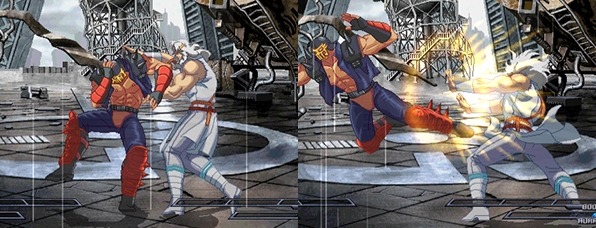
1 frame counter move for normal and high attacks. Takes off one star on Counter Hit. Won't work on projectiles or super moves. Causes wall bounce, and you can follow up with a teleport for a 70%~100% combo. Aside from using it on its own, it is also very good to use for baiting Guard Cancels.
Hokuto Suibugeki
214B
1F Startup
1 frame counter move for low attacks. Takes off one star on Counter Hit. Sends the opponent flying, and you can follow up with a teleport to continue into a combo. Not as awesome as Haryuushou because it doesn't cause wallbounce, but still insanely good.
Hokuto Shourinkyaku
(Air) 214D
2F Startup
Aerial counter move, and the only one with 2F Startup. Takes off one star on Counter Hit. Won't work on projectiles or super moves. Causes wallbounce vs grounded opponents, and recovery ends while still in the air.
Hokuto Musou Ryuubu (Forwards)
623A/B/C/D
A forward-moving teleport. A and C versions teleport you diagonally into the air, while B and D versions move straight ahead. The C and D versions have the same effect as the A and B ones, but move farther. Toki has almost no hitbox while teleporting, and the recovery can be canceled into any move.
Hokuto Musou Ryuubu (Backwards)
421A/B/C/D
A backward-moving teleport. A and C versions teleport you diagonally into the air, while B and D versions move straight back. The C and D versions have the same effect as the A and B ones, but move farther. Unlike the forward version, this one does have quite a bit of recovery. Pretty much useless for anything but messing around - which you can do if you want, you are Toki after all!
Hokuto Musou Ryuubu (Vertical)
(Land or Air) 236A
A vertical teleport. On the ground it shoots you up into the air, and in the air it quickly brings you back to the ground. Doesn't count as jumping so you can jump twice after using it on the ground. Used extensively both in and out of combos
Hokuto Ujou Danjinken
236236C (Uses 1 Bar Aura)
29F Startup pre flash, 1F Post flash
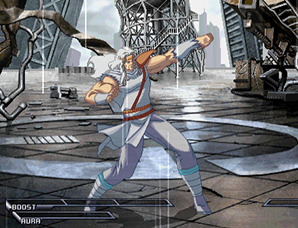
Toki strikes a pose, then speeds forward and past his opponent, striking them many times. Takes off one on normal hit and two stars on Counter Hit. No startup invulnerability, but fully invulnerable when Toki moves forward. Staple combo finisher and also used to begin Dribble/Hyakuretsu combos.
Hikou Sekkatsukou (Self)
214214B (Uses 1 Bar Aura)
Toki hits his own pressure points, powering up. Once activated, for a period of time the damage of Tenshou Hyakuretsuken, Toukei Kohou, and Hokuto Saihaken is increased, Tenshou Hyakuretsuken and the catch moves take one extra star than usual, and Toki's life doesn't recover. This move doesn't get much use as Toki usually has better use for his Aura, but it is by no means bad.
Hikou Sekkatsukou (Enemy)
236236B (Uses 1 Bar Aura)
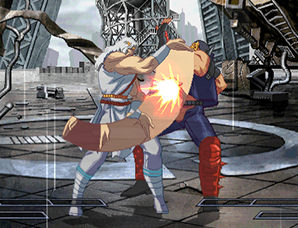
8F Startup pre flash, 0F Post flash
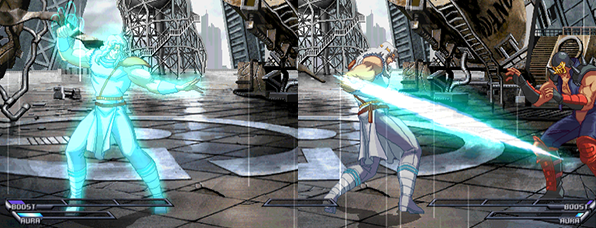
Toki winds up and strikes his opponent's pressure points. Takes two stars on normal hit, and will hit downed opponents. Counter hit causes wallbounce and takes 3 stars. Great reversal move, and has advantage on guard. For a period of time after connecting with this Toki's opponent is unable to recover health.
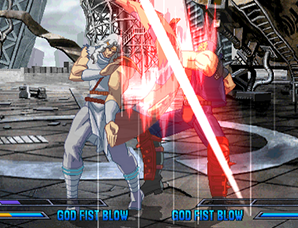
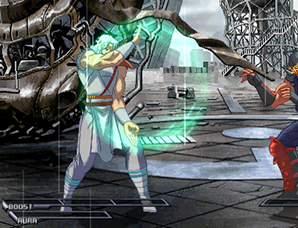
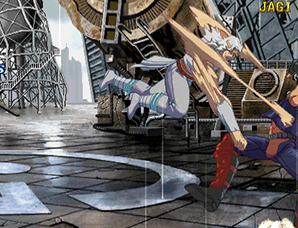
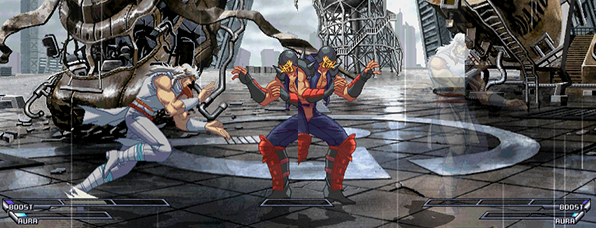
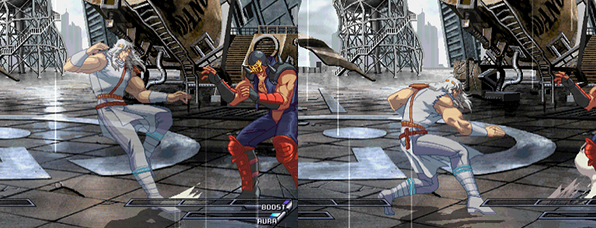
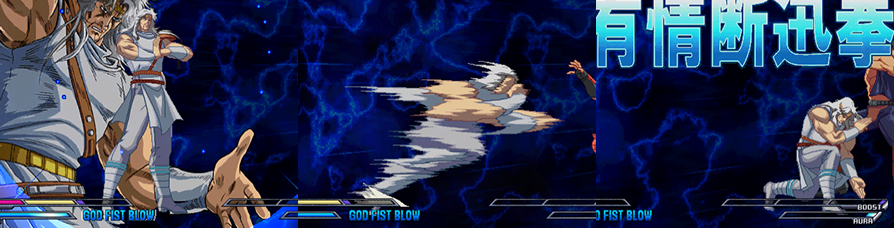
Hokuto Saihaken
214214C (Uses 1 Bar Aura)
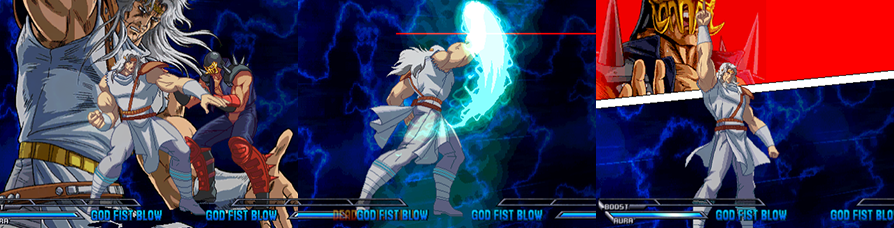
6F Startup pre flash, 3F Post flash
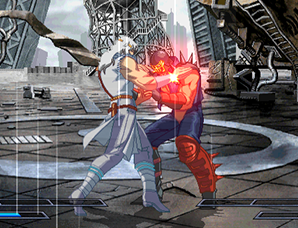
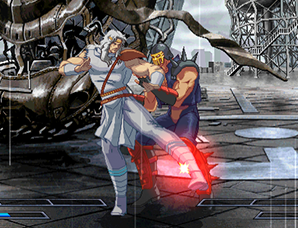
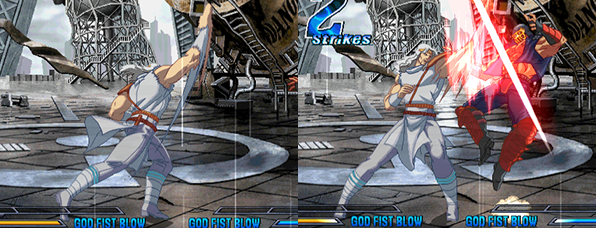
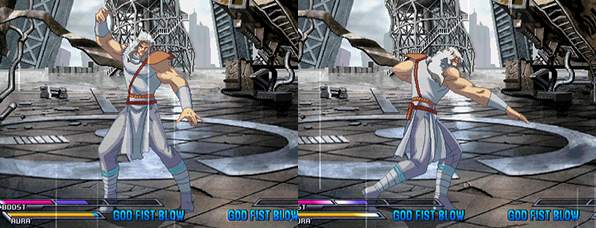
A huge uppercut. The ultimate anti-air attack - like Raoh's Shinkesshuu, this move cannot be blocked at all in the air. Takes off one on normal hit and two stars on Counter Hit. Opponent goes flying into the air on Counter Hit so you can continue into a combo. However, if this move is used to take off your opponents last star, a special animation plays(3rd picture), and follow up is not possible.
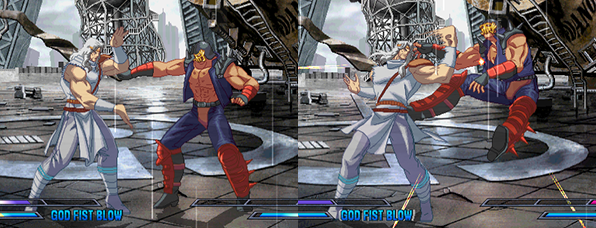
Hokuto Ujou Haganken
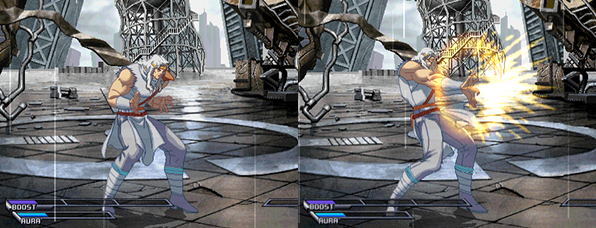
236CD (Fatal KO)

20F Startup pre flash, 5F Post flash
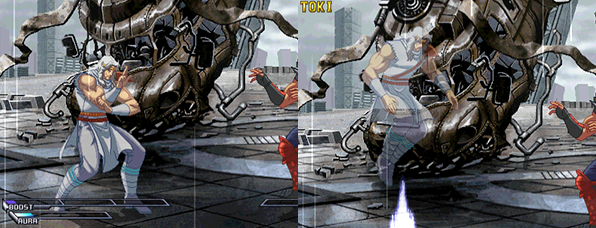
Toki sits down to relax for a moment, then shoots lazers from his hands and kills his opponent. Hits downed opponents. The lazer beams will also go through other projectiles, although this doesn't have much use except as a gimmick.
Game Navigation


