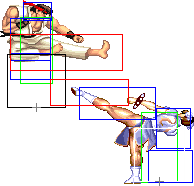
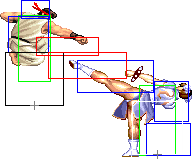
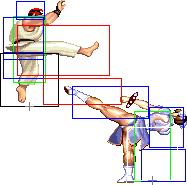
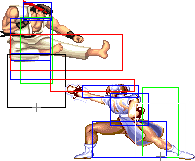
ReckyDaGuy (talk | contribs) No edit summary |
ReckyDaGuy (talk | contribs) No edit summary |
||
| Line 291: | Line 291: | ||
</div></div> | </div></div> | ||
}} | }} | ||
-------- | -------- | ||
==Even Matchups== | ==Even Matchups== | ||
| Line 297: | Line 302: | ||
=== | ===Guile (5.5-4.5)=== | ||
<br> | <br> | ||
{{Content Box|content= | {{Content Box|content= | ||
| Line 304: | Line 309: | ||
<br> | <br> | ||
''' | '''Advantage/Disadvantage'''<br> | ||
Chun has a slight advantage in this match because she can hang with Guile's turtling, but if she gets in, she can also harrass him badly with st.Strongs and cr.Forwards. Pretty much his only reliable option at that point is a very risky psychic Flash Kick. However, Guile can also rush down Chun. It is very hard for her to deal with his hop kick (towards or back + medium kick) mixed with cr.Jabs and Sonic Booms. (Yes, Guile can rush down with Sonic Booms, too.) | |||
'''Guile's Game Plan'''<br> | |||
Guile really has two options. Players such as Muteki will usually plays turtle style, hoping to wear you down little by little until eventually you get frustrated and try to rush him down. At this point, Chun will generally do something silly, like jumping in anticipation of a Sonic Boom, but guessing incorrectly and eating a Flash Kick. Guile then goes for the ambiguous cross-up, and it all goes downhill from there. | |||
'' | Other Guile players like Nakano Guile will tend to rush down Chun. He will play a "fake turtle" game where you think he's going to just keep throwing Sonic Booms, but after a while he'll predict one of your fireballs, hit you with a high j.Forward, then begin rushing down with hop kicks, cr.Jabs, throws, and Sonic Booms. This is surprisingly hard for Chun to stop, because most of her usual options (lightning legs, st.Strong, cr.Forward) will get stuffed before the hitting frames. | ||
'''Chun's Game Plan'''<br> | |||
Even though Chun can hang with Guile's turtling, she is more effective if she tries to rush him down with st.Strongs mixed with throws. Guile really has no good answer for this, as long as you don't get reckless (because he can Flash Kick you, of course, but that's risky for him to try). | |||
Another reason why turtling isn't that effective against Guile is because her Super is not very useful against him, so building meter isn't that important. Except from very close range, Guile can throw Sonic Booms fairly safely against Chun, even when she has meter. | |||
Basically, you want to close the gap, but you have to be patient in doing this. You can't just blatantly jump at him, but from the right distance you can jump at him pretty safely after he throws a Sonic Boom. If you're at the max range for Chun's j.Forward, you can jump at Guile and he won't really be able to answer with anything, so he'll be forced to block. After he blocks the j.Forward, you want to walk in and make him guess between a throw or a low move (preferably cr.Forward). Whether he blocks your low move or techs your throw, continue to rush him down with st.Strongs. If he doesn't tech, go for meaty [cr.Forward, cr.Fierce]. | |||
-- | Throughout the match, you should always be on the look-out for Guile's cr.Forward. This is the move Guile players like to poke with the most, but it has a good amount of lag afterwards. If you hang just outside of his cr.Forward range, you can punish Guile's whiffed cr.Forwards with a st.Strong or walk-up throw. | ||
< | '''Anti-Air'''<br> | ||
From close: upkicks, close st.Forward, close st.Strong | |||
From medium distance: upkicks, jump straight up Short or RH, far st.Forward | |||
From far: far st.Forward, jump straight up Short RH, make him land on a cr.Forward | |||
'''Misc. Notes'''<br> | |||
Definitely go for meaty D/F+RH if you get a clean knockdown. This is a very bad position for Guile to be in, especially if your opponent's not familiar with Chun's D/F+RH shenanigans. For one thing, she can do a meaty D/F+RH safely such that even if Guile reverses with a Flash Kick or super, Chun will be able to block in time, but if Guile doesn't reverse, he'll be forced to block Chun's D/F+RH, and then she gets a guessing game. Also, Chun can do the D/F+RH has a cross-up against Guile, so he also has to know which way to block, which can be pretty hard. (If you do the D/F+RH from point-blank range, it will cross-up. Otherwise, it's not a cross-up.) | |||
Also, you never want to jump at Guile unless you see the Sonic Boom. Even if you do correctly predict a Sonic Boom, you don't get anything for free because Chun's jump arc is too big, so don't take the risk of eating a Flash Kick. Only jump if you see the Sonic Boom. | |||
--[[User:NKI|NKI]] 20:59, 18 June 2007 (UTC) | |||
</div></div> | </div></div> | ||
| Line 341: | Line 345: | ||
=== | ===Dhalsim (5.5-4.5)=== | ||
<br> | <br> | ||
{{Content Box|content= | {{Content Box|content= | ||
| Line 348: | Line 352: | ||
<br> | <br> | ||
Needs more info! | |||
</div></div> | </div></div> | ||
| Line 361: | Line 359: | ||
=== | ===T. Hawk (5.5-4.5)=== | ||
<br> | <br> | ||
{{Content Box|content= | {{Content Box|content= | ||
| Line 368: | Line 366: | ||
<br> | <br> | ||
Needs more info! | |||
</div></div> | </div></div> | ||
| Line 384: | Line 373: | ||
=== | ===Dee Jay (5.5-4.5)=== | ||
<br> | <br> | ||
{{Content Box|content= | {{Content Box|content= | ||
| Line 391: | Line 380: | ||
<br> | <br> | ||
'''Advantage/Disadvantage'''<br> | |||
This is a fairly even match where neither character has a clear advantage over the other. Chun has good rush down and a superior super, but Dee Jay has superior turtling due to his excellent normals, and his fireball goes full screen. | |||
'''Dee Jay's Game Plan'''<br> | |||
Dee Jay wants to turtle heavily in this match, using his excellent normals to nullify Chun's rush down attempts. cr.Forward is very good because it knocks down and recovers so quickly that it's hard for Chun to punish on reaction. It's not like a Shoto cr.RH which can easily be punished with walk-up throw. He can also continue to use fireballs relatively safely even when Chun is up close. | |||
'''Chun's Game Plan'''<br> | |||
Chun can't really beat Dee Jay in a fireball war because her fireball won't reach Dee Jay from full screen, so she wants to rush him down. However, it is a good idea to throw fireballs with Dee Jay until you have meter, then start your rush down. Chun's super is a lot better than Dee Jay's, and if you have your super stored, you can even counter his super on reaction. | |||
After you get that meter, your next step is to close the gap. This usually is not a problem for Chun. You can do a j.Forward or j.Short from full screen over one of his fireballs, and there's not much he can do about it. At best he can trade, but then you've still closed the gap. Just make sure that you jump on reaction to one of his fireballs; otherwise, you'll eat upkicks. | |||
- | When rushing down Dee Jay, you'll want to use st.Strong a lot. If you get too predictable with the st.Strongs, he can use upkicks, so don't get sloppy. His upkicks will not hit your cr.Forward however, so you can do that safely. His ground normals (cr.Strong, cr.Forward, cr.Fierce) are all very good and will usually at least trade with yours, so you want to let him whiff and punish, either with st.Strong or walk-up throw. cr.RH is also good to use if you think he will fireball. Even if you trade, it's a good trade for you, because you get the knock down. | ||
'''Anti-Air'''<br> | |||
Short Upkicks if you are charged, jump straight up RH if you're not charged, or Super (if you have meter). You can also make him land on a Jab fireball, then follow up with meaty D/F+RH. | |||
< | '''Misc. Notes'''<br> | ||
Dee Jay has nothing to beat Chun's headstomp. Because of this, you can pull some shenanigans from about half screen (or a little bit closer). You can just blatantly jump at Dee Jay, and when he tries to do upkicks, do the headstomp to beat it clean. After that happens, the opponent will most likely not do upkicks again, allowing you to do [whiff headstomp, throw]. The throw is free for Chun she whiffs the headstomp. | |||
However, it should be stressed that this is nothing but shenanigans. It's good to use once in a while, but should not be relied on heavily. | |||
D/F+RH can be used as a safe meaty against Dee Jay. If he successfully reverses with upkicks, he will whiff backwards, and you can throw him as he lands. | |||
I would almost never do Lightning Legs against Dee Jay because his RH upkicks will beat it clean. | |||
If he crosses you up with j.Forward, it is not blocked as a cross-up. You need to block it as if it weren't a cross-up. Your other option is to just Spinning Bird Kick out of there. If you mess up your Spinning Bird Kick, a good Dee Jay will follow up the blocked cross-up with a cr.Jab, then either throw or do cr.Short xx Machine Gun Upper. ALWAYS just plan on teching the throw. If you stand up early to try to reversal throw, you could get hit by cr.Short xx Machine Gun Upper, that very well might dizzy you, and you could be done for the round. Teching the throw is the much better, safer option. | |||
--[[User:NKI|NKI]] 10:53, 21 June 2006 (CDT) | |||
</div></div> | |||
}} | |||
=== | ===Balrog (Boxer) (5.5-4.5)=== | ||
<br> | <br> | ||
{{Content Box|content= | {{Content Box|content= | ||
| Line 422: | Line 421: | ||
<br> | <br> | ||
This | '''Advantage/Disadvantage''' | ||
<br> | |||
''' | This is a mostly even match in slight favor of Chun. For the most part Chun controls the match until Boxer gets meter, at which point Boxer then controls the match. After he uses the Super, Chun once again controls the match. Chun has good tools to stop Boxer's rush down, but if she gets trapped in the corner, it can get ugly for her. No really dominating advantage for either character. | ||
<br><br> | |||
'''Boxer's Game Plan''' | |||
<br> | |||
''' | Boxer wants to rush her down as he does to pretty much everyone except Gief. His problem is that Chun can stop his rush down pretty well. For that reason, a huge part of the winning strategy for Boxer is to trade. There are virtually no bad trades for Boxer in this match, as he just does more damage in general. His most useful trade is when she does a fireball; he can st.Fierce or high rush and do nearly double the damage she does. | ||
<br><br> | |||
Boxer's Super also helps him a lot in this match, so many Boxer players will let Chun throw fireballs, doing either Short rushes or Jab shoulder charges between fireballs to build meter. | |||
<br><br> | |||
'''Chun's Game Plan''' | |||
<br> | |||
For the most part, Chun wants to turtle it up, because that's the best way to stop Boxer's rush down. She can use fireballs and cr.Forwards to keep him out. Lightning Legs will beat practically everything he has, but watch out for the shoulder charge. If he does a jumping attack to hit you out of lightning legs, he's going to have to do it so high that you get a free throw on him when he lands. | |||
<br><br> | |||
The only time Chun wants to go on the offensive is when Boxer is knocked down. She gets a free safe jump on him, and it is quite easy to time because even his fastest shoulder charge (the Jab version) has a whopping 11 frames of start-up before it can hit. His super has 6 frames of non-hitting start-up, so you can still safe jump even when he has meter. Getting him to throw away his super on a safe jump is huge, because that super is what's stopping you from throwing fireballs, and fireballs are a big part of Chun's strategy in this match. | |||
<br><br> | |||
After doing a safe jump (I use j.Forward), you need to hold down/back for just a split second in case he did get the reversal, then go for the throw or [cr.Forward, cr.RH]. | |||
<br><br> | |||
If Boxer gets meter, it's time to chill. You need to go into super turtle mode: stop throwing fireballs, stop whiffing cr.Forwards... just chill. You should only react to what he does. Most Boxer players are expecting you to chill, so it's at this time that you can sometimes surprise them with a blatant walk up throw, especially if one of you/both of you are low on life, but don't depend on this as a stable strategy. (Another good thing about walk up throw is that he can not catch you with the super while you are walking up--you can react and block in time.) | |||
<br><br> | |||
If Boxer throws you and goes for a meaty cr.Forward as you land, just throw him. (It doesn't matter if he crossed you up or not, you still get a free throw if he's within your throw range.) Upkicks are too risky if he blocks it, so be safe and go with the throw. | |||
<br><br> | |||
'''Anti-Air''' | |||
<br> | |||
''From far:''<br> | |||
-far st.Forward<br> | |||
-far st.RH<br> | |||
-make him land on a fireball (will probably trade with his jumping attack). Even though you lose the damage trade, you are in an excellent position. He has been knocked down, and you can do a risk-free meaty D/F+RH, followed by guessing game: throw, or [cr.Forward, throw], or [cr.Forward, cr.RH]. | |||
<br><br> | |||
''From close:''<br> | |||
-jump straight up Short<br> | |||
-jump straight up RH<br> | |||
-upkicks<br> | |||
-close st.Forward | |||
<br><br> | |||
Probably upkicks are the best bet, but if your reactions are quick enough, jump straight up RH is just as good. Jump straight up Short and close st.Forward will work decently, but you really want to get that knock down so that you can safe jump at him. | |||
<br><br> | |||
'''Anti-Shoulder-Charge''' | |||
<br> | |||
Because it's invincible, there's really nothing you can do about the shoulder charge as it's coming out. However, if he whiffs it from up close, you can do: | |||
<br><br> | |||
cr.Forward xx RH upkicks (good damage, knocks down) | |||
<br> | |||
if you're not charged: cr.Forward, cr.Fierce (high dizzy potential) | |||
<br> | |||
if you are charged: meaty cr.Forward as he lands, close st.Fierce xx Fierce fireball (almost certainly will dizzy) | |||
<br><br> | |||
If he whiffs from far away, you can do: | |||
<br><br> | |||
far st.Fierce, meaty fireball as he lands (decent damage) | |||
<br> | |||
jump straight up RH (knocks down) | |||
<br> | |||
walk up cr.RH (knocks down) | |||
<br><br> | |||
Of course if you have meter, just do the Super so that he's grounded for all 6 hits. | |||
<br><br> | |||
'''Anti-Rush''' | |||
<br> | |||
Chun's cr.Forward and fireballs are her best weapons against his rushes. Her cr.Forward will also beat his st.Fierce in case he tries to trade with your fireballs. Every time you see him do a rush, do an option-selected cr.Forward. Time is such that if he did a low rush, you will block, but if he did a high rush (for the throw attempt), you will hit him. If it does hit, follow up with cr.RH for the two hit combo. | |||
<br><br> | |||
Lightning legs will also beat his low rush clean, but it will sometimes trade with his straight rush, so be careful. | |||
<br><br> | |||
'''Misc. Notes''' | |||
<br> | |||
-It is not safe to pop Super on Boxer while he is just ducking. On reaction, Boxer can do shoulder charge to beat your super clean. | |||
<br> | |||
-Don't bother with cross-ups - they're not needed when you have the safe jump. | |||
<br> | |||
-You want to avoid trading with Boxer at all costs, unless you can knock him down. He just does too much damage. | |||
--[[User:NKI|NKI]] 16:02, 15 May 2006 (CDT) | |||
' | When in the corner and Boxer has super, Try to tick him 2/3 times with cr forward to get him to about 3/4 screen. If you do this, He can't really use his super, because the 3rd hit will glitch and you get a free throw. | ||
[[User:Kenny Ng|Unessential]] 14:34, 2 November 2013 (UTC) | |||
</div></div> | </div></div> | ||
| Line 447: | Line 506: | ||
=== | ===Old Ryu (5.5-4.5)=== | ||
<br> | <br> | ||
{{Content Box|content= | {{Content Box|content= | ||
| Line 454: | Line 513: | ||
<br> | <br> | ||
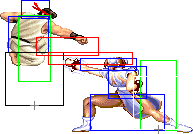
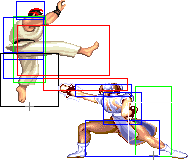
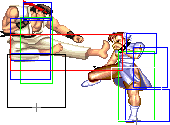
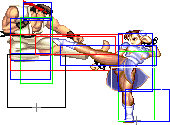
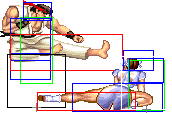
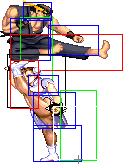
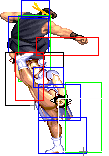
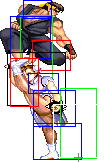
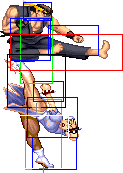
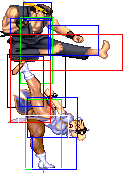
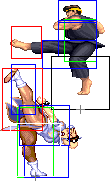
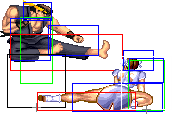
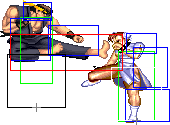
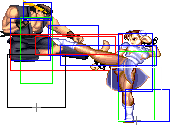
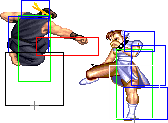
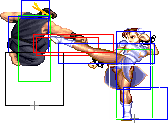
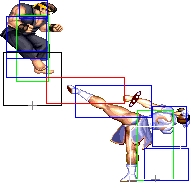
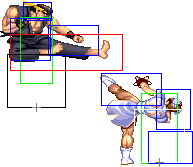
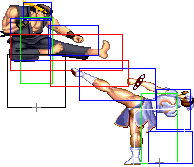
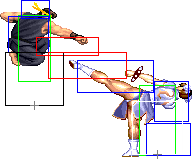
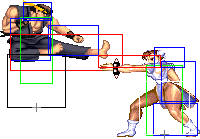
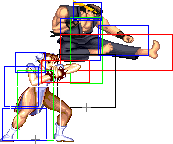
'''Matchup Specific Anti-Airs''' | |||
Old Ryu is infamous for his Diagonal Jumping Rh, its horizontal priority is practically infinite. It is an issue for a lot of characters, but not for Chun. This is because its vertical priority is actually abysmal, because unlike Ryu his butt stays exposed the whole duration of the move, a weakness Chun can fully exploit from the ground. However, because of this move he will dominate any aerial encounter with great ease. | |||
*Far Standing Rh: | |||
[[image:Zagi_oRyu_JHK_vs_farHK.png]] [[image:Zagi_oRyu_JHP_vs_farHK.png]] [[image:Zagi_oRyu_njHK_vs_farHK.png]] | |||
This move dominates all his aerial options, period. Be sure to be close enough to reach his butt. If he is too far you can use Far Standing Fierce or Crouching Rh instead for better reach. | |||
*Far Standing Fierce: | |||
[[image:Zagi_oRyu_JHK_vs_farHP.png]] [[image:Zagi_oRyu_JHP_vs_farHP.png]] [[image:Zagi_oRyu_njHK_vs_farHP.png]] | |||
It is useful for its additional reach over Far Standing Rh. It also comes out faster for situations where Far Standing Rh would be too slow. O.Ryu can evade this move with a late air Tatsu, he will land behind you and throw you for free. Not exactly a big deal as long as the throw don't kill you. It will often trade with his Diagonal Jumping Fierce and his Neutral Jumping Rh. | |||
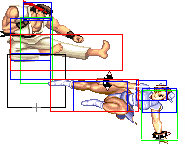
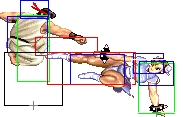
*Crouching Rh: | |||
[[image:Zagi_oRyu_JHK_vs_crHK.png]] [[image:Zagi_oRyu_JHP_vs_crHK.png]] [[image:Zagi_oRyu_njHK_vs_crHK.png]]<br> | |||
Grants you even greater range over Far Standing Fierce. O.Ryu can evade this with a late air Tatsu as well. It will often trade with his Diagonal Jumping Fierce and his Neutral Jumping Rh. | |||
<br> | |||
*Close Standing Forward: | |||
[[image:Zagi_oRyu_JHK_vs_closeMK.png]] [[image:Zagi_oRyu_JHP_vs_closeMK.png]] | |||
<br> | |||
Her Close Standing Forward beats all his jump attacks clean, however there are two caveats to this. First one is obvious, you have to be close enough to get this version of Forward kick, sometime easier said than done. Second is, if Ryu jumped from up close, [https://youtu.be/QAfe6A6BEyw?t=116 instead of a normal attack he can do an air tatsu a little after his apex], not only evading your attack completely but hitting you in the back and knocking you down. For this move to be safe you have to use it only when Ryu is barely close enough to trigger your Close Standing Forward, any closer and you may want to use another move instead: Close Standing Rh. | |||
<br> | |||
*Close Standing Rh: | |||
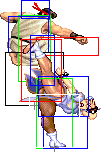
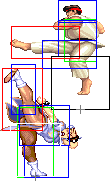
[[image:Zagi_oRyu_JHK_vs_closeHK.png]] [[image:Zagi_oRyu_JHP_vs_closeHKstartup.png]] → [[image:Zagi_oRyu_JHP_vs_closeHK.png]][[image:Zagi_oRyu_airtatsu_vs_closeHK.png]]<br> | |||
Unlike N.Ryu it can stuff his Diagonal Jump Rh clean, but it's a good idea to aim for a trade regardless in case a Diagonal Jumping Fierce comes out instead. | |||
<br> | |||
*Far Standing Forward: | |||
[[image:Zagi_oRyu_jHK_vs_farMKstartup.png]] → [[image:Zagi_oRyu_jHK_vs_farMK.png]]<br> | |||
< | Despite O.Ryu Diagonal Jumping Rh gigantic horizontal priority, you can still exploit the transition of your Far Standing Forward from startup to active part to trade with his attack. Use it only when Ryu jumps from too far to reach your standing stance. Be sure to do it late enough so it don't get stuffed by his aerial attack. | ||
<br> | |||
*Crouching Forward: | |||
[[image:Zagi_oRyu_jHK_vs_crMK.png]] → [[image:Zagi_oRyu_JHK_vs_crMKlanding.png]]<br> | |||
You have so many options against O.Ryu it is easy to forget about this one, but it is a great anti air as long as Ryu jump from too far to reach your crouched stance. This move may have less range than Guile's, but yours come out faster, combined with your superior walk speed you can sometime walk forward a bit just to get in range while Ryu is still in the air. | |||
<br> | |||
*Note about Tenshou Kyaku: | |||
This is Chun's dedicated anti air so you may be tempted to use it, especially if you mastered the kara tensho technique. However Ryu can easily evade it if he go for an air tatsu instead of a regular attack. It is a lot harder for him to avoid your tensho that way when you are cornered, making it more viable in this scenario.<br> | |||
There is a second way to use the tensho, the haya oki tensho (early rising tensho.) It involve the use of her Rh tensho in Ryu's very early state of his jump, so the second active part meet him in the air before he do any attack. I'm not familiar enough with this to comment it any further, but I know top Japanese Chuns are. | |||
*Note about Super: | |||
It can be done so, if timed right, Ryu take all 6 hits grounded. Great! In theory... because it has to be done so early, Ryu can still evade the super if he went for a late air tatsu instead of a regular jump attack. And making you waste that super is every Ryu's wet dream. | |||
</div></div> | |||
}} | |||
== | ===Old T.Hawk (5-5)=== | ||
<br> | <br> | ||
{{Content Box|content= | {{Content Box|content= | ||
| Line 497: | Line 574: | ||
<br> | <br> | ||
Old T.Hawk has better normals than New Hawk and also better Typhoon Traps. Kikoken isn't useful due to Condor Dive, so try to have an air to air battle to see if he is a Rising Hawk or Condor Dive spammer. Tenshokyaku or crouching Roundhouse are great anti airs against Condor Dive. Keeping him away is the key to winning. | |||
</div></div> | </div></div> | ||
| Line 506: | Line 581: | ||
=== | ===Chun-Li (Mirror Match)=== | ||
<br> | <br> | ||
{{Content Box|content= | {{Content Box|content= | ||
| Line 513: | Line 588: | ||
<br> | <br> | ||
Needs more info! | |||
</div></div> | </div></div> | ||
| Line 523: | Line 595: | ||
===Ryu ( | ===Ryu (4.5-5.5)=== | ||
<br> | <br> | ||
{{Content Box|content= | {{Content Box|content= | ||
| Line 530: | Line 602: | ||
<br> | <br> | ||
'''Advantage/Disadvantage''' | |||
<br> | |||
Chun can effectively lock Ryu down if she is controlling the match, but if she gets stuck in a fireball trap, it can be very difficult to get out. | |||
<br><br> | |||
'''Ryu's Game Plan''' | |||
<br> | |||
Ryu's fireball is much better than Chun's (he doesn't have to charge for it, and it will go full screen), so he basically just wants to fireball her to death. If he can zone her with fireballs and push her back into the corner, his most effective range is a little bit more than half screen away with Chun in the corner. At that distance, she can't react to a fireball by jumping over it because that's easily countered with a DP, and she can't keep up with his fireballs because she has no time to charge. Because she's in the corner, jumping straight up over a fireball (especially a Fierce fireball) doesn't really give her a whole lot of advantage. Her best option is just to jump back over a fireball (so that she's charged), then either do air Spinning Bird Kick as she lands or throw a fireball to build meter. Her super is the only really effective way to get out of that situation. | |||
<br><br> | |||
If Ryu can keep her zoned with fireballs at that range, it is a fairly easy match for him. | |||
<br><br> | |||
While his Super is very good, Ryu getting meter is not a huge turning point in the match like it is for some of his other matches (Sim, O.Sagat, etc), especially if Chun has meter. If Chun has meter, Ryu should be very weary about using his super. | |||
<br><br> | |||
'''Chun's Game Plan''' | |||
<br> | |||
Chun's ideal range in this match is just outside of Ryu's cr.RH range. She has two big advantages from that range. | |||
<br><br> | |||
The first advantage is when you have meter, because her Super nullifies pretty much everything Ryu has. Even if he has meter, you can react to his super and counter with yours (assuming you have it stored already). So once you have meter, store the Super and stay just barely out of range of his cr.RH. Hold down/towards, and react to whatever he does. From that range, a lot of people will try to either do a regular fireball, the Super, or air hurricane kick back (or towards). All of those are punishable by Super. If he does an air hurricane kick over your head, make sure you switch your charge direction, walk towards just a bit, then catch him when he lands. | |||
<br><br> | |||
Even if you don't have meter, from that range she can completely zone Ryu using st.Forward and st.Strong. You can safely whiff st.Forwards because you are outside of his footsies range, but if he tries a fireball or a hurricane kick, he gets beat cleanly. His only options are to psychic DP (which is very risky), or to try to fireball in-between your cr.Forwards (very difficult). | |||
<br><br> | |||
If he whiffs a cr.Forward or cr.RH, walk up and throw. | |||
<br><br> | |||
After you're in his face and you've stuffed several fireball attempts, and all of his normals are whiffing and getting punished by throws, he will start to hesitate, and that's when you just go in for the blatant throw out of nowhere. If he start wising up to the walk-up throw, and he tries to stop you with a normal, use your st.Strong to beat his normal. | |||
<br><br> | |||
If you're not inside the ideal range and you're getting bombarded with fireballs, Chun can punish his fireballs from full screen using a j.Forward. A lot of Ryu players try to reversal with a DP or another fireball, both of which will lose cleanly to Lightning Legs. The only thing Ryu can do to stop you from jumping in from that range is if he does a rush punch (towards+Fierce) to get closer, then he can DP you. | |||
<br><br> | |||
*'''Anti-Airs''' | |||
<br> | |||
Against Ryu, her best anti-air (aside from the super) is jump straight up RH. Upkicks are pretty much worthless because Ryu can just do an air hurricane kick to beat upkicks clean. In the worst case scenario (he trades an air hurricane kick with your jump straight up RH), you both get knocked down, so he can't continue the pressure. | |||
<br><br> | |||
After you hit him with out of the air with jump straight up RH, you should follow it up with something: [meaty cr.Forward, cr.Fierce] or max range lightning legs (100% safe unless he has meter). | |||
<br><br> | |||
If you have meter, always do the super as anti-air. It is not too hard to time it such that Ryu is grounded for all 6 hits. If he does an air hurricane kick, it is extremely easy to time. | |||
<br><br> | |||
*'''Detailed Analysis''' | |||
Ryu's most annoying aerial attack is his Diagonal Jumping Rh, because it has both good horizontal and vertical priority on top of a very good range. | |||
*Close Standing Forward: | |||
[[image:Zagi_Ryu_JHK_vs_closeMK.png]] [[image:Zagi_Ryu_JHP_vs_closeMK.png]] [[image:Zagi_Ryu_JLK_vs_closeMK.png]] | |||
Her Close Standing Forward beat his Diagonal Jumping Rh clean, however there are two caveast to this. First one is obvious, you have to be close enough to get this version of Forward kick, sometime easier said than done. Second is, if Ryu jumped from up close, [https://youtu.be/QAfe6A6BEyw?t=116 instead of Rh he can do an air tatsu a little after his apex], not only evading your attack completely but hitting you in the back and knocking you down. For this move to be safe you have to use it only when Ryu is barely close enough to trigger your Close Standing Forward, any closer and you might want to use another move instead: Close Standing Rh. | |||
*Close Standing Rh: | |||
[[image:Zagi_Ryu_JHK_vs_closeHKstartup.png]] → [[image:Zagi_Ryu_JHK_vs_closeHK.png]] [[image:Zagi_Ryu_JLK_vs_closeHKstartup.png]] → [[image:Zagi_Ryu_JLK_vs_closeHK.png]] [[image:Zagi_Ryu_airtatsu_vs_closeHK.png]] | |||
A very useful move, it will annihilate any air tatsu that come close enough above you. It also trade with all his aerial attacks if timed right. Be careful of his Diagonal Jumping Short, its priority is surprisingly good, you have to do it late enough so it don't beat your move clean. | |||
*Crouching Forward: | |||
[[image:Zagi_Ryu_JHK_vs_crMK.png]] → [[image:Zagi_Ryu_JHK_vs_crMKlanding.png]] | |||
' | If Ryu jumps far enough to not reach your crouched stance with his longest range attack, your Crouching Forward will hit him on his landing frame. This move may have less range than Guile's, but yours come out faster, combined with your superior walk speed you can sometime walk forward a bit just to get in range while Ryu is still in the air. | ||
*Far Standing Forward: | |||
[[image:Zagi_Ryu_JHK_vs_farMKstartup.png]] → [[image:Zagi_Ryu_JHK_vs_farMK.png]] [[image:Zagi_Ryu_jHP_vs_farMKstartup.png]] → [[image:Zagi_Ryu_jHP_vs_farMK.png]] | |||
''' | This is a trade anti air, use it only when Ryu jump from too far to reach your standing stance. Be sure to do it late enough so it don't get stuffed by his aerial attack. | ||
<!--This is a trade anti air, be careful to do it late enough so it don't get stuffed by his aerial attack. Note that in the example pictured above Ryu is so far that your move would get stuffed clean by Ryu's Diagonal Jumping Ferce, but if you let him get closer before you activate it can cover both his Fierce and Rh options.--> | |||
*Far Standing Rh: | |||
[[image:Zagi_Ryu_JHK_Startup_vs_farHK.png]] [[image:Zagi_Ryu_JHK_vs_farHKstartup.png]] → [[image:Zagi_Ryu_JHK_vs_farHK.png]] [[image:Zagi_Ryu_JHP_vs_farHK.png]] | |||
This move has to be used when Ryu jumps too close for both your Crouching Forward and Far Standing Forward to have a chance to trade, but not close enough for your Close Stading Forward to activate. Ryu's butt is very exposed during his startup so chances are you going to hit that, if not it will hit as a trade if not done too early. | |||
*Far Stading Jab: | |||
[[image:Zagi_Ryu_JHK_vs_farLP.png]] | |||
For when Ryu jumps from afar but too close to use Crouching Forward, your Far Standing Jab has a better horizontal priority than his Diagonal Jumping Rh so it will beat that clean. Useful in situations you really want a clean anti air, and not a trade. However if he jump with say Fierce instead, you are both going to whiff each other and he will land safely very close to you. So only use it when you are 100% sure he is going to jump with Rh. | |||
*Cross down Close Standing Jab: | |||
[[image:Zagi_Ryu_JHK_vs_crossdownLP.png]] | |||
If Ryu jumps from close enough to cross you up you can walk under him to evade his attack completely, then your Close Standing Jab hit him clean in the back on his way down. Note that this move do insane damage for such a fast attack. | |||
< | *Note about Tenshoukyaku: | ||
This is Chun's dedicated anti air so you may be tempted to use it, especially if you mastered the kara tensho technique. However Ryu can easily evade it if he go for an air tatsu instead of a regular attack, and do a nasty punish on you (3 hits of jump mp + 2 hits of Shinkuu if he got meter). It is a lot harder for him to avoid your tensho that way when you are cornered, making it more viable in this scenario.<br> | |||
There is a second way to use the tensho, the haya oki tensho (early rising tensho). It involve the use of her Rh tensho in Ryu's very early state of his jump, so the second active part meet him in the air before he do any attack. I'm not familiar enough with this to comment it any further, but I know top Japanese Chuns are. | |||
*Note about Super: | |||
It can be done so, if timed right, Ryu take all 6 hits grounded. Great! In theory... because it has to be done so early, Ryu can still evade the super if he went for a late air tatsu instead of a regular jump attack. And making you waste that super is every Ryu's wet dream. | |||
'''Anti-Fireball''' | |||
<br> | |||
Far st.Forward and far st.Strong are both good at stuffing fireballs. Far st.Fierce can also be used from much further away, but it has considerable lag, so use it only if you are certain he will do a fireball. And of course you can super through the fireball if you have meter. | |||
<br><br> | |||
If you are stuck in the corner, you can do jump back Spinning Bird Kick over fireballs to build meter. Be careful though, because if he see's this coming, he can deley his fireball and make you land on it. | |||
<br><br> | |||
'''Anti-Hurricane-Kick''' | |||
<br> | |||
If the hurricane kick is just starting up, far st.Forward is her best counter. If he's already spinning and coming towards you, st.Short will beat it cleanly. If he's already passed over your head and he's spinning away from you, you can catch him with a far st.Fierce, far st.Strong, or super (just one hit). Lightning legs will usually beat hurricane kick cleanly. | |||
<br><br> | |||
After he has passed over you and is spinning away from you, be careful when using normals to counter his hurricane kicks. If his spinning leg is facing you, you will trade or lose cleanly. If his spinning leg is facing away from you, you will beat him cleanly. If you're low enough on life where a hurricane kick will kill you, it might not be a good idea to try to hit him. | |||
<br><br> | |||
'''Misc. Notes''' | |||
<br> | |||
-If you have the Super stored, don't be afraid of Ryu's Super. On reaction, you can Super through his Super. | |||
<br> | <br> | ||
-Meaty instant head stomp for the kill is good against Ryu because all of his DPs lose cleanly to head stomp. | |||
<br> | <br> | ||
</div></div> | </div></div> | ||
| Line 583: | Line 719: | ||
=== | ===Fei Long (4.5-5.5)=== | ||
<br> | <br> | ||
{{Content Box|content= | {{Content Box|content= | ||
| Line 590: | Line 726: | ||
<br> | <br> | ||
'''Misc. Notes''' | |||
Although it looks infinite, Fei can only do guaranteed [st.Fierce xx Chicken Wing] three times, because he's slowly getting pushed back a tiny bit each rotation. After the third Chicken Wing, if he tries to go for another st.Fierce, you can actually throw him. This turns the moment after the third Chicken Wing into a guessing game between Flame Kick (if he thinks you'll try to throw), or take a step forward, then start the [st.Fierce xx Chicken Wing] for another three reps. (Each rep is doing good block damage, mind you.) | |||
There are a few things Chun can do once she's stuck in that trap. Her options are: | |||
*'''Upkicks:''' There is a crazy property of the Chicken Wing where you can actually stand block while holding D/B. You have to stand block the first hit of the Chicken Wing, then immediately hold D/B. Even though you're holding D/B, Chun will stand block the next hit of the Chicken Wing (which is necessary, because it's an overhead and can't be duck blocked). This allows you enough time to charge upkicks by the time the next Chicken Wing comes around. The problem with this is that even though the upkicks will beat Chicken Wing cleanly, sometimes it just goes straight through Fei, he lands, then you fall helplessly into [st.Fierce xx Rekka Ken x3]. | |||
*'''Jump straight up RH:''' This will usually just trade (at least it gets him off you), but it is extremely hard to time, and if you time it wrong, you get juggled by 3 hits of Chicken Wing, then he gets to start the trap on you again as you get up. | |||
*'''Far st.RH:''' This will actually beat Chicken Wing cleanly. The problem is that it is quite hard to do (seemingly random), and if you mess up, you eat [3 hits of Chicken Wing, st.Fierce xx Rekka Ken x3], which is about 50%-60% damage and probably dizzy and probably peace out...HELLA not worth the risk. | |||
*'''Walk forward to go under him:''' This only works if he is doing the RH version of Chicken Wing. A good Fei Will do the Forward (medium) version so that you can't walk under it. This is why (as Tama said) he can only do it three times. You can do the RH version infinitely, but she can walk under at any time. Again, if you try to walk under him and he does the Forward (medium) version, you'll eat the above combo, probably be dizzied, and probably lose the round. | |||
*'''Spinning Bird Kick:''' Because it's invincible, you can use SBK to make his Chicken Wing whiff. The problem is that because he recovers instantly from the Chicken Wing, he can simply cr.Jab you out of the SBK, then start the trap again. | |||
Reversal throwing is a good idea here. A lot of times the Fei player won't get the timing perfect on the st.Fierce, so you can throw them. This is not guaranteed (Fei can do the st.Fierce for free if he times it right), but it works a lot of times. It's actually not all bad if you get hit by a Flame Kick while trying to reverse throw, because then the Fei player gets the idea "Oh, they're trying to reverse throw...I can catch them with Flame Kick", and they'll try to do that every once in a while, which creates an opening for Chun if you block it. | |||
--[[User:NKI|NKI]] | |||
</div></div> | </div></div> | ||
| Line 600: | Line 751: | ||
=== | ===Vega (Claw) (4.5-5.5)=== | ||
<br> | <br> | ||
{{Content Box|content= | {{Content Box|content= | ||
| Line 607: | Line 758: | ||
<br> | <br> | ||
'''Chun's Game Plan''' | |||
Turtle it up. Chun controls that match on the ground because lightning legs beat all of Claw's normals, and upkicks beat his jump-ins. He has to take it to the air, so it becomes a guessing game between wall dive, punch wall dive, and wall dive fake-out. Chun has an answer for all three, but you have to guess right. If he does real wall dive, just do jump back medium kick. (Or if he tries to do real wall dive off of your wall, just air throw him before he gets to the wall.) If he does punch wall dive or wall dive fake-out, just fireball him. | |||
</div></div> | |||
}} | |||
-------- | |||
==Disadvantage Matchups== | |||
-- | ===Old Sagat (4-6)=== | ||
<br> | |||
{{Content Box|content= | |||
<div class="mw-collapsible mw-collapsed" style="padding: 30px;"> | |||
<div class="mw-collapsible-content"> | |||
<br> | |||
Needs more info! | |||
</div></div> | </div></div> | ||
}} | }} | ||
===Akuma ( | |||
-------- | |||
==Serious Disadvantage Matchups== | |||
===Akuma (2.5-7.5)=== | |||
<br> | <br> | ||
{{Content Box|content= | {{Content Box|content= | ||
| Line 645: | Line 804: | ||
<br> | <br> | ||
Call a tournament organizer. If one is unavailable, | Call a tournament organizer. If one is unavailable, pretend to be one and disqualify your opponent yourself. | ||
</div></div> | </div></div> | ||
Revision as of 20:45, 22 March 2023
Chun-Li may have trouble against jump-ins due to her lack of a reliable anti-air, but her strong neutral options and speed allow her to earn winning to even matchups against most of the cast.
Matchup placements are based off of Goukipedia's JP Average Matchup chart. Most old characters aren't played at a high enough level to warrant tier list placements, so with the exception of Old Ryu, Ken, T.Hawk, and Sagat, they'll be listed alongside their New counterparts.
| Serious Advantage (10-7) |
|
|---|---|
| Advantage (6.5-6) |     
|
  
| |
| Even (5.5-4.5) |     
|
    
| |

| |
| Disadvantage (4-3.5) | 
|
| Serious Disadvantage (3-0) |

|
Advantage Matchups
E. Honda (6.5-3.5)
Honda's Game Plan Get in. do stuff. win.
Chun's Game Plan
Keep honda out by throwing lots of fireballs. Watch out for when Honda gets into buttslam range though. Once you see that happens, simply jump back. If you're in the corner, push him forward and inch forward, or walljump. Heck, you can even stay in the corner and still fight this pretty damn well.
The start of this match is just outside Honda's buttslam range. Many new players don't realize this and will try an opening buttslam. That's why it's often advised neutral jump at the beginning. With practice, you can time it to beat an opening headbutt (unless the Honda has the timing down) and throw the buttslam.
If you get your Lightning Legs out first, they will beat out Honda's HHS. If you're unlucky enough for Honda to get in on you, it's just a guessing game to get out. If you're in the corner, hope he doesn't start an Oicho loop. It's a guessing game between poking and footsies, and if Honda's going to jump at you.
Keep in mind, if you predict a buttslam, you can neutral jump throw, just like at the beginning of the match.
There is much Honda can do once he gets in, and everything needs a different answer. The goal is to keep him out, just like any other grappler. You can randomly jump forward fierce at Honda and it will beat mostly everything he has. But make sure you always blockstring to a safe distance. If you get a knockdown, same thing. or just keep your distance with a meaty Kikoken.
Blanka (6.5-3.5)
Advantage/Disadvantage
Chun's strength is in her turtling ability, but Blanka's jump is so quick and his normals are so good, it's pretty hard to keep him out the entire round.
Blanka's Game Plan
Blanka wants to get in and bite you, and he also doesn't mind trading with you on his way in, because he does more damage in general. Once he gets in, he can start some shenanigans with j.Short, and because Chun has to charge for Tenshokyaku, it's hard for her to get out.
Chun has no way to get out of his ticks if they start with a cross-up j.Short, because her only reversals are charge moves: she's lost her horizontal charge because Blanka crossed her up, and she's lost her vertical charge because she had to stand up to block the j.Short.
If Chun duck-blocks a Blanka Ball (or if she gets hit by it while ducking), the only thing she can punish with is the Super. However, if she is standing when she gets hit or blocks, she can retaliate with a walk-up st.Strong. (The Blanka Ball is usually not used much though, because Chun will be throwing a lot of fireballs.)
Chun's Game Plan
Chun wants to keep Blanka out with well-placed fireballs and cr.Forwards. You can't be sloppy or over-anxious with the fireballs, because Blanka can easily jump over your fireballs on reaction. With his quick jump and high-priority jumping attacks, you can only do a fireball when you are sure he will not jump (for example, when you know he will do a normal move). He will try to slide at you because it has good range and moves him forward. This is a good time to do a fireball, but make sure it's done early enough to hit him cleanly out of the slide.
While Chun has good normals, Blanka also has good normals, and better throw range. Chun can essentially create a wall with fireballs and jump straight up Short, and it can be hard for Blanka to get in. However, unlike most of her other matches, being in the corner actually helps Chun against Blanka, because then he can't cross her up there.
If you knock down Blanka, you should never go for a meaty (other than meaty fireball). Blanka's balls (both horizontal and vertical) hit on the first frame, so you cannot do safe meaties against him. For the same reason, you also cannot do safe jumps against him. If you try that, at best you will trade and get knocked down, but Blanka won't be knocked down, putting you in a very bad position. Just do a meaty fireball when he's down. He has no choice but to block it.
Lightning Legs will beat all of Blanka's ground attacks cleanly, but you must be very careful using it because Blanka's jump is so quick. Make sure you always charge D/B while doing Legs so that you can anti-air him if he jumps too late.
Anti-Air
If you're charged, you can use Short Tenshokyaku, but without a charge Chun has a hard time against Blanka's jumping attacks. I would not recommend trying any of her standing normals, because at the very best they will trade, but he won't be knocked down. Jump straight up Short is quite good, and jump straight up RH is also good, but because his jump is so fast, you need to have equally fast reactions.
One strategy is to simply make Blanka land on a fireball. You may trade with him, but at least you completely kill any momentum he may have been building. You can then follow up with a meaty fireball, followed by another fireball, and he really can't do anything about it. In this match, it's worth it to sacrifice damage for position advantage.
Of course the Super is always the best option, but because Blanka's jump is so fast, it can be difficult to time. You must do the super VERY early--do it just past the peek of his jump, when he is starting to come down.
Added: Unessential 14:34, 2 November 2013 (UTC) There is one more option you can walk forward into Blanka's jump: Sweep him as he lands. This has to be done almost directly below Blanka. This anti-air drastically improves the Blanka matchup. You may trade, but it is a good alternative if you are not at the right angle for the other antiairs and you don't have a charge (ie, you've already blocked a jumping attack in the corner).
Anti-Ball
Typically Blanka doesn't use the ball all that often in this match, but just in case it comes up...
A well-timed st.Strong will beat his horizontal ball, but it is better to do a fireball if you are charged. Getting the knock down is important, because you want to control the round.
If you are charged, you get a free Super on Blanka whether you block or get hit by the ball. You won't get all 6 hits of the super, but it's still free damage.
Misc. Notes
-You always want to be charged so that you can anti-air him with something that knocks down.
-If you block Blanka's super, you get a free super on him (or a cr.RH, if you don't have meter).
-If he tries to hop at you, do [cr.Forward, cr.RH] for a two hit combo, then follow up with a meaty fireball, walk back a few steps, then throw another.
--NKI 11:31, 18 May 2006 (CDT)
Zangief (6.5-3.5)
Advantage/Disadvantage
Chun can effectively keep Zangief out the entire round with fireballs. If Gief manages to get in once, Chun usually takes at least one SPD, but it is very difficult for Gief to close the gap in the first place.
Zangief's Game Plan
Gief has one objective in this match: to get in. If he can close the gap and start tick throwing, it's pretty hard for Chun to get him off her. Unfortunately for Gief, he doesn't really have an effective way to get in. He has to use really unreliable tactics like predicting a fireball and jumping over it, or psychic Green Hand to nullify a fireball. Of course he can try to lariat through fireballs, but that doesn't really get him anywhere. Unless the Chun player screws up somewhere, it's very difficult for Gief to do anything effective.
Chun's Game Plan
Chun's only objective is to keep Gief out. Gief spends the whole round trying to get in for those grabs, so you don't want to do his job for him by closing the gap. It's extremely hard for him to get around Chun's fireballs and normals, so just stick to those. You should never jump at Gief. If you knock him down, do not go for the cross-up. Just do a meaty fireball. Worst case scenario is that he reversal lariats through it, but at least you still maintain the position advantage.
It's not exciting, but the way to win this match is to hold down/back and do cr.Forward a lot. When he's safely out of range, throw a Jab fireball, and when he jumps, anti-air him. Make him block a fireball as he gets up, and repeat.
After knocking him down, you have the option of doing meaty D/F+RH, cr.Forward xx Lightning Legs. The advantage to this is that the D/F+RH is safe (even if he does reversal lariat, it will lose cleanly) and Lightning Legs do more block damage than a single fireball. The disadvantage is that if you mess up, you have lost your position advantage, and he is now right next to you. It's your choice if you want to go for it or not. It is safe if done correctly, but I tend to just do a meaty fireball instead.
Once you get meter, you can two-in-one motion your Super over your fireball, walk up behind your fireball with the super stored, and wait to see what Gief does. If he tries to lariat through it or jump over it, super him. If he blocks it, walk back and repeat.
If you mess up somewhere along the line and he manages to get in on you, it can be hard to get him off you. Really your only option for reversing his ticks is upkicks, but you must be VERY careful with this move. If Gief knows it's coming and lets you whiff it, he can do the stomach crunch (jump straight up up+Fierce) for the instant dizzy (Japanese version only).
Also don't forget that if he is too close to you on a tick attempt (if he's within your throw range), you can reversal throw him for free. But make sure not to throw him into the corner though, because if he techs it he gets a free 360 (or even worse, 720)
Anti-Air
Her best anti-air is making Zangief land on a fireball. If he's closer than 1/2 screen, you will most likely trade hits and you may even lose the damage trade by a little bit, but you get the extreme position advantage. He is knocked down, so you can take a step back to regain your distance, then throw a meaty Jab fireball for him to block as he gets up.
If you're really good at using the upkicks, you can use those as well, but it can be difficult to consistently use upkicks as anti-air, and all Gief needs is for you to screw up once. Consider using fireballs if you want a much more fail-safe option.
If you don't have a charge, you can also use jump straight up RH or jump straight up Short.
Misc. Notes
-It is not safe to do Super against Gief. On reaction to your Super, he can kick lariat to beat it cleanly.
-If you're going to throw Gief, do not throw him into the corner. Always throw him away from the corner, because if he techs into the corner, you get thrown for free.
--NKI 13:13, 12 May 2006 (CDT)
- You CAN however react to a punch lariat with Super. This is especially effective as a pocket tool against a Zangief. After a fireball, you can bait a kick lariat and sweep, or if you notice the Gief player doesn't know to use a kick lariat to go through a fireball when you have Super, you can wait till the fireball Overlaps Zangief, and start your super, knocking Zangief out of the lariat. The fireball will then hit Zangief (since he's no longer invincible) and then you can still combo into Tenshokyaku after. This is not an instant kill, but by the time you have a Super you most likely have gotten a few pokes on Zangief, so you can think of it as a round ender. --Unessential
Ken (6-4)
Needs more info!
Old Ken (6-4)
Needs more info!
Cammy (6-4)
Cammy's Game Plan Hope and pray that Chun-Li doesn't know the matchup, and jump in over a fireball or maybe a Lightning Legs if the Chun player is being predictable. If Chun-Li isn't throwing Lightning Legs or fireballs, Cammy can get in with safe cannon drills too. but LL and good poking will stop that.
Chun's Game Plan Lightning Legs and jumping neutral short beats out almost anything Cammy has. If not, try other jumping neutral normals. Cammy's Hooligan should NEVER be landed on you as long as you you watch out for it. If you're feeling confident you can use Chun-Li's regular pokes too and you'll out poke her without needing her to make the first move.
If you choose the Lightning Legs route, always do Legs in short bursts and don't get into a rhythm. Cammy can J. Strong and get in, but if you jump a couple of times (out of her cannon spike range), Legs into jump once, Legs into walk back Jump a random amount of times into another Legs, you'll be ok.
If you ever do Legs for too long, Cammy WILL be able to jump in, the same way she can jump over a fireball.
NEVER throw a fireball against Cammy. That's the ONLY way Cammy can get in. This tends to be a common mistake among newer Chun-Li players. Just don't throw a fireball, keep Cammy out, and play it lame.
Unessential 14:34, 2 November 2013 (UTC)
Sagat (6-4)
Needs more info!
M. Bison (Dictator) (6-4)
You're going to need knowledge about spacing and timing, which you really only get with practice.
Once either character gains frame advantage, they are going to try their damndest to keep it and win the match. Dictator can go for a TOD combo while Chun does not have one. The reason why this is Chun's advantage, however, is because Chun has many more options to get Dictator to make that first block and keep frame advantage.
Watch out for Dictator's throw. After you reversal, a good dictator can time a meaty sweep and cross under. This is Dictator's version of Chun-Li's df/RH shenanigans, except he can't repeat it.
Unessential 14:34, 2 November 2013 (UTC)
Anti-Air st rh, st short, jumping neutral short, jumping neutral strong.
Jumping neutral anything should work.
Unessential 14:34, 2 November 2013 (UTC)
Even Matchups
Guile (5.5-4.5)
Advantage/Disadvantage
Chun has a slight advantage in this match because she can hang with Guile's turtling, but if she gets in, she can also harrass him badly with st.Strongs and cr.Forwards. Pretty much his only reliable option at that point is a very risky psychic Flash Kick. However, Guile can also rush down Chun. It is very hard for her to deal with his hop kick (towards or back + medium kick) mixed with cr.Jabs and Sonic Booms. (Yes, Guile can rush down with Sonic Booms, too.)
Guile's Game Plan
Guile really has two options. Players such as Muteki will usually plays turtle style, hoping to wear you down little by little until eventually you get frustrated and try to rush him down. At this point, Chun will generally do something silly, like jumping in anticipation of a Sonic Boom, but guessing incorrectly and eating a Flash Kick. Guile then goes for the ambiguous cross-up, and it all goes downhill from there.
Other Guile players like Nakano Guile will tend to rush down Chun. He will play a "fake turtle" game where you think he's going to just keep throwing Sonic Booms, but after a while he'll predict one of your fireballs, hit you with a high j.Forward, then begin rushing down with hop kicks, cr.Jabs, throws, and Sonic Booms. This is surprisingly hard for Chun to stop, because most of her usual options (lightning legs, st.Strong, cr.Forward) will get stuffed before the hitting frames.
Chun's Game Plan
Even though Chun can hang with Guile's turtling, she is more effective if she tries to rush him down with st.Strongs mixed with throws. Guile really has no good answer for this, as long as you don't get reckless (because he can Flash Kick you, of course, but that's risky for him to try).
Another reason why turtling isn't that effective against Guile is because her Super is not very useful against him, so building meter isn't that important. Except from very close range, Guile can throw Sonic Booms fairly safely against Chun, even when she has meter.
Basically, you want to close the gap, but you have to be patient in doing this. You can't just blatantly jump at him, but from the right distance you can jump at him pretty safely after he throws a Sonic Boom. If you're at the max range for Chun's j.Forward, you can jump at Guile and he won't really be able to answer with anything, so he'll be forced to block. After he blocks the j.Forward, you want to walk in and make him guess between a throw or a low move (preferably cr.Forward). Whether he blocks your low move or techs your throw, continue to rush him down with st.Strongs. If he doesn't tech, go for meaty [cr.Forward, cr.Fierce].
Throughout the match, you should always be on the look-out for Guile's cr.Forward. This is the move Guile players like to poke with the most, but it has a good amount of lag afterwards. If you hang just outside of his cr.Forward range, you can punish Guile's whiffed cr.Forwards with a st.Strong or walk-up throw.
Anti-Air
From close: upkicks, close st.Forward, close st.Strong
From medium distance: upkicks, jump straight up Short or RH, far st.Forward
From far: far st.Forward, jump straight up Short RH, make him land on a cr.Forward
Misc. Notes
Definitely go for meaty D/F+RH if you get a clean knockdown. This is a very bad position for Guile to be in, especially if your opponent's not familiar with Chun's D/F+RH shenanigans. For one thing, she can do a meaty D/F+RH safely such that even if Guile reverses with a Flash Kick or super, Chun will be able to block in time, but if Guile doesn't reverse, he'll be forced to block Chun's D/F+RH, and then she gets a guessing game. Also, Chun can do the D/F+RH has a cross-up against Guile, so he also has to know which way to block, which can be pretty hard. (If you do the D/F+RH from point-blank range, it will cross-up. Otherwise, it's not a cross-up.)
Also, you never want to jump at Guile unless you see the Sonic Boom. Even if you do correctly predict a Sonic Boom, you don't get anything for free because Chun's jump arc is too big, so don't take the risk of eating a Flash Kick. Only jump if you see the Sonic Boom.
--NKI 20:59, 18 June 2007 (UTC)
Dhalsim (5.5-4.5)
Needs more info!
T. Hawk (5.5-4.5)
Needs more info!
Dee Jay (5.5-4.5)
Advantage/Disadvantage
This is a fairly even match where neither character has a clear advantage over the other. Chun has good rush down and a superior super, but Dee Jay has superior turtling due to his excellent normals, and his fireball goes full screen.
Dee Jay's Game Plan
Dee Jay wants to turtle heavily in this match, using his excellent normals to nullify Chun's rush down attempts. cr.Forward is very good because it knocks down and recovers so quickly that it's hard for Chun to punish on reaction. It's not like a Shoto cr.RH which can easily be punished with walk-up throw. He can also continue to use fireballs relatively safely even when Chun is up close.
Chun's Game Plan
Chun can't really beat Dee Jay in a fireball war because her fireball won't reach Dee Jay from full screen, so she wants to rush him down. However, it is a good idea to throw fireballs with Dee Jay until you have meter, then start your rush down. Chun's super is a lot better than Dee Jay's, and if you have your super stored, you can even counter his super on reaction.
After you get that meter, your next step is to close the gap. This usually is not a problem for Chun. You can do a j.Forward or j.Short from full screen over one of his fireballs, and there's not much he can do about it. At best he can trade, but then you've still closed the gap. Just make sure that you jump on reaction to one of his fireballs; otherwise, you'll eat upkicks.
When rushing down Dee Jay, you'll want to use st.Strong a lot. If you get too predictable with the st.Strongs, he can use upkicks, so don't get sloppy. His upkicks will not hit your cr.Forward however, so you can do that safely. His ground normals (cr.Strong, cr.Forward, cr.Fierce) are all very good and will usually at least trade with yours, so you want to let him whiff and punish, either with st.Strong or walk-up throw. cr.RH is also good to use if you think he will fireball. Even if you trade, it's a good trade for you, because you get the knock down.
Anti-Air
Short Upkicks if you are charged, jump straight up RH if you're not charged, or Super (if you have meter). You can also make him land on a Jab fireball, then follow up with meaty D/F+RH.
Misc. Notes
Dee Jay has nothing to beat Chun's headstomp. Because of this, you can pull some shenanigans from about half screen (or a little bit closer). You can just blatantly jump at Dee Jay, and when he tries to do upkicks, do the headstomp to beat it clean. After that happens, the opponent will most likely not do upkicks again, allowing you to do [whiff headstomp, throw]. The throw is free for Chun she whiffs the headstomp.
However, it should be stressed that this is nothing but shenanigans. It's good to use once in a while, but should not be relied on heavily.
D/F+RH can be used as a safe meaty against Dee Jay. If he successfully reverses with upkicks, he will whiff backwards, and you can throw him as he lands.
I would almost never do Lightning Legs against Dee Jay because his RH upkicks will beat it clean.
If he crosses you up with j.Forward, it is not blocked as a cross-up. You need to block it as if it weren't a cross-up. Your other option is to just Spinning Bird Kick out of there. If you mess up your Spinning Bird Kick, a good Dee Jay will follow up the blocked cross-up with a cr.Jab, then either throw or do cr.Short xx Machine Gun Upper. ALWAYS just plan on teching the throw. If you stand up early to try to reversal throw, you could get hit by cr.Short xx Machine Gun Upper, that very well might dizzy you, and you could be done for the round. Teching the throw is the much better, safer option.
--NKI 10:53, 21 June 2006 (CDT)
Balrog (Boxer) (5.5-4.5)
Advantage/Disadvantage
This is a mostly even match in slight favor of Chun. For the most part Chun controls the match until Boxer gets meter, at which point Boxer then controls the match. After he uses the Super, Chun once again controls the match. Chun has good tools to stop Boxer's rush down, but if she gets trapped in the corner, it can get ugly for her. No really dominating advantage for either character.
Boxer's Game Plan
Boxer wants to rush her down as he does to pretty much everyone except Gief. His problem is that Chun can stop his rush down pretty well. For that reason, a huge part of the winning strategy for Boxer is to trade. There are virtually no bad trades for Boxer in this match, as he just does more damage in general. His most useful trade is when she does a fireball; he can st.Fierce or high rush and do nearly double the damage she does.
Boxer's Super also helps him a lot in this match, so many Boxer players will let Chun throw fireballs, doing either Short rushes or Jab shoulder charges between fireballs to build meter.
Chun's Game Plan
For the most part, Chun wants to turtle it up, because that's the best way to stop Boxer's rush down. She can use fireballs and cr.Forwards to keep him out. Lightning Legs will beat practically everything he has, but watch out for the shoulder charge. If he does a jumping attack to hit you out of lightning legs, he's going to have to do it so high that you get a free throw on him when he lands.
The only time Chun wants to go on the offensive is when Boxer is knocked down. She gets a free safe jump on him, and it is quite easy to time because even his fastest shoulder charge (the Jab version) has a whopping 11 frames of start-up before it can hit. His super has 6 frames of non-hitting start-up, so you can still safe jump even when he has meter. Getting him to throw away his super on a safe jump is huge, because that super is what's stopping you from throwing fireballs, and fireballs are a big part of Chun's strategy in this match.
After doing a safe jump (I use j.Forward), you need to hold down/back for just a split second in case he did get the reversal, then go for the throw or [cr.Forward, cr.RH].
If Boxer gets meter, it's time to chill. You need to go into super turtle mode: stop throwing fireballs, stop whiffing cr.Forwards... just chill. You should only react to what he does. Most Boxer players are expecting you to chill, so it's at this time that you can sometimes surprise them with a blatant walk up throw, especially if one of you/both of you are low on life, but don't depend on this as a stable strategy. (Another good thing about walk up throw is that he can not catch you with the super while you are walking up--you can react and block in time.)
If Boxer throws you and goes for a meaty cr.Forward as you land, just throw him. (It doesn't matter if he crossed you up or not, you still get a free throw if he's within your throw range.) Upkicks are too risky if he blocks it, so be safe and go with the throw.
Anti-Air
From far:
-far st.Forward
-far st.RH
-make him land on a fireball (will probably trade with his jumping attack). Even though you lose the damage trade, you are in an excellent position. He has been knocked down, and you can do a risk-free meaty D/F+RH, followed by guessing game: throw, or [cr.Forward, throw], or [cr.Forward, cr.RH].
From close:
-jump straight up Short
-jump straight up RH
-upkicks
-close st.Forward
Probably upkicks are the best bet, but if your reactions are quick enough, jump straight up RH is just as good. Jump straight up Short and close st.Forward will work decently, but you really want to get that knock down so that you can safe jump at him.
Anti-Shoulder-Charge
Because it's invincible, there's really nothing you can do about the shoulder charge as it's coming out. However, if he whiffs it from up close, you can do:
cr.Forward xx RH upkicks (good damage, knocks down)
if you're not charged: cr.Forward, cr.Fierce (high dizzy potential)
if you are charged: meaty cr.Forward as he lands, close st.Fierce xx Fierce fireball (almost certainly will dizzy)
If he whiffs from far away, you can do:
far st.Fierce, meaty fireball as he lands (decent damage)
jump straight up RH (knocks down)
walk up cr.RH (knocks down)
Of course if you have meter, just do the Super so that he's grounded for all 6 hits.
Anti-Rush
Chun's cr.Forward and fireballs are her best weapons against his rushes. Her cr.Forward will also beat his st.Fierce in case he tries to trade with your fireballs. Every time you see him do a rush, do an option-selected cr.Forward. Time is such that if he did a low rush, you will block, but if he did a high rush (for the throw attempt), you will hit him. If it does hit, follow up with cr.RH for the two hit combo.
Lightning legs will also beat his low rush clean, but it will sometimes trade with his straight rush, so be careful.
Misc. Notes
-It is not safe to pop Super on Boxer while he is just ducking. On reaction, Boxer can do shoulder charge to beat your super clean.
-Don't bother with cross-ups - they're not needed when you have the safe jump.
-You want to avoid trading with Boxer at all costs, unless you can knock him down. He just does too much damage.
--NKI 16:02, 15 May 2006 (CDT)
When in the corner and Boxer has super, Try to tick him 2/3 times with cr forward to get him to about 3/4 screen. If you do this, He can't really use his super, because the 3rd hit will glitch and you get a free throw.
Unessential 14:34, 2 November 2013 (UTC)
Old Ryu (5.5-4.5)
Matchup Specific Anti-Airs
Old Ryu is infamous for his Diagonal Jumping Rh, its horizontal priority is practically infinite. It is an issue for a lot of characters, but not for Chun. This is because its vertical priority is actually abysmal, because unlike Ryu his butt stays exposed the whole duration of the move, a weakness Chun can fully exploit from the ground. However, because of this move he will dominate any aerial encounter with great ease.
- Far Standing Rh:
This move dominates all his aerial options, period. Be sure to be close enough to reach his butt. If he is too far you can use Far Standing Fierce or Crouching Rh instead for better reach.
- Far Standing Fierce:
It is useful for its additional reach over Far Standing Rh. It also comes out faster for situations where Far Standing Rh would be too slow. O.Ryu can evade this move with a late air Tatsu, he will land behind you and throw you for free. Not exactly a big deal as long as the throw don't kill you. It will often trade with his Diagonal Jumping Fierce and his Neutral Jumping Rh.
- Crouching Rh:
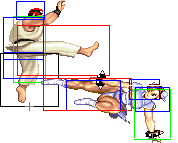
Grants you even greater range over Far Standing Fierce. O.Ryu can evade this with a late air Tatsu as well. It will often trade with his Diagonal Jumping Fierce and his Neutral Jumping Rh.
- Close Standing Forward:
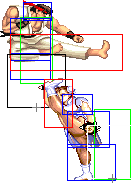
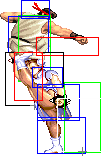
Her Close Standing Forward beats all his jump attacks clean, however there are two caveats to this. First one is obvious, you have to be close enough to get this version of Forward kick, sometime easier said than done. Second is, if Ryu jumped from up close, instead of a normal attack he can do an air tatsu a little after his apex, not only evading your attack completely but hitting you in the back and knocking you down. For this move to be safe you have to use it only when Ryu is barely close enough to trigger your Close Standing Forward, any closer and you may want to use another move instead: Close Standing Rh.
- Close Standing Rh:
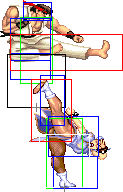
 →
→ 
Unlike N.Ryu it can stuff his Diagonal Jump Rh clean, but it's a good idea to aim for a trade regardless in case a Diagonal Jumping Fierce comes out instead.
- Far Standing Forward:
Despite O.Ryu Diagonal Jumping Rh gigantic horizontal priority, you can still exploit the transition of your Far Standing Forward from startup to active part to trade with his attack. Use it only when Ryu jumps from too far to reach your standing stance. Be sure to do it late enough so it don't get stuffed by his aerial attack.
- Crouching Forward:
You have so many options against O.Ryu it is easy to forget about this one, but it is a great anti air as long as Ryu jump from too far to reach your crouched stance. This move may have less range than Guile's, but yours come out faster, combined with your superior walk speed you can sometime walk forward a bit just to get in range while Ryu is still in the air.
- Note about Tenshou Kyaku:
This is Chun's dedicated anti air so you may be tempted to use it, especially if you mastered the kara tensho technique. However Ryu can easily evade it if he go for an air tatsu instead of a regular attack. It is a lot harder for him to avoid your tensho that way when you are cornered, making it more viable in this scenario.
There is a second way to use the tensho, the haya oki tensho (early rising tensho.) It involve the use of her Rh tensho in Ryu's very early state of his jump, so the second active part meet him in the air before he do any attack. I'm not familiar enough with this to comment it any further, but I know top Japanese Chuns are.
- Note about Super:
It can be done so, if timed right, Ryu take all 6 hits grounded. Great! In theory... because it has to be done so early, Ryu can still evade the super if he went for a late air tatsu instead of a regular jump attack. And making you waste that super is every Ryu's wet dream.
Old T.Hawk (5-5)
Old T.Hawk has better normals than New Hawk and also better Typhoon Traps. Kikoken isn't useful due to Condor Dive, so try to have an air to air battle to see if he is a Rising Hawk or Condor Dive spammer. Tenshokyaku or crouching Roundhouse are great anti airs against Condor Dive. Keeping him away is the key to winning.
Chun-Li (Mirror Match)
Needs more info!
Ryu (4.5-5.5)
Advantage/Disadvantage
Chun can effectively lock Ryu down if she is controlling the match, but if she gets stuck in a fireball trap, it can be very difficult to get out.
Ryu's Game Plan
Ryu's fireball is much better than Chun's (he doesn't have to charge for it, and it will go full screen), so he basically just wants to fireball her to death. If he can zone her with fireballs and push her back into the corner, his most effective range is a little bit more than half screen away with Chun in the corner. At that distance, she can't react to a fireball by jumping over it because that's easily countered with a DP, and she can't keep up with his fireballs because she has no time to charge. Because she's in the corner, jumping straight up over a fireball (especially a Fierce fireball) doesn't really give her a whole lot of advantage. Her best option is just to jump back over a fireball (so that she's charged), then either do air Spinning Bird Kick as she lands or throw a fireball to build meter. Her super is the only really effective way to get out of that situation.
If Ryu can keep her zoned with fireballs at that range, it is a fairly easy match for him.
While his Super is very good, Ryu getting meter is not a huge turning point in the match like it is for some of his other matches (Sim, O.Sagat, etc), especially if Chun has meter. If Chun has meter, Ryu should be very weary about using his super.
Chun's Game Plan
Chun's ideal range in this match is just outside of Ryu's cr.RH range. She has two big advantages from that range.
The first advantage is when you have meter, because her Super nullifies pretty much everything Ryu has. Even if he has meter, you can react to his super and counter with yours (assuming you have it stored already). So once you have meter, store the Super and stay just barely out of range of his cr.RH. Hold down/towards, and react to whatever he does. From that range, a lot of people will try to either do a regular fireball, the Super, or air hurricane kick back (or towards). All of those are punishable by Super. If he does an air hurricane kick over your head, make sure you switch your charge direction, walk towards just a bit, then catch him when he lands.
Even if you don't have meter, from that range she can completely zone Ryu using st.Forward and st.Strong. You can safely whiff st.Forwards because you are outside of his footsies range, but if he tries a fireball or a hurricane kick, he gets beat cleanly. His only options are to psychic DP (which is very risky), or to try to fireball in-between your cr.Forwards (very difficult).
If he whiffs a cr.Forward or cr.RH, walk up and throw.
After you're in his face and you've stuffed several fireball attempts, and all of his normals are whiffing and getting punished by throws, he will start to hesitate, and that's when you just go in for the blatant throw out of nowhere. If he start wising up to the walk-up throw, and he tries to stop you with a normal, use your st.Strong to beat his normal.
If you're not inside the ideal range and you're getting bombarded with fireballs, Chun can punish his fireballs from full screen using a j.Forward. A lot of Ryu players try to reversal with a DP or another fireball, both of which will lose cleanly to Lightning Legs. The only thing Ryu can do to stop you from jumping in from that range is if he does a rush punch (towards+Fierce) to get closer, then he can DP you.
- Anti-Airs
Against Ryu, her best anti-air (aside from the super) is jump straight up RH. Upkicks are pretty much worthless because Ryu can just do an air hurricane kick to beat upkicks clean. In the worst case scenario (he trades an air hurricane kick with your jump straight up RH), you both get knocked down, so he can't continue the pressure.
After you hit him with out of the air with jump straight up RH, you should follow it up with something: [meaty cr.Forward, cr.Fierce] or max range lightning legs (100% safe unless he has meter).
If you have meter, always do the super as anti-air. It is not too hard to time it such that Ryu is grounded for all 6 hits. If he does an air hurricane kick, it is extremely easy to time.
- Detailed Analysis
Ryu's most annoying aerial attack is his Diagonal Jumping Rh, because it has both good horizontal and vertical priority on top of a very good range.
- Close Standing Forward:
Her Close Standing Forward beat his Diagonal Jumping Rh clean, however there are two caveast to this. First one is obvious, you have to be close enough to get this version of Forward kick, sometime easier said than done. Second is, if Ryu jumped from up close, instead of Rh he can do an air tatsu a little after his apex, not only evading your attack completely but hitting you in the back and knocking you down. For this move to be safe you have to use it only when Ryu is barely close enough to trigger your Close Standing Forward, any closer and you might want to use another move instead: Close Standing Rh.
- Close Standing Rh:
A very useful move, it will annihilate any air tatsu that come close enough above you. It also trade with all his aerial attacks if timed right. Be careful of his Diagonal Jumping Short, its priority is surprisingly good, you have to do it late enough so it don't beat your move clean.
- Crouching Forward:
If Ryu jumps far enough to not reach your crouched stance with his longest range attack, your Crouching Forward will hit him on his landing frame. This move may have less range than Guile's, but yours come out faster, combined with your superior walk speed you can sometime walk forward a bit just to get in range while Ryu is still in the air.
- Far Standing Forward:
This is a trade anti air, use it only when Ryu jump from too far to reach your standing stance. Be sure to do it late enough so it don't get stuffed by his aerial attack.
- Far Standing Rh:
This move has to be used when Ryu jumps too close for both your Crouching Forward and Far Standing Forward to have a chance to trade, but not close enough for your Close Stading Forward to activate. Ryu's butt is very exposed during his startup so chances are you going to hit that, if not it will hit as a trade if not done too early.
- Far Stading Jab:
For when Ryu jumps from afar but too close to use Crouching Forward, your Far Standing Jab has a better horizontal priority than his Diagonal Jumping Rh so it will beat that clean. Useful in situations you really want a clean anti air, and not a trade. However if he jump with say Fierce instead, you are both going to whiff each other and he will land safely very close to you. So only use it when you are 100% sure he is going to jump with Rh.
- Cross down Close Standing Jab:
If Ryu jumps from close enough to cross you up you can walk under him to evade his attack completely, then your Close Standing Jab hit him clean in the back on his way down. Note that this move do insane damage for such a fast attack.
- Note about Tenshoukyaku:
This is Chun's dedicated anti air so you may be tempted to use it, especially if you mastered the kara tensho technique. However Ryu can easily evade it if he go for an air tatsu instead of a regular attack, and do a nasty punish on you (3 hits of jump mp + 2 hits of Shinkuu if he got meter). It is a lot harder for him to avoid your tensho that way when you are cornered, making it more viable in this scenario.
There is a second way to use the tensho, the haya oki tensho (early rising tensho). It involve the use of her Rh tensho in Ryu's very early state of his jump, so the second active part meet him in the air before he do any attack. I'm not familiar enough with this to comment it any further, but I know top Japanese Chuns are.
- Note about Super:
It can be done so, if timed right, Ryu take all 6 hits grounded. Great! In theory... because it has to be done so early, Ryu can still evade the super if he went for a late air tatsu instead of a regular jump attack. And making you waste that super is every Ryu's wet dream.
Anti-Fireball
Far st.Forward and far st.Strong are both good at stuffing fireballs. Far st.Fierce can also be used from much further away, but it has considerable lag, so use it only if you are certain he will do a fireball. And of course you can super through the fireball if you have meter.
If you are stuck in the corner, you can do jump back Spinning Bird Kick over fireballs to build meter. Be careful though, because if he see's this coming, he can deley his fireball and make you land on it.
Anti-Hurricane-Kick
If the hurricane kick is just starting up, far st.Forward is her best counter. If he's already spinning and coming towards you, st.Short will beat it cleanly. If he's already passed over your head and he's spinning away from you, you can catch him with a far st.Fierce, far st.Strong, or super (just one hit). Lightning legs will usually beat hurricane kick cleanly.
After he has passed over you and is spinning away from you, be careful when using normals to counter his hurricane kicks. If his spinning leg is facing you, you will trade or lose cleanly. If his spinning leg is facing away from you, you will beat him cleanly. If you're low enough on life where a hurricane kick will kill you, it might not be a good idea to try to hit him.
Misc. Notes
-If you have the Super stored, don't be afraid of Ryu's Super. On reaction, you can Super through his Super.
-Meaty instant head stomp for the kill is good against Ryu because all of his DPs lose cleanly to head stomp.
Fei Long (4.5-5.5)
Misc. Notes
Although it looks infinite, Fei can only do guaranteed [st.Fierce xx Chicken Wing] three times, because he's slowly getting pushed back a tiny bit each rotation. After the third Chicken Wing, if he tries to go for another st.Fierce, you can actually throw him. This turns the moment after the third Chicken Wing into a guessing game between Flame Kick (if he thinks you'll try to throw), or take a step forward, then start the [st.Fierce xx Chicken Wing] for another three reps. (Each rep is doing good block damage, mind you.)
There are a few things Chun can do once she's stuck in that trap. Her options are:
- Upkicks: There is a crazy property of the Chicken Wing where you can actually stand block while holding D/B. You have to stand block the first hit of the Chicken Wing, then immediately hold D/B. Even though you're holding D/B, Chun will stand block the next hit of the Chicken Wing (which is necessary, because it's an overhead and can't be duck blocked). This allows you enough time to charge upkicks by the time the next Chicken Wing comes around. The problem with this is that even though the upkicks will beat Chicken Wing cleanly, sometimes it just goes straight through Fei, he lands, then you fall helplessly into [st.Fierce xx Rekka Ken x3].
- Jump straight up RH: This will usually just trade (at least it gets him off you), but it is extremely hard to time, and if you time it wrong, you get juggled by 3 hits of Chicken Wing, then he gets to start the trap on you again as you get up.
- Far st.RH: This will actually beat Chicken Wing cleanly. The problem is that it is quite hard to do (seemingly random), and if you mess up, you eat [3 hits of Chicken Wing, st.Fierce xx Rekka Ken x3], which is about 50%-60% damage and probably dizzy and probably peace out...HELLA not worth the risk.
- Walk forward to go under him: This only works if he is doing the RH version of Chicken Wing. A good Fei Will do the Forward (medium) version so that you can't walk under it. This is why (as Tama said) he can only do it three times. You can do the RH version infinitely, but she can walk under at any time. Again, if you try to walk under him and he does the Forward (medium) version, you'll eat the above combo, probably be dizzied, and probably lose the round.
- Spinning Bird Kick: Because it's invincible, you can use SBK to make his Chicken Wing whiff. The problem is that because he recovers instantly from the Chicken Wing, he can simply cr.Jab you out of the SBK, then start the trap again.
Reversal throwing is a good idea here. A lot of times the Fei player won't get the timing perfect on the st.Fierce, so you can throw them. This is not guaranteed (Fei can do the st.Fierce for free if he times it right), but it works a lot of times. It's actually not all bad if you get hit by a Flame Kick while trying to reverse throw, because then the Fei player gets the idea "Oh, they're trying to reverse throw...I can catch them with Flame Kick", and they'll try to do that every once in a while, which creates an opening for Chun if you block it.
--NKI
Vega (Claw) (4.5-5.5)
Chun's Game Plan
Turtle it up. Chun controls that match on the ground because lightning legs beat all of Claw's normals, and upkicks beat his jump-ins. He has to take it to the air, so it becomes a guessing game between wall dive, punch wall dive, and wall dive fake-out. Chun has an answer for all three, but you have to guess right. If he does real wall dive, just do jump back medium kick. (Or if he tries to do real wall dive off of your wall, just air throw him before he gets to the wall.) If he does punch wall dive or wall dive fake-out, just fireball him.
Disadvantage Matchups
Old Sagat (4-6)
Needs more info!
Serious Disadvantage Matchups
Akuma (2.5-7.5)
Call a tournament organizer. If one is unavailable, pretend to be one and disqualify your opponent yourself.
