


Introduction
Super Street Fighter II Turbo, or Super Street Fighter II X: Grand Master Challenge in Japan, is the fifth revision of Street Fighter II. The previous versions were Street Fighter II: The World Warrior; Street Fighter II': Champion Edition; Street Fighter II': Hyper Fighting ("Turbo" in Japan) and Super Street Fighter II: The New Challengers.
Street Fighter II: The World Warrior was released in 1990 by Capcom for the CPS-1 arcade board and completely revolutionized gaming by then. People were used to competing against the CPU for high scores, and most two-player games were cooperative, such as Double Dragon or Final Fight. Street Fighter II presented eight selectable characters - a high number by that time - that people could use not only against the CPU, but to face other human opponents. While being considered the best arcade game by then, it did have a few glitches, and players could not select the same character at the same time. Reversal specials were impossible, with a perfectly timed input resulting in a normal move on the reversal frame (or nothing if performed by negative edge). This made safe jumps into tick throws exceedingly strong, as the only chance to escape was via reversal throw. This was extremely difficult due to the opponent being able to mix up by doing jabs, twice, once, or none at all after the jump in, and throws being a 50/50 chance of success when both players throw on the same frame.
Street Fighter II': Champion Edition was released in 1991 and had a number of improvements. First of all, the four bosses were made playable, which turned the game into another huge success. Also, reversal special attacks were fixed and many moves were adjusted for improved balance.
In 1992, Capcom released Street Fighter II' Hyper Fighting, or Street Fighter II Turbo in Japan. This was Capcom's response to the several bootleg versions of Champion Edition which were getting spread around the world. The game speed was increased, characters were given extra moves and some special attacks were allowed to be used in the air. The game has also been adjusted for improved balance. This was the last Street Fighter game released to the CPS-1 board.
Capcom released Super Street Fighter II: The New Challengers in 1993 together with a new, more powerful hardware: the CPS-2. The new board used data encryption to prevent piracy and bootleg versions such as the ones based on Champion Edition. The game came with reworked music, different voices for the announcer and most characters, new sound effects, redrawn graphics for the stages, redrawn character animations for a few attacks, extra win pose animations, the introduction of combo counters, bonuses for using reversals and attacking the enemy first and, finally, four new playable characters. On the other hand, the speed had been again reduced to that of the original two versions, which was a turn-off to Hyper Fighting fans.
In 1994, Capcom released Super Street Fighter II Turbo for the CPS-2. The speed had again been increased, all characters had moves adjusted for balance and new special and normal attacks were added. Still, the previous incarnation of every character, from Super Street Fighter II, was available through a code which could be used after selecting the character, effectively doubling the number of characters from the previous game. Additionally, a secret final boss was introduced, Akuma, and a toned down version was available for players to use with a more complicated code. Finally, a new type of special move was introduced: the super combo. While they have "combo" in the name, some of them are not actually combos. We shall refer to these moves as super moves instead, or simply super. These super moves could only be used after the small bar at the bottom of the screen were filled, did high damage and often had special properties such as periods of invulnerability, the ability to combo even if the enemy was in the air (so-called juggle combos) or the ability to erase incoming projectiles.
Super Street Fighter II Turbo has been played competitively since then and has been featured in countless major fighting game tournaments such as the EVO Series and SBO/Tougeki. To this day, it is a favorite old-school game and still recognized by many professional-level players as the best fighting game ever.
Notation
Joystick Notation
- F - Forward - Tilt stick forward/towards the opponent. (X-axis)
- B - Backward/Back - Tilt stick backward/away from the opponent. (X-axis)
- U - Up - Tilt stick upwards. (Y-axis)
- D - Down - Tilt stick downwards. (Y-axis)
- QCF - Quarter circle forward/Hadouken/Fireball - Tilt stick downwards, then to downwards and forward, then forward.
- QCB - Quarter circle backward - Tilt stick downwards, then to downwards and backward, then backward.
- HCF - Half circle forward - Tilt stick backwards, then to downwards and backward, then to downward, then to downwards and forward, then forward.
- HCB - Half circle backward - Tilt stick forwards, then to downwards and forward, then to downward, then to downwards and backward, then backward.
- DP - Dragon punch - Tilt stick forwards, then to downward, then to downward and forward.
- 360/FC - Full circle - Complete a full rotation of the stick.
- 720 - N/A - Complete a 720 degree rotation of the stick.
- Charge - Hold a tilt - Hold the stick in either B or D (Depending) then move to F or U respectively.
X-axis functions can be used interchangeably with Y-axis functions and vice versa. X-axis functions cannot be used in conjunction with another X-axis function and vice versa.
In addition to the letter notation, an Unicode arrow notation will be used. The symbols →, ↓, ← will be employed assuming your character is facing right, which is the initial position for the first player when a round starts. Thus, → will denote towards, ↓ denotes down, ← means back and ↑ means up. Finally, the symbols ↙, ↘, ↗ and ↖ will denote the diagonals. Unless stated otherwise, the player on the player 2 side will just reverse the commands left to right for similar results.
Six Button Notation
- Jab - weak punch (also called LP)
- Strong - medium punch (also called MP)
- Fierce - fierce punch (also called HP)
- P - any punch
- PPP or 3P - all three punches simultaneously
- Short - weak kick (also called LK)
- Forward - medium kick (also called MK)
- Roundhouse (RH) - fierce kick (also called HK)
- K - any kick
- KKK or 3K - all three kicks simultaneously
--NKI 14:42, 7 January 2007 (UTC)
Descriptors
Character Modifiers
- O. X - Where X is a character. e.g. O.Ryu. The Old version of the Ryu character.
- N. X - Where X is a character. e.g. N.Ryu. The New (relatively speaking) version of the Ryu character.
Connectors
- ~ = Immediately after, e.g "Strong~Fierce" means press Fierce IMMEDIATELY after Strong
State Modifiers
- st. - The following move should be performed in the standing position (neutral in the Y-axis). i.e. st.Fierce, perform a Fierce whilst standing.
- cr. - The following move should be performed in the crouched position (held down in the Y-axis). i.e. cr.Fierce, perform a Fierce whilst crouching.
- j. - The following move should be performed in the "in the air" position (After having held up in the Y-axis). i.e. j.Fierce, perform a Fierce whilst in the air.
- cl. -The following move should be performed 'close' to the opponent in the standing position so that the close animation of the move activates.
Miscellaneous Notation
- WW = World Warrior
- CE = Champion Edition
- HF = Hyper Fighting = SF2T = Street Fighter 2 Turbo
- SSF2 = Super Street Fighter 2
- ST = Super Street Fighter 2 Turbo
- TAP = Boxer's Turn Around Punch (hold 3P or 3K, then release)
- DP = Dragon Punch = Any Shoryuken-like move
- Claw = American Vega = Japanese Balrog
- Boxer = American Balrog = Japanese Bison
- Dictator (Dic) = American Bison = Japanese Vega
Not everyone plays on the American version, and some character names are different in the Japanese version, so to avoid confusion, we should not use the names Vega, Bison, or Balrog.
--NKI 14:44, 7 January 2007 (UTC)
Game Mechanics
Character Movement
If you do not move the joystick nor press any buttons, your character simply stands still. In this state, any attacks directed at your character will hit, and you take damage as a result. To block attacks, move the joystick in the opposite direction your enemy is. The attack will touch you, but you will take no damage. Some attacks, usually crouching kicks, hit low and will not be blocked that way. In order to block low attacks, move the stick to the diagonal direction between down and the opposite of where your enemy is. To make matters simpler, we shall assume you are in the 1P side (left) and your enemy is in the 2P side (right). So you block ordinary attacks by pressing the joystick left and low attacks by moving the joystick to down-left. If you are on the other side, simply reverse the directions "left" to "right." Other attacks can also be blocked by staying in down-back direction: you will either block the attacks, or they will whiff above your head. However, if your enemy jumps, you will not be able to block that way: you need to move the joystick left. Blocking comes at a price: if your enemy whiffs his attack, you will still enter block animation, and will not be able to move for a split second. This can be used to get closer to you and may also prevent you from getting closer to him so as to punish. In addition to it, there are attacks that do damage even if they get blocked (called special attacks). Finally, some attacks such as throws or holds can not be blocked.
To move your character towards your enemy, simply move the joystick in that direction. We assume you are in the 1P side, so you just move the joystick to the right. To move you away from him, move it left. You will notice walking towards him is faster than walking backwards. If you move the joystick down, down-left or down-right, you will crouch. You can not walk towards or backwards while crouching. If you move the joystick to the up direction, your character will jump. You can jump straight up this way, but also jump towards your enemy by pressing up-right and backwards by pressing up-left. Jumping can be used to avoid a number of attacks, but it has two very important disadvantages: you can never block while in the air and most characters can not change their trajectory for some time. The ones who are still restricted in specific ways. For instance, Chun Li can jump back then jump from a wall. She needs to be near a wall to use this. Jumping is a risky move in general and should be avoided.
Normal Attacks
If you press any of the six push-buttons, your character will attack. On a standard cabinet, the top row of buttons are punches and the bottom one are the kicks. The six attacks you have available directly through the buttons are Jab punch, Strong punch and Fierce punch, plus Short kick, Forward kick and Roundhouse kick. Jab and Short are weak attacks: they do relatively low damage, but often recover fast, leaving little time for the enemy to punish you just for using them. Strong and Forward are mid attacks often have a bit better reach, do higher damage but take more time to recover. Players with good reflexes can punish a few of these attacks, or they can use the recovery time to get closer to you. Fierce and Roundhouse are heavy, hard-hitting attacks that often have very good reach and better damage, but the recovery is noticeably higher, in general. Some of them can be easily punished, even if they hit, depending on the situation.
If you get closer to your enemies while standing, most buttons will give you a different normal standing attack. These are called "close normals." All attacks can also be used while crouching or in the air. Most of them have a different version if you jump straight up or not. Thus, unless otherwise noted at the specific character sections (which are linked to at the bottom of the page), all normals will have a far standing version, a close standing version, a crouching version, a neutral jumping version and a diagonal jumping version. Some normals such are Ken's standing Roundhouse kick have only one standing version, while some jumping attacks such as Ryu's jumping Fierce punch have a single version for both diagonal and neutral jumps. Finally, SSF2 and ST Dhalsim have two versions for both their standing and crouching normals: a close one and a far one. SSF2 Dhalsim's moves are chosen by the game, based on the distance between the characters, while ST Dhalsim can select which version of his normals, far or close, by pressing back on the joystick with conjunction with the button to select the close one. For instance, back and Jab gives his close Jab, down-back and Forward kick gives the thrust kick, and either neutral or towards and Fierce gives the double stretching punch.
If you use a normal attack while on the ground, it will come out one frame later than other actions. Also, normal attacks can not be used as [reversals].
Throws
If you approach the enemy and press Fierce punch, your character will either throw the enemy or hold him while attacking. The conditions for it are that the enemy must be on the ground, not recovering from an attack or knockdown, and not invincible (which can result from some [special moves]). In addition to it, some characters can also throw or hold with buttons among Strong, Forward and Roundhouse. Throws are an important part of Super Turbo, as they force the enemy to attack back or try something, else they will be thrown or held.
Some characters also have air throws. For them to work, both characters must be in the air, and the jumping character must press toward or back and the appropriate throw button. There are also altitude requirements, check the Dammit's article which is linked below.
A compilation of throw ranges can be found in T.Akiba's SF2 data. Finally, the exact mechanic of throws have been unveiled by Dammit in his SF2 throwboxes article.
As characters wake up, they gain throw invulnerability for a random number of frames. During that period, any throw attempted at them will fail, but they can still throw the opponent. The possible throw-invulnerable wake up times and their likelihood are as follows:
| Throw-invulnerable frames | 1 | 11 | 12 | 13 | 14 | 15 | 17 | 19 | 21 | 23 | 25 | 27 | 29 |
| Likelihood | 6.25% | 6.25% | 6.25% | 9.375% | 9.375% | 9.375% | 9.375% | 9.375% | 9.375% | 9.375% | 9.375% | 3.125% | 3.125% |
Normal Throw Tech
Also called "softening a throw". When your opponent throws you with a normal throw, enter a throw command (back or towards plus Strong, Fierce, Forward, or Roundhouse) within 13 frames, and you will take half the damage, and recover in the air. You can tech while crouching, too, even though only Zangief has crouching throws, and you can tech with buttons that do not correspond to your character's throws. For example, Chun Li can tech with the Forward or Roundhouse kick buttons, even though she does not have normal throws with those buttons. Holds (such as Blanka's bite or Dhalsim's noogie), Command throws (such as Zangief's SPD or Honda's Ochio), and Super throws (such as T.Hawk's Double Typhoon or Claw's Izuna Drop), cannot be softened. Throw tech only applies normal throws. If both players input the command for a throw or hold at the same time, the game will randomly choose who grabs the enemy, and in case a throw wins, it will always be softened.
If you do not soften or tech a normal throw, it means you will take more damage, and your character will be knocked down, and will recover from the ground with a wake up animation. So failing to soften a throw will leave you wide open for meaty attacks and ground ups. Only N.Characters can soften throws. O.Characters cannot soften throws. So if can O.Character throws an N.Character, the N.Character can soften that throw. But if an N.Character throws an O.Character, that O.Character cannot tech the throw, and must take full damage, and get knocked down. Not being able to soften throws is a universal disadvantage that all O.Characters share (and consequently an advantage that all N.Characters share as well).
Take notice, however, when you soften the throws of some characters, such as Cammy, Fei Long, or Dictator, you could potentially be setting yourself up for a ground cross up or some other immediate attack on recovery, so pay attention even if you manage to soften a throw because you are not in the clear yet.
Escaping Holds
A hold is a type of normal throw that does multiple, and a variable amount of, hits. Examples are: Ken's Knee-Bash, Blanka's Bite, Dhalsim's Noogie, and Honda's Bear-Hug. Holds are performed the same way that throws are, by getting within range, and pressing forward (or backward) plus any button that a hold has been assigned to. So if you walk up to your opponent as Ken, and press forward+medium kick, you will initiate his Knee-Bash hold.
When softening normal throws, you have a 13 frame window in which to react, and it doesn't matter which frame you perform a throw command on within that window to get the soften. A throw can be softened on frame one after it has been initiated or on frame ten and the result will be the same (half damage taken, air recovery). Holds however are a different story. The luxury of a 13 frame window to reduce damage is not afforded to a person caught in a hold. From the very first frame you are held every input counts. In order to release you from that hold, and to reduce the damage you take, you have struggle the joystick, and mash buttons, as quickly and as early into the hold as possible.
Not only will you be struggling to escape a hold, but your opponent will also be struggling to increase the number of hits the hold he initiated will do, so both players will be struggling against each other. So what's the best way to escape, or release yourself from a hold, after you have been grabbed?
When mashing out of holds, the best directional command input is [dn/away, n, up/towards, n, dn/away, etc.]. This is the best command input because the game engine wants you to move through neutral as often as possible. By moving through opposite diagonals the game is registering you as passing through neutral twice. You get credit for moving through neutral vertically, up to down on the joystick, and horizontally, left to right, by wiggling the stick back and forth in opposite diagonals.
However, if you are playing a charge character, you will lose your charge, by struggling in all directions. Remember, when struggling out of holds, some characters might require a charge immediately after recovering, to be used for a reversal special attack. Let's take Dictator versus Dhalsim as an example. Say Dictator has a full meter, and gets held by Dhalsim's hold, if the Dictator struggles in all directions to escape the hold, then he won't have a the necessary backwards charge to use a reversal super to escape Dhalsim's slide after he recovers. However if Dictator only struggles using back, up+back, and down+back, then when he recovers from the hold he'll have the necessary charge to use a reversal Super and escape Dhalsim's throw loop. The Dictator player will have struggled only using backwards facing directions. And by doing so, he can preserve his backwards charge to prepare for a reversal Super, while simultaneously reducing damage from a hold. Watch here and here as Taira (Dictator) gets caught by Gian (Dhalsim) in Dhalsim's Noogie hold. Both times Taira performs a reversal Super immediately after recovering from the hold. He does so because he only struggles the joystick in the directions that preserve his necessary backwards charge for a Super.
Now, for mashing the buttons during holds, you have two options. You can simply just use one attack button (so for Ken's Knee-Bash you would only use foward); however, you do this by timing the fowards with dn/away and up/towards (requires some serious practice). Or you can use piano/mashing. For escaping holds use piano/mashing, but for dealing damage I stick with one attack timing inputs (it does make a difference).
All holds can be escaped in 1 hit (difficult), 2 hits (moderate to easy), if your opponent hits you more than 3 times it means that you probably didn't react quickly enough. This all takes steady practice. It is possible to escape holds without taking damage however this is prohibitively difficult and also requires that your opponent does not struggle to increase his hold damage as well. So don't expect to regularly see anyone escape holds without taking damage.
Remember, even after you escape from a hold, you still aren't in the clear. After T.Hawk's Roundhouse hold he can cross both Ken and Ryu up with a jumping Forward kick. Honda, after his Fierce hold, can cross Guile up with his splash. Knowing what to expect after you've been released from a hold is just as importing as struggling to release yourself from the hold in the first place.
Holds do a set amount of hits if neither player inputs any commands after the hold has been initiated. So some holds have higher damage potential because they usually yield more hits by default and are naturally harder to struggle out of in lesser amounts of hits. Here is the list of how many hits each hold in the game does by default if neither player struggles or mashes:
- O.Boxer's Strong & Fierce Holds - 12 hits
- N.Boxer's Strong & Fierce Holds - 9 hits
- Honda's Fierce Hold - 8 hits
- Honda's Roundhouse Hold - 7 hits
- Blanka's Fierce Hold - 7 hits
- Dhalsim's Strong Hold - 6 hits
- N.Ken's Forward Hold - 5 hits
- Zangief's Standing Fierce & Roundhouse Holds - 4 hits
- Zangief's Crouching Strong & Fierce Holds - 4 hits
- T.Hawk's Fierce Hold - 4 hits
- T.Hawk's Roundhouse Hold - 3 hits
--ShinVega 18:12, 3 December 2007 (UTC) --VirtuaFighterFour - February 13, 2010
Special Moves
Special moves are attacks or evading maneuvers that have special properties, but demand some joystick motion or button pattern to be obtained. There are motion specials, charge specials and button specials. Motion specials are performed by doing a certain joystick motion, such as down, down-right, right, and either pressing or releasing a button. If you are Ryu in 1P side, input a quarter-circle motion starting in down and ending in towards and press - or release - any punch button, this will give you a Hadouken. There are many different motions and different specials for different buttons. Charge special moves demand that you hold a direction for some time, then complete the joystick motion and perform the correct button press. The main example is Guile's Sonic Boom. In the 1P side, hold the joystick left for around one second, then move the joystick right and press a punch button. If performed correctly, Guile will throw a projectile to the right, that is, to the P2 side. Finally, button specials are obtained by either pressing buttons at the same time, such as all punches for Zangief's Lariat, or pressing the same button (usually) five times in a row. Blanka can do his electricity attack by pressing the same punch button in quick succession, for example.
Special attack moves will cause damage even if they get blocked, which is called chip damage. The amount is around 1/4 of the move's normal damage. This can be used to force a reaction on part of your enemy, else he or she will lose due to the accumulated chip damage. They are also the only moves that give super meter points even if they whiff. This can be used to fill your super bar by whiffing short-recovery moves or forcing the enemy to block special moves that he or she can not punish. Finally, some normals allow that you [cancel their recovery into a special move] on hit or block, which makes special moves very important in block strings and combinations.
The exact routine for performing special moves is as follows:
- The game scans for the first input of all special moves from each character being played.
- If the first input of a special move is detected, the player is given a limited number of frames to perform the subsequent input. (If that input happens to be the first one for other special moves, this step is triggered for each of them.)
- If the player succeeds, Step 2 takes place until all inputs have been performed.
- If the player fails to perform the next input, previous inputs are no longer considered for that special move.
- When all inputs have been entered within the allowed time, the special move will come out.
Sometimes, the conditions for more than one special move are met. In this case, the game has an order of precedence which is used to determine which of them will be performed. For instance, let us assume that a player controlling Ryu would perform →↓↘→ + P fast enough for both the Hadouken and the Shoryuken special moves. The last part of the command suggests that a Hadouken would be obtained, since the motion is ↓↘→ + P. However, the inputs for the Shoryuken have also been performed in the correct order, viz., →↓↘ + P (the last → joystick movement is not necessary). The game has the Shoryuken as the higher precedence special among these two, so that is the move which comes out.
Reversals
A reversal is defined as: any time you go from a non-neutral state directly into a move (special, super, or throw), without ever going to neutral state. A non-neutral state is any state that your opponent inflicts on you: block stun, hit stun, getting up after being knocked down, dizzy, or being knocked out of the air. Only throws, special moves and super moves work as reversals.
For example, your opponent knocks you down, and just as you're getting up, you time a Dragon Punch perfectly, so that it comes out on the first frame possible once your character is standing. You never go into a neutral state - you go directly from your invincible waking up animation, to a Dragon Punch animation. The game will confirm your reversal, with a reversal message, and will add 1000 points to your arcade score. The reversal message only shows up when a special attack, special throw, or Super move is done as a reversal. You can use any of your special attacks as reversals, but they are mostly useful with attacks that are invulnerable for a split second or throws. For example, you are playing as Honda and someone decides to use a Fierce punch as you recover from a knock down. You can just block the move while getting up, but as some of his special moves such as the Jab headbutt are invulnerable for a few frames and hard to punish after that invulnerability period ends (Honda can only be hit on the back during the initial part of the move), they are great options for reversals. Thus, if you time a reversal Jab headbutt while your enemy is trying to hit you with (say) a Fierce punch, you will evade the punch due to being invulnerable, then hit him out of the move. Similarly, if you are playing as Zangief and someone is doing a meaty attack as you wake up, you can grab him out of the move with a reversal spinning pile driver.
Normal throws, despite not activating the reversal message and 1000 points, can still be used as reversals. So for example, you are playing as Dictator, and your opponent is playing as Ryu. Your opponent knocks you down with a low Roundhouse, and then walks up to while you are waking up, and does a meaty towards+Strong (Ryu's standing overhead command). If you input a throw command (towards or backwards + Strong or Fierce punch) at the reversal frame and Ryu is within your throw range, you will immediately enter throw animation while Ryu's move will be canceled.
While that sounds nice on paper, it is much harder to execute in practice, and it can be dangerous especially because the risk is almost always higher than the reward. So why are reversal normal throws, coming from waking up after getting knocked down, so risky? For one, you are limited by your character's throw range, so if you attempt to use a reversal throw to beat a low meaty ground normal, but your opponent was smart enough to stay out of your throw range, you'll lose that transaction. You'll lose because you need to be standing in order to perform a throw. Another unfortunate occurrence in Super Turbo is that even a perfectly timed reversal normal throw, that is done within the throw's range, can sometimes randomly come out as a standing normal attack anyways. So even if you had perfect timing, a random aspect of the game will put you on the losing end of that exchange.
The last reason that using normal throws as a reversal is risky, is because you lose the ability to negative edge with normal throws, meaning you have less of a chance to time a normal throw attempt as a reversal compared to special attacks or throws. Take a reversal Dragon Punch, you have six chances to time a punch command on the correct frame, you have the three Jab, Strong, and Fierce buttons when you both press them, and when you release them. That's two chances per button, on the press and release, for a total of six. Normal throws however do not come out when you simply release, or negative edge, the buttons. And some characters can only throw with one or two buttons. So for a reversal throw with Dictator, you have two chances, when you press Strong and Fierce punch, to time a reversal throw. And if you mistime both of them, which is highly likely, against a meaty attack, then you are going be on the losing end of a potentially huge combo.
Reversals are primarily useful against two things: meaty ground normals, and beating tick throw attempts. There are other more advanced uses for reversals so you should refer to each character's specific article to discover more.
--VirtuaFighterFour February 13, 2010.
Knockdowns
There are three types of knockdown in the game: sweep knockdowns, full knockdowns and long-distance knockdowns. Sweep knockdowns are a result of certain normal attacks, usually crouching Roundhouse, and Balrog's (Boxer) low rush punch. The character falls back up to some relatively small distance with its back to the ground, then rises up quickly after that. All characters can cause this kind of knockdown with a crouching Roundhouse kick. Additionally, some characters have extra moves that cause sweep knockdowns, such as Dee Jay's crouching Forward kick. Old Honda is known to have many attacks that cause sweep knockdowns, namely, all his far standing kicks and crouching Fierce punch.
Full knockdowns push the character further back, it bounces on ground as it falls for the first time and then stays there for some time after it touches the ground for the second time. This is often a much better type of knockdown to inflict on the enemy as it pushes the character back more in the direction of his corner, gives more time to build meter with whiffed special attacks, gives you more time to set up fireball traps, meaty attacks, safe jumps, cross-ups or mix-ups and gives you more time to recover from stun damage you had accumulated at that moment. Full knockdowns can be a result of normal attacks such as Chun Li's neutral jumping Roundhouse kick, but happen more often due to special attacks and dizzying the enemy. Some characters can only be safe-jumped if you score a full knockdown.
The long-distance knockdowns are a result of Akuma's Hadoukens, when they hit up close, Dhalsim's Super last hit, and Ken's special roundhouse kick, which is exclusive to the new version. These attacks cause the enemy to be thrown to the other side of the screen. That aside, they are similar to full knockdowns.
Impact Freeze
As soon as an attack touches the opponent, on hit or block, the attacking character freezes for some instants while the character being hit shakes left and right, slightly. This is called impact freeze, or hit freeze. There are three important facts related to impact freeze in Super Turbo. They are special canceling, frame advantage on single hits and option selects.
Due to a glitch in the original SF2, the impact freeze period would extend the kara cancel period, allowing normals to be canceled into special attacks on hit or block, not just whiffing or before becoming active. Thus, if an attack was fast enough to be kara canceled after becoming active, it could also be canceled into a special attack on hit or block during the whole impact freeze period, opening many combo opportunities and extending block strings. Eventually, some moves were hard-coded to be special cancelable or not, such as Fei Long's normals in ST. For this game, all we need to know if that if a move is special cancelable, we will finish the motion and press the button during impact freeze.
Impact freeze happens not to be the same for the character being attacked and the one attacking. Isolated attacks, that is, attacks that are not part of combinations or block strings, cause a one frame longer impact freeze on the enemy. Thus, some moves will combo after certain attacks only as the second hit of the combination. In addition to it, link combos will be slightly harder to do from the second attack on. More detailed information is available.
A few option selects are available due to impact freeze either extending the recovery of moves or cancel time. The first kind of technique usually consists of inputting normals or specials during the impact freeze of non cancelable moves. If such moves whiff, usually due to invulnerable attacks, the other move comes out and either beats or trades with the opponent's move. Prime examples are safe jumps with embedded moves (usually SRK-like moves). One can also do a late cancel attempt. If the move connects, it will be canceled into a special attack. Else, as the impact freeze did not extend the kara cancel time, the normal move recovers normally.
Hitstun And Blockstun
When a character is hit by an attack, or blocks an attack, after impact freeze, they enter a state of stun known as hitstun or blockstun. This is also known as "the reeling animation". During hitstun or blockstun, a player is temporarily unable to control the character, but the character is also temporarily immune to throws, but not to subsequent attacks. If an attacker lands a subsequent attack before hitstun or blockstun ends, this results in a combo or a blockstring, and the defender will be unable to block the combo or perform any actions during the blockstring, except for switching from a standing block to a crouching block or vice versa (this is also known as "auto blockstun"). If a subsequent attack connects after hitstun/blockstun has ended, this will not result in a combo or a blockstring, and the defender will be able to block the subsequent attacks or perform an action to evade/counter the string of attacks such as a reversal attack or a jump.
Depending on the strength of a Normal Attack, the character will be in a longer state of hitstun or blockstun. As a general rule of thumb, Light Normal Attacks cause 11 frames of hitstun/blockstun, Medium Normal Attacks cause 16 frames of hitstun/blockstun and Hard Normal Attacks cause 20 frames of hitstun/blockstun. Although this may vary, depending on if the attack is a jumping attack and whether the opponent is standing or crouching. This can also vary with Special Attacks and Command Normal Attacks. The important thing to remember so that this info is not confusing, is that all Jumping Normal Attacks cause the same amount of hitstun (11 frames), but cause different amounts of blockstun (depends on the strength of the Normal).
Standing/Crouching Normal Attacks vs a standing/crouching opponent:
Jab/Short = 11 frames of hitstun/blockstun
Strong/Forward = 16 frames of hitstun/blockstun
Fierce/Roundhouse = 20 frames of hitstun/blockstun
Jumping Normal Attacks vs a standing opponent:
Jab/Short = 11 frames of hitstun/blockstun
Strong/Forward = 11 frames of hitstun, 16 frames of blockstun
Fierce/Roundhouse = 11 frames of hitstun, 20 frames of blockstun
Jumping Normal Attacks vs a crouching opponent:
Jab/Short = 11 frames of hitstun
Strong/Forward = 16 frames of hitstun
Fierce/Roundhouse = 21 frames of hitstun
Command Normal Attacks (eg Overheads) have their own unique stun data. YBH claims it is totally dependent on the attack itself:
Ryu's Overhead vs a standing opponent = 11 frames of hitstun/blockstun
Ryu's Overhead vs a crouching opponent = 20 frames of hitstun
Ryu's Rushing Fierce vs a standing/crouching opponent = 20 frames of hitstun/blockstun
(All other command normals are currently unknown, Ken's Overhead is classified as a Special Attack since it does block damage, see below)
All Special Attacks (eg Shoryuken) vs a standing/crouching opponent:
20 frames of hitstun/blockstun
The blockstun for Super Attacks is unknown. It's not clear in any situation what the hitstun/blockstun for a Super would be. The hitstun for knockdown Special Attacks and Super Attacks doesn't exist, since they knockdown. Just to be clear, getting up speed has nothing to do with blockstun. Hitstun/blockstun data for Super Attacks is not 100% confirmable, unless someone counts the frame data. This info is not in the YBH.
--Blitzfu 06:42, 26 May 2010 (UTC)
Dizzy
If you are hit by a number of attacks within a short time span, you may get dizzied, or "stunned." If that happens, your character will be knocked down, juggle state will be disabled, symbols such as birds or stars will appear above the character and when it gets up it will not be able to block for some time, being wide open for punishment. Wiggle the joystick while mashing buttons to recover faster from such a state. Check the section Escaping Holds for the optimal joystick and button pattern.
Each time you are hit by an attack, you are inflicted a random amount of dizzy damage, which belongs to a determined interval which varies from move to move. This also increases the value of a counter, which decreases over time, i.e., a decreasing timer. The amount of dizzy damage is added to whatever dizzy total you have, and as soon as it reaches a limit, you get dizzied, the dizzy total is set to zero and does not increase for about a second after dizzy state is over. If you are not dizzied, then the total value remains until the timer reaches zero, which causes whatever stun damage you have by then to disappear, that is, your total dizzy damage is set to zero when the dizzy timer reaches zero. Both the total counter and the timer remain zero until other attacks hit.
The dizzy damage is not the same among the different game regions. As an instance, Zangief's neutral jumping Fierce headbutt dizzies almost every time in the Japanese version of the game. The dizzy limit, which can be understood as a "dizzy meter length," starts at 30. If the character gets dizzied, its value changes to 34, and then to 35 if a dizzy happens again. More information can be found in this post.
The dizzy system has been recently revealed and explained by the SRK user Cauldrath throughout this thread, and summarized and made visible by Pasky through the Super Turbo HUD tool.
If someone is dizzied by a throw, they will remain throw-invulnerable for the duration of the dizzy.
Juggles
Super Street Fighter II Turbo introduced aerial combos in the SF2 series. As a character bounces up each time it is hit in the air, these combos are called juggles, or juggle combos. However, not every move can be used to start or continue such combos: only the so-called juggle-able moves can do so. If the enemy is in the air, any juggle-able move will work. If the enemy is on the ground, only a juggle-launcher can start the combo. Most juggle-launchers are special or super moves. After being hit by a juggle-able move, any juggle-able normal or special move can juggle for up to 2 more hits (except Sagat's Tiger Uppercut, which can juggle for up to 4 hits). Any non-throw super can juggle for up to 4 more hits.
Juggle-able normal moves
- Ryu - diagonal jumping Strong
- M. Bison (Dictator) - diagonal jumping Strong
Juggle-able special moves:
- Akuma - Forward and RH (grounded) Hurricane Kicks, Air Hurricane Kicks, Shoryuken
- Balrog - Super
- Blanka - Super
- Cammy - Super
- Chun-Li - Upkicks, Super
- Dee Jay - Forward and RH Maximum Jackknife (the charge upkicks), Super
- Dhalsim - Super
- E. Honda - Super
- Fei Long - Rekkuukyaku (Chicken Wing), Super
- Guile - Super
- Ken - Super
- M. Bison - Super
- Ryu - Super
- Sagat - Fierce Tiger Uppercut, Super
- T. Hawk - none
- Vega - Scarlet Terror (flip kick)
- Zangief - none
Juggle-launchers:
- Akuma - Forward and RH Hurricane Kicks, Shoryuken
- Chun-Li - Upkicks, Super
- Dee Jay - Forward and RH Maximum Jackknife, Super
- M. Bison - Super
- Sagat - Fierce Tiger Uppercut, Super
- Vega - Scarlet Terror
Sagat's juggle-able moves are launchers, but he can almost never combo unless the enemy is already in the air, and this still demands special setups.
Simply being a juggle-able move does not mean that it can juggle at any time. The opponent must first be hit by a juggle-able move, then you can follow it up with a juggle. For example, Chun can do upkicks (3 hits) to knock the opponent out of the air, then juggle with the super for 2 more hits. However, she can not follow up with a juggle super after knocking the opponent out of the air with a fireball, because the fireball is not a juggle-able move.
Kara Canceling
In the original Street Fighter, special moves were quite hard to obtain. In order to obtain a special move, the players had to perform a specific sequence of joystick commands, then press the correct button. However, the joystick motions and the timing for the button press were strict. When developing Street Fighter II, Capcom's designers added a couple of mechanics which would help players when trying to use those special moves, and many more which had been created for the different characters. First of all, special moves could also be obtained by performing the joystick motion and releasing a button. Secondly, normal attacks were allowed to be canceled into special moves during the first frames of their animations. As a consequence, would a player press a button too early, before finishing the joystick movements, the special move would still come out if he or she released the button after the motion was complete.
Kara canceling is when you cancel the initial part of a normal move into a special or super move. The cancel can be done so quickly that you probably may not even see the normal move come out (but you will still hear it). And up until the first hitting frames appear on the screen, depending on the normal attack used. Also, you do not need to use the same button for the special move when using kara canceling. Say, you can kara cancel a Jab into a special move that is obtained with a Jab punch, but you can also kara cancel a Jab into special moves with any other punches, or even kicks.
For several characters, you can shorten the recovery time of their Strong and Fierce fireballs by kara canceling a Jab or Short normal attack into a Strong or Fierce fireball. See T.Akiba's frame data.) Let's take N.Ken for example. If he throws a Jab strength fireball, the recovery on the animation lasts for 39 frames. If he throws a Strong fireball, it's 40 frames. A Fierce fireball will have 41 frames of recovery animation. However if you kara cancel a Strong or Fierce fireball, off of a standing Jab for example, a glitch game will change the recovery of a Strong or Fierce fireball to the 39 frame recovery of a Jab fireball.
Mash moves are also often done through kara canceling. So you rapidly mash Jab with Honda for example, his standing Jab will come out and you'll hear it, but then the starting frames of that standing Jab will be quickly canceled into Jab strength HHS. You won't see the full animation for the standing Jab because the starting frames will get canceled directly into Honda's HHS. Same thing applies to other mash moves such as Blanka's electricity or Chun's legs.
Kara canceling is extremely useful for T.Hawk's command throw done as an empty throw. If you try to walk up and throw someone with T.Hawk's command throw you have to have incredible timing. T.Hawk's pre-jump animation is three frames. Meaning from the moment you hit the up direction as part of a walk up command throw attempt, you have only three frames to hit a punch button to get a command throw, or else T.Hawk will jump straight up into the air. However you can hit standing Jab with T.Hawk, then input the execution for a command throw, and the starting frames of your standing Jab will cancel into a command throw. This technique even makes it possible for T.Hawk to do walk up 720s or walk up super throws. So you can kara cancel a standing Jab into T.Hawk's super and throw your opponent with a super without buffering the super into a jump or off of a tick.
Kara cancels are very useful for things like auto mix-ups that involve special kara cancels built into whiffed normal throws. The idea with this auto mix-up is that you input a throw command and then do a dragon punch right after the throw attempt. If the throw is successful the throw animation comes out and your dragon punch never appears. If the throw whiffs, because your opponent did a reversal attack, then your throw becomes a normal attack, that normal attack is kara canceled into a special attack of your own, and depending on how good your special attack is you could beat your opponent's reversal. Dealing with O.Ken is nightmarish at close ranges because of this kara technique.
[VirtuaFighterFour]
Kara canceling is what allows [special canceling] in SF2, as explained in the [impact freeze section], and is also useful when used in conjunction with [renda canceling].
Special Canceling
As stated in the [impact freeze section], some normals have the property that, during the freeze, they still accept commands for special moves. When the impact freeze for the attacker ends, all the remaining active and recovery frames are ignored, and the special attack starts immediately. This is the result of a glitch in the original game, but as of Champion Edition it was even coded into the AI behavior so it would use special cancels in their combos. Special canceling is extremely important, as it allows players to extend their block strings and combos, or occupy space in ways otherwise impossible. Several high damaging combos are a result of special canceling, such as Guile's jumping Fierce, crouching Strong into Flash Kick. It also allows a player to extend their attacking momentum. For instance, Ken or Chun Li can never combo a Hadouken or Kikouken from the tip of a crouching Forward kick, even if they cancel it. However, if the enemy has no super bar nor an invulnerable special move, odds are he or she will have to block the incoming projectile, even though they will have completely recovered from the block or hitstun by the time it approaches. This gives them time to recover from the projectile and act while the enemy is yet again in either block or hitstun.
Some normal attacks can also be canceled into the super move. However, super cancels do not make use of the extended cancel time from impact freeze, so they are much harder to obtain.
Chain Canceling (formerly known as "Renda Canceling")
In Japanese, "renda" 連打 is the word they use for rapid-fire chain combos, like Guile's cr.Short->cr.Short. Rapid fire moves are moves which are allowed to be canceled into themselves. In old school Street Fighter (in the pre-Alpha games), you can not cancel chain combos into special or super moves the way you would a single move. If you chain two cr.Shorts, you can not cancel the second one into special moves immediately. Using kara canceling, however, you can get around this limitation. This is called chain canceling ("renda canceling", in Japanese).
Chain canceling consists of canceling a rapid-fire Jab or Short into another Jab or Short, then immediately kara cancel it into a special move.
An example would be Ken's cr.Short->cr.Short xx super. The input is D Short, D Short, D/F, F, D, D/F, F Short any punch. So in order to do TWO cr.Shorts into super, you actually need to hit the Short button THREE times. That st.Short on the end is being kara canceled into the super, which is why you never see it. Also note that you must go all the way to towards (even though Ken's super motion only requires you to go to down/towards). This is because for chain canceling, you must switch from crouching to standing (or from standing to crouching). Because you started with cr.Shorts, you have to end with a st.Short.
The reason why chain canceling is so incredibly good is because you can hit confirm (wait to see if it hits or not). If the Shorts are blocked, go for a throw or a DP. If the Shorts connect, just continue the combo into super.
Randomness
Unfortunately, in ST there is a fair amount of randomness. Known randomness includes:
- The amount of damage done by a move (This can be extreme)
- The amount of dizzy damage done by a move
- Ryu's [cr.Short->cr.Short xx super] simply won't combo half the time, even when timed perfectly.
- Gief's standing 720 (He'll just jump half the time, even when timed perfectly)
- Who gets the throw when both players input the command on the same frame
- The length of throw invulnerability on wake-up
- The time it takes for a character to recover from dizziness
- The position of the rocks in Sagat and Chun Li stages
Majestros has also written up a good article on randomness in the SF2 series.
--NKI 03:41, 15 April 2008 (UTC)
Hit-boxes
The so-called "priority" of attacks, that is, what move beats what, is explained by their hit-boxes. There is no actual priority in Street Fighter II, that is, a move which is coded to be completely invulnerable to a certain move but may also be coded to lose to some other move cleanly. What happens in game is that characters have boxes which represent their vulnerable parts. These are the defensive hit-boxes, or proper hit-boxes. They are mostly located around the character body, but do not necessarily match the whole art. When a character attacks, it places another kind on box on the screen: the offensive hit-boxes, or attack boxes. When an offensive hit-box from a character intercepts a defensive hit-box from another character, the game registers either a hit or a blocked attack, depending on the type of move and if the other player blocked correctly.
There is yet another type of box, which are the pushboxes. They determine the are the character occupies on the screen. The pushboxes from different characters can never overlap. Finally, when characters throw projectiles, they come with collision boxes around them. These are the boxes related to projectiles disappearing when they get close to each other.
There is a very good guest article by Dammit on Sonic Hurricane about hit-boxes. It has instructions on how to enable them on emulators and illustrative pictures of several interesting aspects about the theme.
The Shoryuken.com user Born2SPD captured the hitboxes from all attacks from both 'Old' and 'New' characters with perfect resolution and put them in the SRK wiki. They are found on the character pages. The Shoryuken.com user Papasi recorded and captured the hit-boxes as well, but with the disadvantage of them being a little blurry. It has a option to compare hitboxes side by side and drag and drop comparison which are worth checking though. Link.
The Characters
Super Street Fighter II X/Turbo allows you to choose among 16 readily available characters. Two of these are the original playable characters from Street Fighter: Ryu, the game's protagonist, who is a Japanese karate practitioner, and his friend Ken, another karate practitioner, who used to be a clone but since CE earned a few distinct special and normal moves. Their gameplay revolves around their special projectiles, the Hadouken, and their (originally) invincible anti-air move, the Shoryuken. Street Fighter II allowed 6 more characters to be used, which were E. Honda, a sumo practitioner with very damaging attacks, but poor mobility; Chun Li, a Wushu practitioner with fast attacks and movement, and particularly good aerial attacks; Blanka, a savage half man half monster fighter from Brazil with electrical powers; Zangief, a Russian wrestler with slow speed but very damaging long-range throws; Guile, a US military worked in hand-to-hand combat; and Dhalsim, a yoga practitioner from India who can breath fire and stretch his limbs to attack from a distance. The four bosses from the original game are also available: US Balrog/Japanese M. Bison, a former heavy weight boxing champion; US Vega/Japanese Balrog, a Spanish torero that fights with a hand claw; Sagat, the boss from the original Street Fighter, a Muay Thai champion that can summon fast projectiles; and US M. Bison/Japanese Vega, a fast fighter with special powers and dangerous combos. Four more characters had been added in SSF2 and are still available in ST/X: Fei Long, a Bruce Lee clone with great speed and combos; Dee Jay, a Jamaican musician and fighter; T. Hawk, an American indian versed in wrestling; and Cammy, a British special force agent with fast attacks and walking speed. All these characters have distinct abilities and weaknesses, providing a different experience when you either use them of face them.
The readily available version of the characters can be obtained by simply moving the cursor to the specific character and pressing any button. Each of the buttons will give a different color, including the Start button, being that an additional color can be obtained by holding any attack button. These characters have a move set which was reviewed by the time the game was released. However, the versions from the previous game, SSF2, were still available through the use of a code. These versions are called "old versions," or "super versions." Note that "super" comes from the name of the previous game and not any special property these characters may possess. In fact, most super versions are worse than the reviewed, Super Turbo/X versions of the character.
Old Characters
To choose the old version of a character, first choose that character, then immediately input the corresponding code. Each of the codes consists of four directions (combinations of Up, Down, Left, or Right) followed by Jab or Fierce. In order to get the 2P color, enter the code with Jab+Short or Fierce+Short.
There is actually a pattern with the old character codes. For Ryu through Guile, the code is the inverse for the character below. For example, Ryu's code is RRRL, and Ken's is LLLR. This pattern is followed until you get to the four new challengers (Hawk, Fei, Cammy, Dee Jay). Instead of having top/bottom inverses, they have adjacent (left/right) inverses. The top/bottom inverses begin again with the bosses.

O.Sagat, O.Ken, and O.Hawk are the only old characters that are clearly better than their new counterparts. Despite losing their Super moves, and the ability to soften throws, they all gain more than enough to compensate for those loses.
O.Sagat is generally considered to be one of the best characters in the game. His Tiger Shots can zone opponents effectively from full screen for entire rounds without them having a chance at getting in. He can throw a slow then fast Tiger Shot, and they both must be blocked and will do chip damage, and there is no in-between frame for the opponent to avoid the second shot. And he can throw Tiger Shots in such a way, by changing his patterns, that jumping at him will only get you smacked out of the air by a Tiger Uppercut. O.Sagat is a ferocious pure zoning character.
O.Ken, while losing his knee-bash, Super, and jumping medium kick for very deceptive cross-ups, gains better fireballs, diagonal jumping Roundhouse cross-up and dragon punches that are invincible until they reach their respective apex. Ken's invincible dragon punches give him one of the strongest close range option selects in the game (the auto mix-up aka the shoto mix-up). And O.Ken's Jab dragon punch is basically a universal tool for everything from footsies to anti-air. There are not many attacks at close range, that when started on the same frame as O.Ken's Jab dragon punch, that can beat or even trade with it. O.Ken's sweep also has significantly better priority than N.Ken's.
O.Hawk has better normals almost across the board, all of his Jabs are better, his low Roundhouse is much faster to sweep opponents, his low Strong doesn't have a stray hit-box, and his splash has a hit-box that is almost twice as large as N.Hawk's splash. The splash allows him to cross people up with lethal damage and dizzy potential. O.Hawk also has better dragon punches, and combined with his better normals, more than makes up for his loss of a Super throw and the ability to soften throws.
O.Honda is closely competitive compared to his N.Character counterpart, some say that he's not as good overall, others argue that O.Honda is better than his N.Counterpart. O.Honda loses his command throw, HHS that advance forward, his Super, and the ability to soften throws. He gains much better normals, HHS that can be steered right and left, and HHS that recover very quickly. O.Honda's crouching Fierce punch knocks down, and all of his far standing kicks knock down which works wonders in footsies. O.Honda's HHS recover quickly enough that you can use them to tick into O.Honda's throws and holds very easily.
O.Ryu, O.Chun, O.Boxer, O.Guile, O.Fei, and O.Dhalsim, all have enough advantages that they can still be considered competitive, though not nearly as much as their N.Character counterparts. O.Zangief has had success at competitive levels though it has been extremely limited. While none of these characters are on the same level as their better halves they aren't completely absent from competitive play either.
O.Cammy, O.Blanka, O.DJ, O.Dictator, and O.Claw are not really competitive at all compared to their N.Characters. Basically the only time you will see these characters being used is in casual play for fun. Some Japanese tournaments have a rule where you get two slots to choose characters with, but no duplicates are allowed. So sometimes you'll see a Blanka player choose N.Blanka and O.Blanka with his slots, rather than have his secondary be a different character.
--NKI 17:16, 11 April 2006 (CDT) --VirtuaFighterFour April 2010
The Japanese typically use the letter S (for the "Super" in SSFII) instead of O to designate the use of an "old" character. If you're watching a video that's actually from Hyper SFII/SFII:AE, you might also see W (for World Warrior, the original SFII), C or D (for Champion Edition, or "Dash" in Japan), H or T (for Hyper Fighting, or "Turbo" in Japan), and X (for SSFIIX:GMC, aka ST "new").
Playing as Akuma
Akuma is playable as a secret character. To choose him, input the following code at the character selection screen:
- Start with the character selection cursor over Ryu or Ken. Wait a small period of time. (Three seconds should be plenty.)
- Move the cursor to T.Hawk. Wait in the same way.
- Then move the cursor to Guile. Wait a short while again.
- After that, move to Cammy. Wait.
- Finally, move the cursor back to Ryu or Ken. Wait one last time.
- At this point, you may optionally move the cursor to any character. There's no real reason to take this unnecessary step unless you're afraid you might get the code wrong and want to choose a specific backup character in such a case.
- Now press start, and then very quickly after pressing start (within about 0.3 seconds is suggested), press all 3 punch buttons simultaneously.
Since Akuma is considered an overwhelmingly-strong character, he's banned in virtually every tournament. Choosing him outside of tournaments may also be frowned upon if the games are being played with any kind of seriousness. Playing as him should be done for entertainment value only.
--Raisin (May 6, 2007)
In-depth Strategies
![]() Akuma - Code: (3 secs on each character) Ryu or Ken, Hawk, Guile, Cammy, Ryu or Ken, Start, then all 3 punches simultaneously.
Akuma - Code: (3 secs on each character) Ryu or Ken, Hawk, Guile, Cammy, Ryu or Ken, Start, then all 3 punches simultaneously.
--NKI 17:16, 11 April 2006 (CDT)
Strategy
When playing ST, the three most important things are:
- knowing the match-ups
- being able to execute
- being able to out-smart your opponent
You can learn the match-ups by watching vids/reading strats, and you can improve your execution by practicing at home by yourself, but the only way to improve your mind games is to have lots of experience against human opponents. Experience is crucial.
Stable Strategies vs. Shenanigans
It is important to rely on stable strategies and not on shenanigans. A good example of this is the opening attack of the round in a Ryu vs. Dictator match. If Ryu starts off the round by throwing a fireball, Dic can jump at him and do [cross-up j.RH, st.Short, st.Short, st.Short xx Psycho Crusher] for the dizzy, follow up with [j.RH, st.Short, cr.Forward xx Scissor Kicks] for the win.
That is a shenanigan. It is not something that you can consistently rely on to win matches. Your opponent will (hopefully) wise up to the fact that opening the round with a fireball is a bad idea for him.
The most stable strategy for Dic would be to just simply duck-block and wait to see what the opponent does. In the absolute worst-case scenario, he simply blocks a Fierce fireball. Another stable strategy would be opening with [slight step forward, st.RH], which would stuff fireballs and Hurrican Kicks, but lose to DPs.
Also consider the Psychic DP. The Psychic DP is where your opponent does a seemingly safe, non-blatant move, and you "read your opponent's mind", countering him clean with a DP out of nowhere. That might work once in a while, but the truth of the matter is that if you aren't Daigo Umehara, you shouldn't try Psychic DPs, because it is not a stable strategy.
Counter Characters
There are two very different schools of thought when it comes to character selection. One school of thought is basically that because the game has counter characters, you should learn more than one character in order to do well overall. Another school of thought is basically that if you just stick with one character and learn all of the match-ups inside and out, the "counter matches" will not be nearly as hard, and you won't ever need to switch characters.
I feel that relying on counter characters is a very unstable strategy. For one thing, every match is winnable, and for another thing, the numbers are overwhelming. For every one character you play, you need to know 16 match-ups, and that can take an extraordinary amount of time to learn. If you only stick with one character, say, T.Hawk, and if you just man up and learn all 16 matches, you can beat any character, even Dhalsim (as Toutanki has shown). Obviously Dhalsim still has the advantage, but it is definitely not a free win, as a lot of people would have you believe.
Playing counter characters will only work consistently against other people who also play counter characters (people who don't know their characters 100%). It will not consistently work against people who know the matches, and that is why I would not advise relying on counter characters.
I think a good example is the Japanese player Muteki Guile (whose name means "Invincible Guile"). He has unquestionably one of the best Guiles in the world, and he also plays a little bit of Chun (in casual matches). If he were to play in tourney against a Blanka player, he could try switching to Chun (who is considerably better than Guile versus Blanka), but if he wins, then his opponent could just switch it up to O.Sagat and counter-character his Chun (because Muteki Guile doesn't know Chun 100%).
But that situation will never come up for him, because he has taken the time to master Guile, and he has no need to switch to Chun. Even though Blanka vs. Guile is an uneven match, Muteki knows exactly what he can do, and that match is still totally winnable for him, even against the best Blankas.
While the advantage of counter characters is grossly over-exaggerated by a lot of players, it is true that certain characters have inherent advantages over others. Counter character examples that particularly stand out:
- Chun does well against Zangief, Blanka, and Dictator
- Honda does well against most non-fireball characters
- Fireball characters do well against Honda
- Dhalsim does extremely well against everyone but Chun, Claw, and Boxer
- O.Sagat does well against Chun, Zangief, Hawk, Honda
- Blanka does well against Hawk and Dictator
- O.Hawk does well against Chun
- Cammy does extremely well against N.Hawk but has a harder time against O.Hawk
Game Plan
You should never be free-styling a match. You should know before-hand exactly what your game plan is, what advantages/disadvantages you have, and exactly what moves of yours will counter your opponent's (as well as what moves your opponent can use to counter yours).
For example, if I'm Chun playing against Dictator, I go into the match knowing that Chun can get in his face pretty well, and there's not much he can do about it. Dic has no good anti-air, so I can do j.Forward a lot; Dic has no reversal other than super, so I can do meaty D/F RH for free; lightning legs will beat his Psycho Crusher and Scissor Kicks cleanly; upkicks will lose cleanly to his headstomp, etc.
Playing to Win
If you notice that your opponent has any particular weakness, you need to show no mercy and exploit it. Note that the opponent can notice any weakness on your game as well, so try your best to avoid those things below. Common weaknesses include:
- Inability to consistently reverse throws
- Inability to consistently reverse meaty attacks
- Wanting to use the super as soon as the meter is full
- Going for the "revenge super" after getting hit by something big
- Overaggression (ex: always going for the reversal DP)
- Panic moves (ex: throwing away the super, jumping back to the corner, or blatantly jumping at the opponent when in a really tight spot)
- Lack of knowledge (ex: opponent keeps trying to Tiger Uppercut Sim's j.Forward, not knowing that Tiger Uppercut loses cleanly)
- Patterns (ex: always doing a second Shoryuken if the first one whiffs)
Stored Moves
Through a programming glitch, it is possible to do a move's motion, hold the last direction, and then press the button whenever you want, and the move will still come out. This works with Chun's super, Honda's super, Honda's command throw, and Claw's Flip Kick (kind of).
For Chun's super and Honda's super, charge back, then hit towards, back, then towards and hold it. As long as you're holding towards (or up/towards or down/towards), you can press the button at any time to do the super.
For Honda's command throw, do a half-circle from towards to down/back, and hold down/back. As long as you're holding down/back (or back or up/back), you can press punch at any time to do the command throw.
For Claw's Flip Kick, after you charge down/back, you can switch to back or up/back without losing your charge. (Note that you can not store the move with towards.)
Reversing Tick Throws
A tick throw is when you put your opponent in block stun or hit stun, with an attack, and then throw him immediately after he recovers from stun and returns to a neutral state. So you would hit your opponent with an attack, wait for him to return to neutral from stun, then throw him on the first frame where he returns to neutral. So let's say that you are playing Dictator, your opponent is using Guile, you attack your opponent with a standing Short kick from point blank range and he blocks it, you then wait until your opponent recovers from block stun and you throw him. You have just tick thrown your opponent. The 'tick' in that scenario was the standing Short kick.
A perfect tick throw, which is what you'll always want to perform, is when you throw your opponent on the very first frame that they return to neutral from stun. This requires precision timing, 1/60 of a second when you tick into a normal throw, but with practice and continuous play, executing perfect tick throws can be done consistently. The exception to this rule is Zangief using a command throw, his SPD has 11 active throw frames, so he only needs 11/60 precision timing for a perfect tick throw. N.Hawk, O.Hawk, and and N.Honda can negative edge their command throws up to three times for three chances as well, without having to worry about a whiffed normal coming out. Once you begin to effectively utilize perfect tick throws, you then leave your opponent no choice other than to perfectly reverse your tick throws.
If you tick your opponent, and he continues to block after your tick, they you can throw him for free (because throws beat guard). So how does he beat that incoming throw? Or if you are on defense, how do you beat tick throws? The answer: you must reverse. That link is a video tutorial by NKI, illustrating how a tick throw works, and how a reversal special attack beats a tick throw. Essential viewing.
The way to beat tick throws is to perform a reversal special attack, reversal super attack, or a counter throw (which could be a normal, special, or super throw) on the first frame that you recover from stun. Not all reversal attacks work to beat throws however. All fireballs can be thrown on their first frame of animation, Boxer's rush punches can also be thrown right as they start, as can Dictator's psycho crushers. Trying to reverse a tick throw with those attacks will get you nowhere. Refer to the chart further below to see what special moves can be used to beat tick throws for each character. Some characters also cannot use reversal supers because of a bug (further description below as well). Lastly, if you use a throw as a reversal on the first frame out of stun, you only have a 50/50 chance of getting a throw against a perfect tick throw. Why? Because when two characters throw each other on the same frame, within each others' throw ranges, the game engine randomly picks who gets the throw and who gets the whiffed normal attack or nothing at all. Throws also have no priority, providing that they are within range. Meaning Guile's normal throw can beat T.Hawk's command throw when they are done on the same frame. However T.Hawk can stand outside of Guile's throw range, and then throw Guile, without having to worry about a counter throw because Guile is out of range. Refer to Geo's throw range chart or T.Akiba's data to see how throw ranges affect each character match. A more complex example of how throw ranges affect the game can be found in the Dictator section.
Timing anything, such as a reversal, with the precision of one frame is pretty difficult. That reversal frame, which in this case is the first frame of neutral state that a character returns to after recovering from either hit or block stun, lasts for just 1/60 of a second. And it is on that frame, during that 1/60 of a second window, where you must perform a reversal attack or throw in order to beat a perfect tick throw. The timing is extremely strict which is what makes tick throws quite powerful as offensive weapons. When you perform a perfect tick throw you give your opponent only a single frame where they can turn the tables before they get thrown.
If the attacker tries to tick throw you, and he is within your throw range, you can try to counter throw him but the result is going to be 50/50. And if the attacker has more throw range than you, and he ticks you to where you are outside of your throw range, then you must resort to a special or super move. So if you try to counter throw from outside of your throw range you'll be attempting to thrown in vain. Some characters reversal attacks require charge. So if you are playing Guile, and you get up to block an overhead attack, you lose the charge for a flash kick to beat tick throws, meaning you run a huge risk getting thrown. Dictator can only beat tick throws with his super, which requires a full super meter, and once its expended must be recharged. The point is that every character in the game has a move that can be used to get out of tick throw attempts, however, some characters have much better options than others.
- Ryu: Dragon Punch, Hurricane Kick, super
- Ken: Dragon Punch
- Chun: upkicks, Spinning Bird Kick, super
- Guile: Flash Kick, super
- Blanka: Horizontal Ball, Vertical Ball, backwards dash, super
- Zangief: SPD, 360 K, super
- Dhalsim: Yoga Teleport
- Honda: Headbutt, Butt Slam, command throw, super
- Hawk: uppercut, command throw, super
- Fei Long: Flame Kick, Chicken Wing (his twist kick move), super
- Cammy: Cannon Spike, Spinning Knuckle, super
- Dee Jay: Double Dread Kicks, upkicks, Machine Gun Upper, super
- Boxer: Buffalo Headbutt, super
- Claw: Backflips, Flip Kicks
- Sagat: Tiger Uppercut
- Dictator: super
Blanka's Horizontal Ball and Vertical Ball have no invincibility, but they hit on the first frame (they have 0 frames of start-up), so they can also be used to reverse ticks, as long as the opponent is close enough so that the ball will hit on the first frame. If Blanka is too far away, he must use his back dash. Characters with special throws or super throws can also use those to reverse ticks, because command throws have large range and are also 0 frame moves. Due to a glitch in the game, Ken, Dhalsim, and Sagat can NOT use their supers for reversals.
Sacrifice throw (aka sac throw)
This is a strategy to counter early aerial attacks where the defender lets himself get hit (sacrifice) in order to gain a frame advantage and perform a counterthrow as a result. Specifically, sac throws only work against medium or heavy jumping attacks against a standing opponent since it's the only case where the hitstun remains the same (11 frames) regardless of the strength of the normal.
In all other cases, both hitstun and blockstun take more frames with stronger normals. For this same reason, the defender of the aerial attack can perform an early counterthrow if he lets himself get hit instead of blocking the attack. The attacker is going to get caught by surprise as he is expecting the opponent to recover much later especially if he was attempting it with heavy normals.
Sac throws have two main uses: 1) countering tick throw attempts 2) blockstrings.
Against tick throws, the attacker expects the opponent to block against a safe jump. If he chooses a medium or heavy attack, he will expect a long recovery. However, if the defender lets himself get hit, he will recover much faster and be able to counterthrow before the attacker attempts to throw him instead. Of course, this is risky. If the attacker decides to delay the timing of the aerial attack, the attacker can connect a powerful combo for free.
Against blockstrings, the idea is pretty similar. But the subsequent attack will be a normal or a grounded special attack instead of a throw. Attackers usually try to hit their jump attacks as low as possible in order to perform combos. With the use of ground normals, you can force them to aim their air attacks higher in order to beat those grounded normals. If you block those high aerial hits, they might try to perform a blockstring. But with a sac throw, you would have the advantage to throw them as soon as they land.
Multi-tap/Multi-release
Multi-tapping refers to hitting more than one button in an attempt to get a reversal. For example, if I simply hit F, D, D/F Fierce, I have to time my reversal with the precision of a single frame (about 1/60th of a second), and that's pretty hard. But if I do F, D, D/F press Jab~press Strong~press Fierce~release Jab~release Strong~release Fierce, I now have a SIX-FRAME window to work with, which is remarkably easier.
Multi-tapping can (and should) be used with throws as well. Don't simply hit one button if you are trying to do a reversal throw. Unless you are going for one specific throw (like Ken's knee bash) and you have extreme confidence in your reversal timing, you should use every button your character can throw with. With Chun, you should try to reversal throw with Strong~Fierce. With Ryu, you should try to reversal throw with Strong~Fierce~Forward~RH.
Option Select
Option select refers to doing one thing that covers more than one possible outcome. For example, I am Honda, and my opponent is trying to do a meaty attack to me as I get up. I do a half-circle to down/back and hold it, so now I have the command throw stored. I press and hold all three punches before I get up (so that nothing comes out), and with reversal timing, I multi-release the punches. There are only two possible outcomes:
- I timed the reversal properly, and I will throw the opponent
- I did not time the reversal properly, but I will block safely because I was holding down/back
Another good example of option select is safe jumping and safe reversing...
Safe Jumps
You can time a jump-in meaty enough so that it will force the opponent to block if they don't reverse, but if they do reverse, you can land quickly enough to block their reversal. This works because there are very few moves in ST that hit on the first frame.
Safe jumps are much more practical against moves that do not have hitting frames at the very beginning. For example, it's very easy to do safe jumps against Boxer's Buffalo Charge, because the quickest version (Jab) has a window of 11 non-hitting frames in the beginning, which gives you plenty of time to land. Safe jumps are extremely hard (or impossible) against moves that have very few (or zero) frames of start-up. Don't try doing safe jumps against:
- Ken's DPs
- Blanka's upballs and horizontal balls
- Akuma's hurricane kicks and uppercuts
Safe Reversal
Safe reversal is a very useful (but very difficult) option select technique. When your opponent does a meaty to you, safe reversal allows you to attempt a reversal risk-free. For the command of the move you're attempting to do as a reversal, rather than leaving the stick in the command's final position and pushing the buttons, if you quickly move the stick to D/B and release the buttons after finishing the motion, you will block if you didn't time the reversal correctly.
For example, with Ryu, as you're getting up, hold all three punches, then do F, D, DF, D/B release Jab~release Strong~release Fierce. If you timed it correctly, you will get a DP. If you didn't time it correctly, you will block. Note that you only have a relatively small window of time to reach D/B and release the buttons, so you must be quick.
Throw For The Win
If you have the opponent's life down to where a teched throw would not kill him, but a non-teched throw would kill him, he will die regardless of if he techs or not. You will see him visually tech the throw, but he will still take full damage and die.
This also works with dizzies. If the opponent has gotten hit by a couple of moves and is at the point where a throw would dizzy him, that throw is untechable, and the dizzy is guaranteed.
Instant Jumping Overheads
Only a few characters (Ryu, Ken, Fei) have true overheads as ground moves, but some characters can also do an overhead as a jumping attack immediately after leaving the ground, at point blank range. These typically can only be done to finish the opponent, because obviously you can't block on your way down from the jump. Good jumping overheads include:
- Chun's headstomp (will beat DP clean)
- Dic's j.Forward
- Boxer's j.Short and j.Forward
Note that Dhalsim's drills, despite being jumping moves, can be duck-blocked. In fact, if angled correctly, they MUST be duck-blocked, because they can hit as a low move.
Cross-ups and Horizontal Charge Moves
If you have a horizontal charge and the opponent crosses you up, you will lose your charge. The three exceptions to this are Chun's stored super, Honda's stored super, and Honda's stored Ochio. With those moves, you can switch the direction of your charge as your characters switch sides. (Side note: Claw can not do this with his stored flip kicks.) In general, if you're being crossed up while you have a horizontal charge, you can still perform the charge move at the moment of the cross-up, when your charge is forcibly removed. For example, Guile knocks down Honda and goes for a cross-up. Honda is already charged, holding the back direction. When Guile crosses up Honda, the back direction turns into the towards direction, and if Honda hits punch, he will get a Headbutt.
--NKI 14:45, 7 January 2007 (UTC)
Throw Range Matchups
Since throws and holds are such an important part of the game, it is useful to know whether you have a throw range advantage or disadvantage in any particular matchup. For example, if I am playing Ryu against a good Blanka player who utilizes his maximum throw range after a tick, I know I will lose if I try to counter-throw if I am out of my own throw range, since Blanka's throw range is greater than Ryu's.
Geo posted an excellent chart on his blog comparing throw ranges by character matchup ranked from top to bottom based on T. Akiba's data. For characters with multiple throw ranges, T.Hawk, Zangief, and Honda, only the throws with the largest ranges are represented on this chart. So T.Hawk's, Honda's, and Zangief's command throws are the data for this chart, all of their normal throws have shorter range than their respective command throws. If you want to see what the different ranges for the throws for those characters then consult T.Akiba's data.

-- Janus Gemini 01:09, 8 August 2009 (UTC)
Tiers & Balance
There is no clear, definitive, universally agreed upon tier list for ST. Even a game as old as ST, that came out in March of 1994, is still evolving. New, or updated, tier lists have appeared in Japanese magazine Arcadia as recently as November of 2008. Below are three tier lists. The first tier list is from the February 2008 issue of Arcadia magazine that ranked (some of) the characters in different tiers based on player consensus and then was finalized by Gian (a top Japanese Dhalsim player). The characters are arbitrarily lumped together in the first tier list (meaning they are not listed in order within the tiers). The second tier list is a diagram, a match specific chart, that ranked every N.Character in a ten point scale across the 15 different character matches. The third list is an individually ranked matchup chart done by various players mostly from the United States.
Arcadia February 2008 Tier List:
SSS Rank:
Akuma
- extremely powerful, cannot be dizzied, red fireball can lock characters down in the corner infinitely, is usually banned in every tournament
S Rank:
O.Sagat, Dhalsim, Boxer, Claw, Chun
A Rank:
Ryu, Dee Jay, Guile, O.Ken, Dictator, O.Hawk
B Rank:
N.Ken, N.Honda, Fei-Long, N.Sagat
C Rank:
Zangief, Cammy, Blanka, N.Hawk
The second list is ordered from top to bottom based on the ten point scale. All of the characters are N.Character versions in this list. The name next to each character is the player who was responsible for assigning the overall number of points to that character. The full diagram, with more information about how this list was formed, is available at Nohoho's blog.
Arcadia November 2008 Chart
Dhalsim (Gian)+27
Boxer (Tsuji)+19
Claw (ARG)+18
Ryu (Gotoh)+15
Chun-Li (Nuki) +13.5
Guile (Muteki)+9
Dee Jay (yaya)+5
Dictator (Taira)-5
E.Honda (Kusumondo)-5.5
Sagat (yaya)-5.5
Ken (Aniken)-7.5
Fei-Long (Yuubou)-7.5
Zangief (Gunze)-16
Blanka (Komoda) -18.5
Cammy (Nakamura)-18.5
T.Hawk (K)-22.5
The third list is far too large to put in the SRK Wiki. Follow the link to Nohoho's blog to see the full chart, plus an explanation how the chart was formed, as well as some discussions in the comments sections.
A fourth tier list, composed for ratio based tournaments at Kohatsu (a Japanese arcade), has all 32 characters, both old and new, grouped into four tiers. The characters are not ordered within the tiers. This list was composed in the fall of 2010 and differs from the Arcadia 2008 tier list.
Ratio 4:
Claw, Dhalsim, Chun-Li, Boxer, O.Sagat
Ratio 3:
Ryu, Guile, Dee Jay, O.Ryu, O.Ken, O.Chun, O.Dhalsim
Ratio 2:
Ken, Dictator, Honda, Zangief, Fei-Long, O.Fei, O.Box, O.Honda, O.Hawk, O.Guile, O.Claw
Ratio 1.5:
Sagat, Cammy, Blanka, T.Hawk, O.Cammy, O.Blanka, O.DJ, O.Dic, O.Gief
Gian and T.Akiba gathered a new list after SBO 2011. Thanks Nohoho for the information.
Tier 1:
Dhalsim, Claw, Boxer, O.Sagat
Tier 2:
Chun-Li, Dee Jay, Ryu
Tier 3:
Guile, O.T.Hawk, Dictator, Honda, Ken, Sagat, Fei-Long
Tier 4:
T.Hawk, Blanka, Cammy, Zangief
This features Dee Jay being promoted to the second highest tier, while Guile and Ken are below. We assume O.Cammy, O.Blanka and O.Dictator are in tier 4 or below.
Super Turbo is more about matchups than definitive tiers. Every N.Character is competitive and several O.Characters are competitive as well (though not all of them). There is no character that is completely excluded from tournament level play because they aren't effectively competitive. While Dhalsim and O.Sagat are clearly better overall than Cammy and N.Hawk, the top tier characters are still beatable, and the low tier characters are still capable of winning. That being said, the odds of seeing Dhalsim and O.Sagat in the later rounds of a tournament, are noticeably higher than seeing a T.Hawk, Blanka, or Cammy player make their way to the finals. But unlike many other fighting games, the lowest tiered characters in ST still make appearances in tournament finals, no one character is completely shutout. In retrospect it is truly amazing to see how ST has evolved into a more balanced game than Capcom ever imagined.
Akuma however is banned in basically every tournament, because he is far too powerful, and dominates the entire cast unfairly. Capcom designed him as a secret boss character for a reason. His air fireball is next to impossible to deal with for most of the cast. His red fireball can be used to infinitely lock any opponent in blockstun in the corner for a perfect, inescapable blockstring, complete with chip damage. And his normals and special moves also have ridiculously high priority hit boxes. It is extremely rare to see a tournament allow Akuma to be used.
Online play
There are many options.
HDR classic mode can be played on Xbox360 XBL or PS3 PSN.
Super Street Fighter 2X can be played online on FightCade, which supports Windows, MacOS and Linux operating systems. You can also play super turbo on ggpo.net (ggpo newbie guide) or damdai's Supercade or arclive (mostly chinese speaking players)
Training Mode
Dreamcast ST and Xbox360/PS3 HDR classic mode provide a training mode. Alternatively, you can run emulators with save states / cheats. A pre-configured MAME training mode with hitbox display can be found here
XSPR also wrote a comprehensive lesson driven training mode here
Pof wrote a modern training mode cheat for MAME that fixes most of the glitches from older training modes, it can be found as a bundle with the emulator and cheat files integrated (ROMs need to be added)
Jedpossum also wrote a training mode that can be patched directly into the JP rom. This one is useful for online training in "unsupported room", and also to convert a CPS2 board to training mode by swapping the 03 and 04 EPROMs.
Game Versions
CPS2 (arcade)
This the original release of Super Turbo.
What follows is a list of ports and differences from the original arcade version.
Dreamcast
The size of the screen is slightly off (it's a little too narrow), making the character sizes appear to be slightly too thin. There is no evidence to show that this affects gameplay in any way.
The Dreamcast version occasionally suffers from 1 frame of input lag (possibly more if you're using a PSX->DC controller converter), though this is undetectable by most players.
During "Round 1/2/3, FIGHT!", the game suffers from noticeable slowdown, regardless of the speed setting. In the arcade version, if you start counting from the moment the background becomes visible until the moment your can control your characters, the elapsed time is almost exactly two seconds. In the Dreamcast version, it's almost exactly 3 seconds. This means you must slightly alter the timing of your opening attack.
In the arcade version, O.Chun can not control the strength of her reversal fireball. (The game "stores" the strength that you previously did.) This was corrected in the Dreamcast version. Strangely, T.Hawk and O.Dictator suffer from similar problems with reversal uppercut and reversal Devil's Reverse, respectively. There is a DIP switch to correct O.Dictator's, but T.Hawk's remains in tact.
By default, there are a few other slight gameplay differences as well (such as Dhalsim/Ken/Sagat being able to reversal super), but aside from the above mentioned reversal glitches for Chun and Hawk, all of the tested and known differences can be corrected using the in-game DIP switches.
Playstation 2 (Hyper Street Fighter II Anniversary Edition, only the ST characters will be addressed)
This version has not been thoroughly tested, but the known differences are:
-O.Sagat's Tiger Shots have been toned down considerably
-Ken, Dhalsim, and Sagat can do reversal supers (which they can not in the arcade version)
-Due to an error in porting, Claw's wall dive (ST versions only) must be performed Charge D, K, U (pressing Kick before Up, instead of the normal order)
-if an ST character is facing a non-ST character, the ST character can not tech the throws (in ST, New characters can tech Old characters' throws)
-Holding start when selecting Super Turbo or Super seems to allow access to the original arcade versions of each character.
Xbox (Hyper Street Fighter II Anniversary Edition, only the ST characters will be addressed)
No information is documented at this time.
Playstation 1
Known differences in the PS1 version:
-if the opponent blocks Dictator's Fierce Psycho Crusher mid-screen, Dic lands right next to the opponent
-Ken, Dhalsim, and Sagat can do reversal supers (which they can not in the arcade version)
-there is a slight delay between "Round 1, Fight!" and when you can actually move (speculation, untested)
-Chun Li falls extremely slowly after her medium upkicks (Short and RH are correct, though)
-Guile regains CPS1 chains
-only two buttons are required for three-button moves (ex: Zangief can do a lariat by hitting only Jab Strong or Strong Fierce or Jab Fierce)
-inputs must be done more quickly (speculation, untested)
-comboing into Ryu's super is exceptionally difficult
-tapping two buttons one right after the other counts as hitting them simultaneously
-when a character has zero life left, it takes two blocked specials to kill him/her
-characters don't seem to get dizzy as easily (speculation, untested)
Sega Saturn
The Saturn version's characters appear to be too big because the screen is stretched. Again, this technically shouldn't change anything in the game, but no thorough testing has been done. One other notable difference is that Guile regained his CPS1 chains. This version is not thoroughly tested, and most likely contains more differences.
Playstation 2 / Xbox: Capcom Classics Collection Volume 2
-The custom code used in this version fixes many inaccuracies found in other common emulators such as MAME and Kawaks.
-This version was emulated from the original arcade ROM's, unlike any other version.
-Some stages are known to cause slowdown or speed changes.
-Sometimes sound effects are known to play at random times, especially the ones for special moves.
-"time warps" where the game will suddenly "jump forward in time" by about 5 to 10 frames.
-There have been many claims of input lag from a large number of arcade players, these claims were later verified in the test seen here.
-Every once in a while, buttons will spontaneously remap themselves, even in the middle of a match.
Xbox 360 / PlayStation 3: Super Street Fighter II Turbo HD Remix
Super Street Fighter II Turbo: HD Remix. A changed version of the traditional ST game with new graphics, 1080p native resolutions, re-balanced gameplay, online functionality, training mode, versus mode, and arcade mode.
Also has a Classic mode, which is the Dreamcast port of ST. The Xbox360 version has 1.5-2.5 added frames of input delay over the arcade version, with the PS3 version having additional 3.5 frames of input delay.
3D0
The most glaring problem with the 3D0 version is that the Old characters are completely missing. It also has lots of missing animation. For example, all of Zangief's ducking punches are the same animation in the 3D0 version.
Other known differences :
- All characters get CPS1 chains
- Gouki/Akuma's Red Fireball has lesser recovery and can throw another fireball again at the 2nd hit !
PC
The PC version initially contained bugs such as moves being missing, however there are two patches available that fix most of the major bugs in this version.
Game Boy Advance
-The character sizes and animations are totally different. Way too many differences to try to list.
-Potential to crash the game (forever) if Akuma is fought.
Nintendo Switch (Ultra Street Fighter 2)
Basically a slightly adjusted version of ST, speculated to be based on HSF2 due to some similarities in the characters, and objects on Ryu stage etc.
-Game speed is slower, speculated to be 1.35x faster than turbo 1 on Japanese ST.
-Throws can now be fully teched, works similar to 3s throw techs, done with the same input as throw softening, window now seems tighter.
-Slight reduction in throw damage.
-No "old" versions of characters.
-Stage speed variation is gone, all stages are the same speed.
-Breakable stage objects are purely visual, no longer have an effect on falling characters after holds and throw softens in the corner.
-Damage and dizzy variation on attacks are now gone, a move will always do the same damage/stun value.
-Evil Ryu and Violent Ken added as playable characters.
-Gouki has a super like in HDR, though he's based on the ST version of Gouki.
-All characters except Gouki, Evil Ryu, and Violent Ken, all have the same dizzy rate (30, 34 after one dizzy).
-Special moves and supers seem to be slightly easier to get to work.
-Ken, Sagat, and Dhalsim can now properly reversal super.
-Oicho, Honda and Chun's supers, and Claw's flip kicks can no longer be stored.
-Claw will climb the wall on Spain stage if he does a walldive.
-Claw cannot juggle after hk flip kick anymore.
-Claw loses his claw for the whole round if it comes off (like old Claw).
-Ryu's red fireball is now half circle back+punch.
-Cammy's hooligan throw is now half circle forward+punch.
-Cammy's backfist/back knuckle is now half circle back+punch.
-Fei's chicken wing is now half circle forward+kick.
-Dhalsim's flame and up flame are now half circle back+punch/kick.
-Sagat's tiger knee is srk motion+kick.
-Zangief's green hand is now srk motion+punch.
-Due to the changes with dizzy rates and set damage/stun, Zangief's neutral jump> up+fierce headbutt will always dizzy the first time it hits in a round.
-Dictator's fierce psycho crusher seems to always hit twice, and he lands very close to them instead of passing through.
-Guile has his CPS1 sonic boom voice clip.
-Gouki's red fireball is now half circle back+punch.
--hagure 22:02, 24 November 2007 (UTC)
--NKI 21:40, 26 May 2008 (UTC)
Regional Differences
Please note that the Japanese arcade version is not the same as the American arcade version:
| Secret character = Akuma | Secret character = Gouki |
| Boxer character = Balrog | Boxer character = M.Bison |
| Claw character = Vega | Claw character = Balrog |
| Dictator character = M.Bison | Dictator character = Vega |
| Speeds are listed as Turbo 0, Turbo 1, Turbo 2, and Turbo 3. | Speeds are listed as Turbo 1, Turbo 2, Turbo 3, and Turbo 4. |
| Zangief's jump straight up up Fierce has no special properties. | Zangief's jump straight up up Fierce is practically a guaranteed dizzy. |
| Can put the game on Free Play. | Has no Free Play option. |
| No dialogue before you fight Akuma/Gouki. | Has a short dialogue before you fight Akuma/Gouki. |
| Akuma/Gouki has no endings. | Akuma/Gouki has two endings (depending on who you fought as the last boss). |
There is also supposedly-a-bug in the WORLD version only, which allows O.Zangief to grab and SPD/Suplex the opponent from any range.
Miscellaneous
-In the arcade version, Dhalsim, Sagat, and Ken can not do reversal supers. If they successfully time a reversal super, they will simply get the last special move they did.
-After getting up from being knocked down, you are unthrowable for 13 frames.
-Old characters have the exact same walking speed as new characters.
-Not all characters get dizzied at the same rate. In order from easiest to dizzy to hardest to dizzy:
- Sim, Claw
- Guile, Cammy DeeJay
- Boxer, Blanka, Chun, Honda, Fei, Ken, Dictator, Ryu, Sagat, Hawk, Zangief
-Blanka's stage is the widest, and Claw's stage is the shortest.
-Boxer's Strong throw has more range than his Fierce throw, even though they're the same throw.
-After being knocked down, different characters get up at different speeds.
Some additional details on miscellany can be found in T.Akiba's game data:
Japanese text / English text
--NKI 14:59, 7 January 2007 (UTC)
The Yoga Book Series
The Yoga Book Series consists of two books released in Japan that contain frame data, hit boxes for every move in the game, in addition to tons of strategies, tricks, glitches, oddities, and a wealth of other information.
The first book is called The Yoga Book Hyper and it was released in 2005. Included with the book was an excellent best-of-the-best tournament DVD featuring Japan's best 16 players, hand-picked by Daigo Umehara. In addition to the tourney, the DVD also features ST casuals, AE casuals, and a CD of remixed Street Fighter tracks.
The second book is called The Yoga Book Super and it was created and handed as a gift to the participants of the Kakerugo tournament in 2017 in Tokyo.
Top players were involved in the making of both books. Yoga Book Hyper focuses on the new character versions of the game whereas Yoga Book Super does it on the old versions.
Help, I can't read Japanese!!
Once you know what the numbers and different colored boxes mean, you don't really need to know Japanese in order to get a lot out of the book. You can view a translation of the diagram names here.
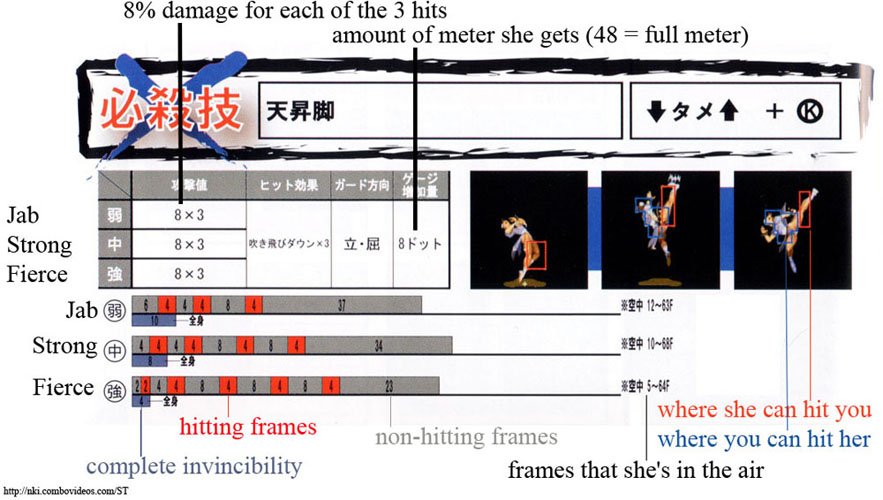
The only parts that really require Japanese are the strategy section and the interviews. For the strategy parts there is a project launched by the LaDose.Net guys in Lyon (France) where they are translating both books into English and French.
Where Can I Buy It?
The Yoga Book Hyper was available at some point on the INH's website and the Play-Asia store. It's currently out of print.
Ammendments/Corrections in the Yoga Book Hyper
When dealing with such a massive amount of information, there are bound to be some typos and mistakes. Here is a list of the mistakes that have been caught. Most of them are very trivial, but for the sake of correctness, here is the translation:
On the DVD staff list, there is a name spelled incorrectly. 北条大吾 小島慎治 should be 北条大悟 小島真志.
On page 23, Guile's Short color is shown as yellow/gold, but it should be red.
On pages 38 and 54, the hit boxes for Zangief's and T.Hawks splashes (jumping down Fierce) are incorrect. Please see official corrections page for images.
On page 70, the name of Zangief's move is incorrectly listed as "Quick Double Lariat", when it should be "High Speed Lariat".
On page 81, the amount of meter gained for Boxer's TAP's are all listed as 7 dots. It should be:
- Level 1: 7 dots
- Level 2: 8 dots
- Level 3: 9 dots
- Level 4: 10 dots
- Level 5: 12 dots
- Level 6: 16 dots
- Level 7: 20 dots
- Final: 32 dots
On page 156, under A7(3), DeeJay's move is listed as "far Fierce", when it should be "far st.Fierce".
On page 164, under Claw's "Other: One Point Technique" section, the "Flying Barcelona Attack" is incorrectly listed as "Barcelona Attack".
On page 175, under "Moves that can juggle up to 3 times", it only lists Claw's Forward and RH flip kicks, when it should list all three (Short, Forward, and RH).
On page 185, under X-MANIA Gaiden Player Introduction, kusumondo's tournament history lists him as the winner of X-MANIA 2000, but he actually got 2nd.
On page 192, under the Daigo Umehara SPECIAL INTERVIEW, the photo cuts off a line of text. It should read ウメちゃんのストリートファイターIIX(以下:X)での強さも再認識できました。
--NKI 14:47, 7 January 2007 (UTC)
SSF2T's Wiki Diagram Conventions
I'm writing this because the diagrams are starting to be not very obvious. To keep the information consistent, compact and well presentable, I'm adopting some simple conventions. If you didn't really got what some stuff in the diagrams actually meant, this topic will clear all your doubts.
- Move name: Each move will be presented with his official and his most common name, if there's one.
- Input data: The special input will be presented, if it's not a normal move (exceptions: some N.Dhalsim moves, which require directions to be activated). All motions are listed under the assumption that the character is facing right. Also, for special and super moves a detailed information about the input will be available. Inputs in ST work in a very simple and straightforward way: there's a set max time (in frames) per input which may differ from move to move. Usually, the time to input the P/K button are usualy longer for light versions and shorter for heavy versions. Supers are always the same regarding the strength of the button pressed. Example: (↓ [0~6f] ↘) means that after ↓ is detected, you can delay the next input (↘) up till 6 frames. Delaying more than that will result in the move not coming out.
- Diagrams may be separated into smaller parts: The reason for this is simple, not everyone uses the same monitor resolution. I designed the diagrams display right in 1280x1024. Since the standard nowadays are wide screen monitors, 1280 pixels of width is fine. When needed, I'll try to divide the diagrams into startup, active, and recovery parts.
- Damage data: For special moves, unless the damage between strengths are different, there will be only one cell for this value. Moves that do more than 1 hit will be presented as a sum of values. Moves with more than one active part with different damage potential but that do only one hit will have its values separated by a /. The number inside square brackets indicates which Random Damage Table the move uses. For more info on how the damage is calculated and all that, read this.
- Stun data: Don't confuse this with hit and block stuns. This is actually related to the Dizzy potential of a move. The Stun Timer is by how much frames the total stun will be stored before getting erased. This is decremented at every frame by 1 (if there's no frameskip). The Stun amount or just Stun is how much stun points the move can afflict on the opponent. This value will always vary from -3 to +3, with 0 being the most common value. This may also be divided by a + or / in the appropriate cases (moves that does 2 or more hits or moves that do different stun depending on the part it hits). When receiving an attack, both stun timer and stun amount of that move are added to their respective counters. If the Stun amount meter goes over 30 points (this may vary a bit) the opponent will fall Dizzy. If the Stun Timer goes to 0, the Stun amount is also erased. The link above gives further explanations on this as well. Values inside parentheses are modifiers for when a move hits an airbone opponent (this usually appears on aerial normals).
- Cancels data: If a move has one of the cancel properties, it will be said here. If a move has multiple active parts, but not all of them can be canceled, the info will be divided, respecting the order of the active parts. An asterisk denotes that Old version of that character can cancel that normal but SSF2's version can't. In HSF2, the Old versions are "hidden", to choose the ST's Old version instead of SSF2's version, hold start while choosing the character version, if done right you'll hear a different sound.
- Frame advantage: This does not apply to knockdowns since each character has his own wake up speeds, this is for block/hitstun only. Hit and block stuns are at most cases the same. If a move has more than one active part but there's only one value present, then that value is from the last active part of the move, with the move doing the maximum quantity of hits. Understand that these values are from non-meaty timed normals (i.e. the opponent was hit from the attack on the first active frame), so if a move is meaty timed it will of course give a better frame advantage. A very good example for this is Dictator's slide, in which it can be made safe if it hits on the last active frames, but will otherwise be a very unsafe move. Also, moves with more than one hitting part will have 1 less frame of advantage if more than one active part actually hits, but only if it results in a combo. In the cases where both frame data are available, the combo case will be presented inside parentheses. A example for this situation is T.Hawk's Crouching Fierce: if the opponent is close enough for the move to hit twice, T.Hawk will be left at 3 frames of advantage, but if the opponent is far enough and only the second active part will hit, then T.Hawk will be left at 4 frames of advantage.
- Hitboxes: Blue boxes represent the vulnerable areas, a.k.a. hurtboxes. Those are the areas your character can be hit. Red boxes are the hitting areas, a.k.a. hitboxes. Those cause a hit or a blocked attack if they overlap with the enemy's hurtboxes. Green boxes are just for preventing one character from walking through the other (i.e. they never overlap), known as pushboxes. Orange and Cyan boxes are projectiles hitting and vulnerable areas, respectively. Yellow boxes are throwboxes. White/black boxes are the throwable boxes, if a throwbox overlaps with a throwable box, one of the characters gets grabbed and either thrown or attacked while being held. If the throwable box is white, it means that the character is in a grounded state and can only be thrown by ground throws (exceptions: Vega's Wall Dive Throws and Cammy's Hooligan Throws). If it is black, it's the opposite (can only be thrown by aerial throws).
- Holds damage data: If the throw is actually a hold (it does multiple hits), the set amount of hits will also be presented (i.e. if both players don't mash, how much hits will it do).
- Throw range data: It's separated in two values: the actual range, from the characters axis, and the "practical" range. That second value is counted from the throwable box edge, giving the perfect notion for the throw range matchups.
- Frame data: There's two rows for it: the first is a more detailed one, with frames per animation, and the second is a more summed one which is separated by startup, active parts and recovery. Ground normals take one extra frame to enter their start-up, which is the reason for the additional frame on the 'Simplified' row. Numbers in parentheses are just a resume, because It wasn't possible to group the entire startup/active part/recovery in a single row (i.e. that would demand a too big page width). Numbers inside square brackets are super's freeze frames. Numbers in curly brackets means that during that time, the character is actually in the opposite state in relation to what his throwable box says (e.g. if the throwable box says that the character is in the ground (i.e. it's white colored), 5 + {2} means that during the last 2 frames he is actually considered in the air and as a consequence he will be invulnerable to ground throws). This was done to simplify things, since different versions of the same move may differ on the air/ground state. So, instead of complicating the diagrams even more with different hitbox images, I created that convention.
After all that stuff is presented, some comments on the usefulness and role of the move may be available.
--Born2SPD
Other ST Links
Super Turbo Revival Go-to reference for tournament related information
ST Strategy and Resources Detailed and curated list of latest resources for Super Turbo
Goukipedia site In-depth reference of the game data
SF2 JP Wiki Together with Akiba site, the other go-to wiki for Japanese players (Japanese content only)
--Ernest 22:10, 22 August 2013 (UTC)
ST forum at Shoryuken.com
The original ST Thread on Shoryuken's forums
T.Akiba's site (entirely in Japanese)
NKI's translations from T.Akiba's site
NKI's random Japan log
ST Old and New Character Hitboxes by papasi (also with Safe Jump Guide and Throw Distance Chart) (former golden-songs.com)
GSV Matchup Videos by papasi (the best resource to quickly check a specific matchup video)
TRUST: a training tool for Super Street Fighter II X/Turbo. Comments from the author at STRevival.
ST HUD: Heads-up display for Super Street Fighter II X/Turbo.
Damage viewer: macro lua and debug breakpoints for checking damage.
Hitbox display: macro lua for displaying the game's hitboxes.
--NKI 14:46, 7 January 2007 (UTC)
Nohoho's Blog: ST news from all around the world, with emphasis on the Japanese scene.
Street Fighter Dojo: While this has many things, the highlights are its comprehensive match-up video lists.
Sonic Hurricane (Informative articles on various SF2 game mechanics and fighting game terminology and a lot more) by Majestros
combovid.com (videos, images, interviews, etc) by Majestros
Grand Master Challenge: ST UK scene with player interviews.
Fighter 101: ST and SSF4 guides in both English and Spanish, with player interviews and video tutorials.
Super-Turbo.net: ST website by Axel Kelly, with forums and translations of the YBH strategy sections.
http://www.dontblowthis.com/ Don't Blow This!: Live streams and forums.
Yoga Noogie (blog) by fatboy
Touch Of Death (blog) by Snatcher
Teahawk (blog) by Zass
--Janus Gemini
Yoga Book Hyper scans for download
Yoga Book Hyper Translation pic by NKI
YBH Errata (site listing YBH errors and mistakes, it's in Japanese, this is the Google English translation)
ST Tutorial Videos by David Sirlin
sirlin.net (Forums, strategy, etc) by David Sirlin
--Blitzfu 15:00, 15 October 2011 (UTC)
FightCade by Pof, to play ST online. Based on the discontinued GGPO. An online platform for arcade gaming, where people gather to play online and chat about the game.
Discord Fightcade Group A Discord group useful for finding people to play Fightcade games with.
http://ggpo.net/ GGPO (Good Game Peace Out, online PC fighting games) by Tom Cannon and Tony Cannon (Inkblot and Ponder)
http://supercade.net/ Supercade] (formerly known as 2dfighter, online PC fighting games) by damdai
http://tonamento.com/ Tonamento] (in-browser tournament organizer) by damdai Use Challonge instead
EVO (annual national fighting game tournament) by SRK staff including Tom Cannon and Tony Cannon (Inkblot and Ponder), Joey Cuellar (Mr.Wizard), James Chen (jchensor) and others
[1] Grandmasterchallenge Discord for ST discussion.