Street Fighter 2: Champion Edition/Balrog (boxer): Difference between revisions
(→Combos) |
|||
| Line 33: | Line 33: | ||
=Combos= | =Combos= | ||
*j.HP,cr.LK,s.LK,b charge f+K,s.HP | |||
*cr.LP,s.LP,b chage f+P | |||
*(Zangief Only)cl.MP, st. MP, st. MP | |||
*(Zangief Only)cl.MK, Cr. MP, st. MP | |||
*(Opponent in Corner)cl.MK, St. HP | |||
=Hitboxes= | =Hitboxes= | ||
Revision as of 16:44, 8 August 2016


Introduction
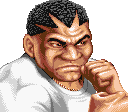
A former World Heavyweight Champion, banned from the professional circuit for killing bitting the ears of an opponent, and now Shadaloo's forth in command. In SF2CE he is one of the bottom tier due to his slow startup normals, lack of low block options and lack of a proper reversal. Anyway he is a great "poking and rush" char with incredible redizzy potential.
Compared to his SF2 version, Balrog was barely touched, being these main changes on his Turn Around Punch (TAP) and the addition of his trademark headbutt grab. However, it's interesting to mention that Balrog is very different according to the game version: the USA/World has only one TAP level and his Dash Straight can be avoided just crouching, while his Japan version have nothing less than 10 TAP levels (according the time you hold the 3 buttons) and the Dash Punch causes chip damage even if the opponent is crouched, making him a significant better char than his american counterpart.
This is Balrog's first step from being a low tier char to become a top tier in Super Turbo and also a mid upper in Super Street Fighter IV revisions.
Color Options
| Start | Default |
 |

|
Moves List
Normal Moves
- Headbutt: close, f + MP or HP
Special Moves
- Turn Around Punch (a.k.a. TAP): Hold all three Punches or Kicks for at least 2 secs then release
- Final Punch: Above move and hold for 60 secs and release (Japanese Version Only. Does MASSIVE damage)
- Dash Punch: b~f + Punch
- Dash Uppercut: b~f + Kick
The Basics
- Anti-Airs: Dash Upper, crouching High Punch, standing Medium Punch
- High Pokes: standing Medium Punch, standing High Punch
- Low Pokes: crouching Short Kick, crouching Roundhouse Kick
Combos
- j.HP,cr.LK,s.LK,b charge f+K,s.HP
- cr.LP,s.LP,b chage f+P
- (Zangief Only)cl.MP, st. MP, st. MP
- (Zangief Only)cl.MK, Cr. MP, st. MP
- (Opponent in Corner)cl.MK, St. HP
Hitboxes
Standing Normals
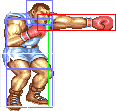
- Standing LP:
| Damage | 4 |  |
 |

|
| Stun | 1~7 | |||
| Stun Timer | 40 | |||
| Chain Cancel | Yes | |||
| Special Cancel | Yes | |||
| Frame Advantage | +5 | |||
| Frame Count | 3 | 4 | 5 | |
| Frame Count | 1+3 | 4 | 5 | |
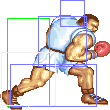
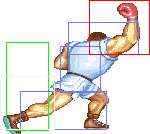
- Standing MP:
| Damage | 14 |  |
 |
 |
 |

|
| Stun | 5~11 | |||||
| Stun Timer | 60 | |||||
| Chain Cancel | No | |||||
| Special Cancel | No | |||||
| Frame Advantage | +6 | |||||
| Frame Count | 3 | 3 | 4 | 3 | 4 | |
| Frame Count | 1+6 | 4 | 7 | |||
- Standing HP:
| Damage | 22 |  |
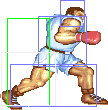 |
 |
 |

|
| Stun | 11~17 | |||||
| Stun Timer | 80 | |||||
| Chain Cancel | No | |||||
| Special Cancel | No | |||||
| Frame Advantage | +2 | |||||
| Frame Count | 5 | 3 | 6 | 9 | 6 | |
| Frame Count | 1+8 | 6 | 15 | |||
- Standing LK:
| Damage | 4 |  |
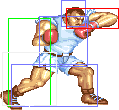 |

|
| Stun | 1~7 | |||
| Stun Timer | 40 | |||
| Chain Cancel | Yes | |||
| Special Cancel | Yes | |||
| Frame Advantage | +5 | |||
| Frame Count | 3 | 4 | 5 | |
| Frame Count | 1+3 | 4 | 5 | |
- Standing MK:
| Damage | 14 | 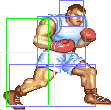 |
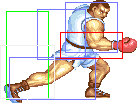 |

|
| Stun | 5~11 | |||
| Stun Timer | 60 | |||
| Chain Cancel | Yes | |||
| Special Cancel | Yes | |||
| Frame Advantage | +8 | |||
| Frame Count | 5 | 4 | 7 | |
| Frame Count | 1+6 | 4 | 7 | |
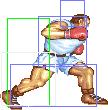
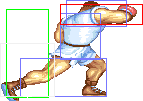
- Standing HK:
| Damage | 22 |  |
 |
 |
 |

|
| Stun | 11~17 | |||||
| Stun Timer | 80 | |||||
| Chain Cancel | No | |||||
| Special Cancel | No | |||||
| Frame Advantage | +2 | |||||
| Frame Count | 5 | 3 | 6 | 9 | 6 | |
| Frame Count | 1+8 | 6 | 15 | |||
Close Standing Normals
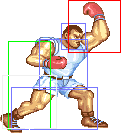
- Close MP:
| Damage | 16 |  |
 |

|
| Stun | 1~7 | |||
| Stun Timer | 40 | |||
| Chain Cancel | Yes | |||
| Special Cancel | Yes | |||
| Frame Advantage | +6/+5 | |||
| Frame Count | 5 | 4 | 7 | |
| Simplified | 1+5 | 4 | 7 | |
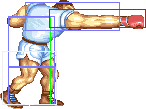
- Close HP:
| Damage | 24 |  |
 |
 |
 |

|
| Stun | 1~7 | |||||
| Stun Timer | 40 | |||||
| Chain Cancel | Yes | |||||
| Special Cancel | Yes | |||||
| Frame Advantage | +6/+5 | |||||
| Frame Count | 5 | 3 | 6 | 9 | 6 | |
| Simplified | 1+8 | 6 | 15 | |||
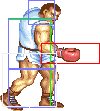
- Close MK:
| Damage | 16 |  |
 |

|
| Stun | 1~7 | |||
| Stun Timer | 40 | |||
| Chain Cancel | Yes | |||
| Special Cancel | Yes | |||
| Frame Advantage | +6/+5 | |||
| Frame Count | 4 | 4 | 7 | |
| Simplified | 1+4 | 4 | 7 | |
- Close HK:
| Damage | 24 |  |
 |

|
| Stun | 1~7 | |||
| Stun Timer | 40 | |||
| Chain Cancel | Yes | |||
| Special Cancel | Yes | |||
| Frame Advantage | +6/+5 | |||
| Frame Count | 6 | 6 | 15 | |
| Simplified | 1+6 | 6 | 15 | |
Close standing Forward and close standing Roundhouse share the same animation.
Crouching Normals
- Crouching LP/LK:
| Damage | 6 |  |
 |
 |
 |

|
| Stun | 1~7 | |||||
| Stun Timer | 40 | |||||
| Chain Cancel | Yes | |||||
| Special Cancel | Yes | |||||
| Frame Advantage | +6/+7 | |||||
| Frame Count | 1 | 2 | 4 | 2 | 2 | |
| Simplified | 1+3 | 4 | 4 | |||
- Crouching MP:
| Damage | 14 |  |
 |
 |
 |

|
| Stun | 5~11 | |||||
| Stun Timer | 60 | |||||
| Chain Cancel | No | |||||
| Special Cancel | No | |||||
| Frame Advantage | +9/+8 | |||||
| Frame Count | 3 | 2 | 4 | 3 | 4 | |
| Simplified | 1+6 | 4 | 7 | |||
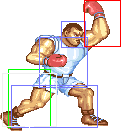
- Crouching HP:
| Damage | 20 |  |
 |
 |
 |

|
| Stun | 11~17 | |||||
| Stun Timer | 80 | |||||
| Chain Cancel | No | |||||
| Special Cancel | No | |||||
| Frame Advantage | +1,+2 | |||||
| Frame Count | 4 | 2 | 6 | 9 | 6 | |
| Simplified | 1+4 | 8 | 15 | |||
- Crouching LK:
See Crouching LP.
- Crouching MK:
| Damage | 14 |  |
 |
 |
 |

|
| Stun | 5~11 | |||||
| Stun Timer | 60 | |||||
| Chain Cancel | No | |||||
| Special Cancel | No | |||||
| Frame Advantage | +9/+8 | |||||
| Frame Count | 3 | 2 | 4 | 3 | 4 | |
| Simplified | 1+5 | 4 | 7 | |||
The same frame and attack data as cr.Strong, except with less range and lower hit/hurt boxes.
- Crouching HK:
| Damage | 20 |  |
 |
 |
 |

|
| Stun | 11~17 | |||||
| Stun Timer | 80 | |||||
| Chain Cancel | No | |||||
| Special Cancel | No | |||||
| Frame Advantage | KD/+2 | |||||
| Frame Count | 2 | 4 | 6 | 9 | 6 | |
| Simplified | 1+6 | 6 | 15 | |||
Aerial Normals
- Neutral/Diagonal Jumping LP/LK:
| Damage | 10 |  |
 |
 |
 |

|
| Stun | 1~7 | |||||
| Stun Timer | 40 | |||||
| Frame Count | 1 | 30 | 3 | 3 | ∞ | |
| Simplified | 1 | 30 | ∞ | |||
- Neutral/Diagonal Jumping MP/MK:
| Damage | 14/16 |  |
 |
 |
 |

|
| Stun | 5~11 | |||||
| Stun Timer | 50 | |||||
| Frame Count | 2 | 15 | 3 | 3 | ∞ | |
| Simplified | 2 | 15 | ∞ | |||
- Neutral/Diagonal Jumping HP/HK:
| Damage | 18/20 |  |
 |
 |
 |

|
| Stun | 11~17 | |||||
| Stun Timer | 60 | |||||
| Frame Count | 3 | 8 | 3 | 3 | ∞ | |
| Simplified | 3 | 8 | ∞ | |||
Throws
- Headbutt: (←/→ + Strong or Fierce)
| Damage | 22+(4*n) | 
|
| Duration | 300 | |
| Stun | 1~7 | |
| Stun Timer | 60 | |
| Range (from axis) | 64 | |
| Range advantage | 36 |
Special Moves
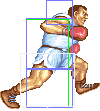
- Dashing Straight: (Charge ←, →, P) [charge time: 69f]
| Damage (Jab) | 22 |  |
 |
  |
 |

|
| Damage (Strong) | 24 | |||||
| Damage (Fierce) | 26 | |||||
| Random dmg table | 0x080 | |||||
| Stun | 13~19 | |||||
| Stun Timer | 120 | |||||
| Frame Advantage | +5 | |||||
| Frame Count | 1~8/1~16/1~24 | 3 | 8 | 6 | 4 | |
| Simplified | 4~11/4~19/4~27 | 8 | 10 | |||
Startup is 4 frames for all versions point blank, stronger punches can travel further (and thus can have longer startup).
Japanese Versions of Champion Edition have a better hitbox.
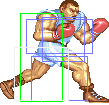
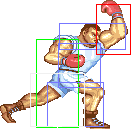
- Dashing Uppercut: (Charge ←, →, K) [charge time: 39f]
| Damage (Short) | 20 |  |
 |
 |

| |
| Damage (Forward) | 22 | |||||
| Damage (Roundhouse) | 26 | |||||
| Random dmg table | 0x080 | |||||
| Stun | 13~19 | |||||
| Stun Timer | 120 | |||||
| Frame Advantage | +9 | |||||
| Frame Count | 1~8/1~16/1~24 | 3 | 8 | 6 | ||
| Simplified | 4~11/4~19/4~27 | 8 | 6 | |||
Startup is 4 frames for all versions point blank, stronger kicks can travel further (and thus can have longer startup). VERY short charge time, also amazing frame advantage.
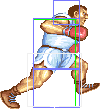
- Turn Around Punch (lvl 1 & 2): Hold all 3 Punch or Kick buttons for at least 30f (lvl1) or 120f (lvl2), then release.
Startup
 |
 |
 |
 |
 |
 |
 |
| |
| Frame Count | 4 | 4 | 4 | 7 | 2 | 2 | 2 | 2 |
| Simplified | 27 | |||||||
Active/Recovery
| Damage (lvl1) | 22 |  |
 |

|
| Damage (lvl2) | 28 | |||
| Random dmg (lvl1) | 0 | |||
| Random dmg (lvl2) | 6 | |||
| Stun | 13~19 | |||
| Stun Timer | 120 | |||
| Frame Advantage | +1 | |||
| Frame Count | 12 | 6 | 4 | |
| Simplified | 12 | 10 | ||
Level 2 TAP has higher overall damage (22 vs 34), and slightly more range.
- Turn Around Punch (lvl 3,4,5,6,7,final): Hold all 3 Punch or Kick buttons for at least 240f (lvl3), 480f (lvl4), 960f (lvl5), 1440f (lvl6), 1920f (lvl7), or 2400f (final), then release.
Active/Recovery
Japanese versions of SF2 Champion Edition have Level 3 and above TAPs can charge and had higher levels that travels further, and do more damage.
Misc Animations
| Walk back | Neutral | Walk Fwd | Crouch |
 |
 |
 |

|
- Standing reel:
 |
 |

|
- Standing gut reel:
 |
 |

|
- Crouching reel:
 |
 |

|
- Dizzy:
 |
 |

|
Combos
- j.HP,cr.LK,s.LK,b charge f+K,s.HP
- cr.LP,s.LP,b chage f+P
- (Zangief Only)cl.MP, st. MP, st. MP
- (Zangief Only)cl.MK, Cr. MP, st. MP
- (Opponent in Corner)cl.MK, St. HP
Advanced Strategy
Balrog is a close combat specialist. His long limbs have good priority and can win most punch/kick trades with heavy damage. He is good for rushdown redizzy routines and ground poking games and does his moves really quick, which is a PITA for cornered opponents. However, Balrog's real problems are: his moves have slow startups (altough great hitboxes), and he doesn't have a reversal attack. And since he's a Boxer, he can't use kicks and have a low jump, which makes him an easy prey for fireball traps.
Balrog's main strategy is to alternate poking and far standing attacks or get closer to the opponent with TAP and Dashes. Most of time the attempts will result in trading hits, but that's normal. Just be careful to not becoming dizzy (remembering that Balrog has a high dizzy capability so these trades will end in the opponent's dizzy most of times, but don't take this as a rule). Even not having kicks, the cr.HK has incredible ground priority and can win most sweep games due to its long hitbox. Also, his st. HP has long reach and is a good answer to projectiles, specially Ryu and Ken ones. Other fireballers like Guile and Sagat can be a little tricky to counter this way, but it's still possible.
The clever Balrog player must be good at reading the opponents game, to the point of predict their fireball routines. Once Balrog hit his adversary with a j.HP or HK this can be the start of a deadly routine that will grant you the victory. As said earlier, Balrog has some good redizzy combos so learn them and, most important, learn how/when to use them. Finish the string of attacks with a TAP and go for the rip off shirt.
The TAP now is faster than the SF2 version but it's still a move that can be countered by most experienced players, so use it carefully and preferably when countering isn't possible. The chip damage is above normal but work hard for connecting the move. And remember that you can even combo a st.HP right after the successfully connected TAP on most opponents and situations, and dizzies are not that rare.
The Headbutt doesn't allow good setups. But it's a fast move and can inflict heavy damage, according the number of headbutts (button mashing FTW). And be aware of the release moment, since it can be a good start for mixup routines. For example: exchange sides to surprise the enemy about where to block, which can free the way for a good combo starter once you connect the first hit.
Cr.HP and Far st.MP are your anti-air weapons against jumping characters like Blanka and Claw, and so does the Dash Upper. Air attacks must be countered on the ground, because air combat is a lost cause for Balrog. Just don't try it. And avoid being cornered by fireball chars because it can pretty much mean game over. One of Balrog's main features is his speed, so don't be ashamed to put it to good use, pressing the opponent against the corners and even engaging tick-grab loops. Anything goes, even bitting the opponent's ear. :P
NOTE: Curiously, Japanese Balrog (or M. Bison) is a much better char. His Dash Straight has better hitbox and can hit crouching characters, and the TAP can be charged up to 60 seconds for a devastating final blow on the opponent.
Match-Ups
Balrog's match-ups according the "official" SF2CE Tier List:
- against Ryu: 1
- against Ken: 2
- against Chun Li: 4
- against E. Honda: 2
- against Zangief: 3
- against Blanka: 8
- against Dhalsim: 1
- against Guile: 0
- against Balrog: 5
- against Vega: 3
- against Sagat: 2
- against M. Bison: 2
Vs. Ryu
A tough matchup for Balrog. Ryu has better range on most of his quicker attacks with your only decent one being cr. HK and not the best speed. Can just crouch most of your attacks. Once he starts throwing fireballs it's hard to stop him unless you are preemptively jumping over it knowing he will do another one(Chances are you'll be eating a shoryuken instead). If you are cornered by fireballs all you can do is block and wait if they do something else(Not likely though). Only way to win this matchup is a great deal patience, and getting lucky with random TAPs, and landing any headbutts.
Vs. E.Honda
Again your standing fierce punch works wonders with this opponent.
You can keep him at bay with this move (watch out for his foot sweeps for they have just about the same range as your punch.) The non-stop super punch attack also works well here as does breaking up your charging straight punches. The best counter for his fists-o-fury attack is a crouching roundhouse kick (or punch in Balrog's case ), when you execute this move make sure that only your glove hits the hands otherwise it will be a mutual hit with you probable losing more.
Against his headbutt you can jump over and headbutt him if he uses a fast one and you have the time or you can use the ducking roundhouse punch when he is about 2 inches away, this should knock him out of the headbutt torpedo.
If he headbutting you if you try to superpunch the best tactic is to get about half the screen away and execute a super punch. From this distance you will not reach him and can recover fast enough to jump or punch his headbutt if he goes for it. ((If you play with cheeps, a good tactic is to get just out of his sweep range and use a short charging punch, straight ones are better, then headbutt him. Works great.))
Vs. Blanka
Use the standing fierce punch just as you would against Honda.
This will allow you to keep him and any jump attack he uses at a distance. When he jumps in your charging uppercut attacks are very effective if he jumps from a distance. When you do use these attacks DO NOT commit to early for if you execute your punch before he starts to come down (and or) before he uses his attack you will be sitting pretty for a roundhouse kick. If he jumps in from medium range your best defense is standing strong or perhaps ducking fierce punch. At close range it is best to try to either block or walk under and headbutt for at close range your attacks will probably overextend and leave you vulnerable. If Blanka use the ball it is a simple matter to block the attack and then use a charging punch to knock him out of the air as he bounces away. The only thing Balrog has trouble with is hitting Blanka out of the electricity without getting shocked. To do so it is like hitting Honda out of his hands. Time your strike so that it barely hits him. Or if he is close to dying a superpunch will get you shocked but do more damage to him.
Vs. Guile
Guile can be very difficult for Balrog to beat especially if he plays super defensive. i.e. (sonic boom, foot sweep, sonic boom, etc.). Against a guile that jumps in and attacks a lot react much as you would to Blanka, for your charging uppercut punches are almost impregnable. But if your opponent stays on the ground using sonic booms and foot sweeps then your choices are few. First you must try to back him into a corner like Zan and Honda must do. You can go about this by using the ducking roundhouse punch to knock him over when he uses the forward sweep. Your can knock him out of the sonic booms like you can Ken and Ryu, just use the standing fierce and hit him just as he starts the motion that forms them. Another good technique is the superpunch barrage described under Ken.
Don't use this that much for it leaves you open for axe-kick.
A good way to sucker Guile into an axe-kick is to get about one inch out of his sweep range and either 1) let your man stand and move slightly back. Most patterning Guiles will see this as the beginning of a super punch and axe. 2) Wait for his sweep to start to recoil and use a short charging punch, then quickly go into the defensive crouch.
Both these fakes work fairly regularly into opening Guile up for a super punch.
Vs. Ken
Pretty much the same as Ryu except Ken can travel way further with his shoryukens, and does even more damage if you make a mistake,but you can punish misses with a Dash Striaght or Upper,also you can use crouching Roundhouse against his startup of hadoken that is slower than Ryu's one.
Vs. Chun Li
Her speed could be a problem here but your excellent air defense should help curb this. If she stays ground based and tries to beat you with foot sweeps the best defense is either the non-stop superpunch combinations or a ducking roundhouse that should knock her down if you time it right. Most Chuns however will most likely come at you from the air. Learning how to use your different charging uppercut punches is key here. Another good attack (best if you have no time to charge) is just the ducking fierce punch or standing strong. If she uses lots of head stomps you can counter this by hitting her with a standing strong or fierce as she goes over you (after she already stomped you). Or you can take her out before she even hits you. You can do this by using a charging uppercut attack (will need her to be at a distance) and timing it so that it hits her in the chest just as she starts to drop. this will work for her stomping leg will be below you. Lastly a good way to get out of her neck kick is to jump straight up and use the jab punch for it stays out so long (or strong if you have good timing) and hit her before she peaks in her attack. You may both get hit but it will give you the distance you need to start using heavier punches.
Vs. Zangief
The usual standing fierce punch will be effective against Zan as well (use them slightly more sparingly than against Blanka or Honda for the airplane punch can knock you out of any standing attack if Zan times it right.) The charging uppercut punches can knock him out of the airplane punch if you hit him in between his swinging arms. The best way to fight Zan however is to be defensive. The ducking roundhouse punch is your best defense here for its range and high priority make it very difficult for him to counter. Don't be to defensive for it won't take him long to get the timing to 360 you in between punches. Throw out a few charging punches (short range ones are best). It is best not to try jumping in for he can airplane punch you almost at will. If you do jump in the best attacks are (fierce punch then ducking roundhouse to knock him down or combo #1). Another good attack that catches many Zans off guardÔtouch the ground again use the charging jab punch. Most Zangiefs like to stay at a fairly close distance and this punch will help deter them.
Vs. Dhalsim
Your two fierce buttons are best here. Your standing fierce punch can knock him out of fireballs, and your ducking roundhouse punch can knock him out of both his ducking fierce punch and standing kicks. A good way to lure him off sides is to use lots of ducking jab punches (these recover so fast that they easily allow you to switch to a more effective ducking roundhouse kick if he tries to knock you out of the jabs or lure you off sides). When doing this try to stay about two body widths distance from Dhalsim so that if he starts a fireball you can execute a charging punch (short uppercut is best) and knock him out of it. Lastly when jumping over his fireballs use your punch almost immediately when you reach the peak of you jump (stays out long enough that you can usually hit him). If he starts to use the slide try using the jab (stays out really long) or hold your attack until you almost land. Another good way to break the fireball kick pattern is to learn the timing of either his kick or fierce punch. You can hit his leg if you use your attack (any will work) just as you start to descend in your jump. You can hit his arm pattern if you hold your attack until you about two inches above the screen. The hardest part in countering his pattern is being able to predict which defend he is going to use. The best way is to jump the fireball and look at your opponents hands instead of the screen. Then hit your button right after you see him hit his.
Vs. Boxer
A good defense and quick reaction to his charging punches are key to defeating a good Balrog. Your ducking roundhouse punch will knock him out of most things and a quick ducking jab usually knocks him out of a charging punch, if you hit him with the first jab you can treat him much as you would Ken, Ryu or Sagat if you hit them right after coming down from an uppercut. The constant superpunch technique is effective here as well as short range charging punches (good to lure your opponent into making a mistake.) When you jump in try to do so from a distance or very close, this makes it harder for him to use his charging punches, and when jumping from a distance try to hold your attack until you have an idea of what your opponent is going to do.
Vs. Claw
Vega's speed, range, excellent throw and of the wall attack combine to make him one of Balrog's toughest opponents. His claw on the ground keep you at a distance and if you jump you will be sliced. A good way to stop his constant ducking claw attack is to either use the ducking roundhouse punch if you have good timing or the standing jab punch like Zangief does. These work well as does the constant superpunch barrage. In countering his claw he will most likely go to the air. Use your charging punches like you would against Blanka. If he uses lots of wall attacks you can 1- wait for him to approach and use the ducking fierce punch 2- if it is coming from a distance use the charging uppercuts, and 3- if it is coming from an opposite wall and you have no time to really orientate yourself a simple jump away in the air punch is your best chance.
Vs. Sagat
Handle much like you would Ken and Ryu but take heed of his low tigers.
Keep distance from Sagat so that if he does an uppercut you won't get nailed. If you can time it right you can superpunch him over the low tigers. You will both get hit and take damage but he will lose much more. Also if you are close when you jump over hold your attack until you are low to the ground (this is good for it will raise your chances of knocking him out of a tiger uppercut. If you are at a distance try some short charging punches to try and fool him into doing an upper cut, then if he does you can standing fierce punch him or if you have time a charging punch. One final note do not use to many standing fierce punches to deter him from throwing for 1- he can still throw low ones 2- he gets so low when he starts his tiger uppercut that he may uppercut you out of it.
Vs. Dictador
Another bad match-up,Dictador had better pokes with fastest startup,Psycho Crusher can be punished at his start with a Far Fierce at distance or if you are close,you must block them and then punish Dictador with hold him or a switch side Dash Straight or Upper,close Jab are fine to keep him away or comboing,and Stomp can be defeated at the start or follow up with a jumping Roundhouse easily,Crouching Roundhouse its your best poke for medium range and wake ups,your main plan is to avoid Corner Trap and stay in the midscreen as long as possible.
Turn Around Punch can be nice as a surprise attack if Dictador walks to get close to you,and a miss Slide is the main attack that you need to punish him with a jumping Fierce and linked to a Crouching Roundhouse, and then a Dash Upper or Straight wake up.
| General | Game Mechanics | Strategy | Tiers | |
| The Characters | Balrog (Boxer) | Blanka | Chun-Li | Dhalsim | E. Honda | Guile | Ken | M. Bison (Dictator) | Ryu | Sagat | Vega (Claw) | Zangief |
