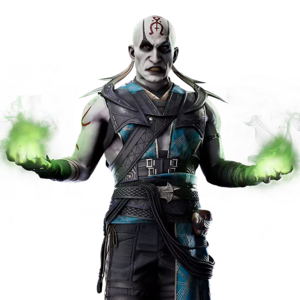
Mortal Kombat 1/Quan Chi

From SuperCombo Wiki

Introduction

Netherrealm Sorcerer

"Quan Chi was born into hard labor in an Outworld mine. He had no future, just the guarantee of certain death in its dark tunnels. To curry favor with the mine’s owner, Quan Chi informed on fellow workers who were planning a strike. It was broken and many strikers killed. The survivors were not going to forgive and forget. They plotted to kill Quan Chi. Quan Chi’s life was saved by a mysterious benefactor. In exchange for his service, she offered to free him from the mines and train him in dark magic. Quan Chi eagerly accepted. Now a master of the Netherrealm's most vile sorcery, Quan Chi plots with Shang Tsung to conquer the realms. He will not be denied."

Quan Chi is a character of contrasts, boasting incredible range, mix potential and an arsenal of projectiles which comes at the cost of a lackluster defense and tying for the lowest health in the game. As long as he can keep his opponent out of his face, Quan Chi can be an oppressive presence thanks to his standing 4, a big teleporting boot to the head which spawns directly behind them regardless of how close they are to Quan Chi. He also has a strong zoning game with fireballs and ranged, disjointed buttons to keep opponents at bay. He also has setplay tools like Zone of Power and Bone Cage to enhance his fireballs and keep his opponent locked down respectively.

Strengths Weaknesses
  • I Am Everywhere: Quan Chi's standing 4 tracks the opponent no matter where they are on screen; when used in conjunction with his projectiles and teleport, Quan Chi can punish at ranges most other characters can only dream of;
  • Skull O'Maniac: Quan Chi has a plethora of fireballs to frustrate his opponents, with straight skulls which can destroy incoming projectiles when enhanced, aimable overhead skulls that reward reading the opponent's movement and an air fireball which fires at an oppressive angle, especially for those who can master the instant air timing. This only gets stronger when he summons his Zone of Power to enhance his fireball game further;
  • Mid Screen Monsters: Many of his buttons have excellent range and are disjointed since they're summoned creatures rather than part of Quan's own body; F21 launches a skeleton to keep opponents away on the ground, standing 3 is a tentacle lash which covers a lot of airspace, and B342 is a strong whiff punisher that full combo launches when confirmed into. Many of these buttons also have the benefit of pushing his opponents back on hit, which keeps them at his preferred range;
  • Trap Lord: Bone Cage can lock down his opponent even if they block, scaring them into attempting to jump out and giving Quan time to run his improved portal game;
  • Portal Kombat: The reworked portals can now be active simultaneously and come with notable improvements, namely with Zone of Fear being given a longer active duration, making his keepout game better than before. Special mentions goes to his new portal:
  • Zone of Waste: A summonable portal that drains meter is already pretty strong but it providing armor if enough is drained (up to three hits' worth when Enhanced) lets Quan Chi create borderline unfair okizeme scenarios in his favor; it can even give him the equivalent of MK11's Breakaway if he gets the armor while being combo'd;
  • Enhanced Mana Regen: Quan's reliance on special moves means he builds meter especially quickly;
  • No Panic Button: His basic pokes are uniquely slow, as his D1 is 9F startup and -10 on block; he can get steamrolled if his opponent gets in on him and he can't punish their pokes like everyone else can. This weakness in defense is exacerbated by the next point;
  • Squishy Wizard: He starts at 900 HP, tied with Nitara for the lowest in the game, so he dies faster than any other character in the game for his mistakes. This also affects his choice of Kameos as he may prefer one which gives him extra HP to address this weakness;
  • Dicey Reversal: Much like in MKX, his Enhanced teleport drop has a lot of problems when used on wakeup, as its slow startup and awkward tracking can make it punishable in more situations than other characters will encounter with theirs;
  • Meter Issues: Enhanced Beyond the Fog, which would otherwise be his main combo extender, costs 2 bars, which limits how often he can actually rack up large combo damage. Otherwise, he needs to somehow set up Zone of Power to convert off his enhanced fireball for 1 bar and even then he's not gaining much damage from it;
  • Gaps Absolutely Everywhere: Quan Chi is the most gap-plagued character in the game, with most of his normals having no gapless cancel options whatsoever.
Quan Chi
Mk1 Quan Chi portrait.png
Base Health

Normals and Strings

Grounded

1

1
Standing Front Punch
Startup Active Recovery Cancel Damage Chip Guard On Hit On Block On Flawless Block Cost
- - - - - - H - - - -

A mediocre jab by itself, with average range and recovery but slightly longer startup. Like most of Quan's normals, every single cancel option will leave an armorable gap, including kameo summons. Has two followup routes:

  • 122 follows up with slow but massive claw attacks, creating enormous pushback (with a gap). The third hit is a high, but it jails from the mid second hit. Flawless blocking does not appear to affect the pushback or frame data in any way, only mitigating the chip. Superb for creating some space on turn, as long as the enemy does not mash, and it leaves the fighters at 0 on block for a true neutral reset. 12 has curiously long cancel advantage on hit, allowing it to combo into nearly anything - in particular, 12 is one of the only strings that can combo into Cyrax Net by itself, giving Quan all the time he needs for setups. Without Cyrax, 12 can be confirmed into EX Psycho Skull for a less expensive route than EX From the Fog (low tentacle).
  • 13 is an overhead that gives a meterless bounce. Crucial for close range punishes and combo construction. Eminently reactable on its own, but can be combined with From the Fog for a rewarding, if expensive and fuzzyable 50/50. Unlike Shao's 12 bounce string it will work on airborne opponents, but the second 13 in a combo will splat the enemy.


D1

d1
Crouching Front Punch
Startup Active Recovery Cancel Damage Chip Guard On Hit On Block On Flawless Block Cost
- - - - - - - - - - -

The main reason why Quan's defense is terrible. Long recovery and nine frame startup make this the worst D1 in the game. Disjoint is nice but being -10 on block will nearly guarantee the counterpoke punish, regardless of the enemy character. Also hampers his offensive capability, as he is much more likely to get counterpoked if trying to interrupt on offense.

D1s are generally a non-optional move to use - being the character's fastest mid while low profiling and being special cancellable, it must be applied in certain situations. Do not entirely neglect Quan's D1, but be judicious with its usage.


2

2
Standing Back Punch
Startup Active Recovery Cancel Damage Chip Guard On Hit On Block On Flawless Block Cost
- - - - - - - - - - -

Important but flawed jabstring. Solid range and built in 50/50 make it a straightforward starting point for offense. Easy to confirm, but without a kameo the only combo starting option is EX Low Tentacle - a kameo that can combo from the overhead or especially the low will go a long way towards properly establishing the string's threat. While the first overhead comes out much earlier than the low, the second overhead hit will require more accurate fuzzying from the enemy, and Quan can cancel the first overhead kick into Low Tentacle to catch their fuzzy timing. Extreme gap between the first and second hit means it is very easy to mash on, so use it at a distance.

  • Like most of Quan's strings, the 2 will have a gap with any cancel option.

21
Lua error in Module:MoveDataParser at line 119: attempt to index field '?' (a nil value).
Lua error in Module:MoveDataParser at line 117: attempt to index field '?' (a nil value).
Hitboxes Off
Hitboxes On

                  No results

Important but flawed jabstring. Solid range and built in 50/50 make it a straightforward starting point for offense. Easy to confirm, but without a kameo the only combo starting option is EX Low Tentacle - a kameo that can combo from the overhead or especially the low will go a long way towards properly establishing the string's threat. While the first overhead comes out much earlier than the low, the second overhead hit will require more accurate fuzzying from the enemy, and Quan can cancel the first overhead kick into Low Tentacle to catch their fuzzy timing. Extreme gap between the first and second hit means it is very easy to mash on, so use it at a distance.

  • Like most of Quan's strings, the 2 will have a gap with any cancel option.

2
Lua error in Module:MoveDataParser at line 119: attempt to index field '?' (a nil value).
Lua error in Module:MoveDataParser at line 117: attempt to index field '?' (a nil value).
Hitboxes Off
Hitboxes On

                  No results

Important but flawed jabstring. Solid range and built in 50/50 make it a straightforward starting point for offense. Easy to confirm, but without a kameo the only combo starting option is EX Low Tentacle - a kameo that can combo from the overhead or especially the low will go a long way towards properly establishing the string's threat. While the first overhead comes out much earlier than the low, the second overhead hit will require more accurate fuzzying from the enemy, and Quan can cancel the first overhead kick into Low Tentacle to catch their fuzzy timing. Extreme gap between the first and second hit means it is very easy to mash on, so use it at a distance.

  • Like most of Quan's strings, the 2 will have a gap with any cancel option.

2144
Lua error in Module:MoveDataParser at line 119: attempt to index field '?' (a nil value).
Lua error in Module:MoveDataParser at line 117: attempt to index field '?' (a nil value).
Hitboxes Off
Hitboxes On

                  No results

Important but flawed jabstring. Solid range and built in 50/50 make it a straightforward starting point for offense. Easy to confirm, but without a kameo the only combo starting option is EX Low Tentacle - a kameo that can combo from the overhead or especially the low will go a long way towards properly establishing the string's threat. While the first overhead comes out much earlier than the low, the second overhead hit will require more accurate fuzzying from the enemy, and Quan can cancel the first overhead kick into Low Tentacle to catch their fuzzy timing. Extreme gap between the first and second hit means it is very easy to mash on, so use it at a distance.

  • Like most of Quan's strings, the 2 will have a gap with any cancel option.


d2
Crouching Back Punch
Startup Active Recovery Cancel Damage Chip Guard On Hit On Block On Flawless Block Cost
- - - - - - - - - - -

3

3
Standing Front Kick
Startup Active Recovery Cancel Damage Chip Guard On Hit On Block On Flawless Block Cost
- - - - - - - - - - -

d3
Crouching Front Kick
Startup Active Recovery Cancel Damage Chip Guard On Hit On Block On Flawless Block Cost
- - - - - - - - - - -

4

4
Standing Back Kick
Startup Active Recovery Cancel Damage Chip Guard On Hit On Block On Flawless Block Cost
- - - - - - - - - - -

d4
Crouching Back Kick
Startup Active Recovery Cancel Damage Chip Guard On Hit On Block On Flawless Block Cost
- - - - - - - - - {{{flawlessBlockAdv}}} -

Aerial

j1

j1
Jumping Front Punch
Startup Active Recovery Cancel Damage Chip Guard On Hit On Block On Flawless Block Cost
- - - - - - - - - - -

j2

j2
Jumping Back Punch
Startup Active Recovery Cancel Damage Chip Guard On Hit On Block On Flawless Block Cost
- - - - - - - - - - -

j3

j3
Jumping Front Kick
Startup Active Recovery Cancel Damage Chip Guard On Hit On Block On Flawless Block Cost
- - - - - - OH - - - -

j4

j4
Jumping Back Kick
Startup Active Recovery Cancel Damage Chip Guard On Hit On Block On Flawless Block Cost
- - - - - - OH - - - -


MK1 Navigation

General
FAQ
HUD
Kameo
Characters
Ashrah
Baraka
Ermac
Geras
Havik
Homelander
Johnny Cage
Kenshi
Kitana
Kung Lao
Li Mei
Liu Kang
Mileena
Nitara
Omni-Man
Peacemaker
Quan Chi
Raiden
Rain
Reiko
Reptile
Scorpion
Shang Tsung
General Shao
Sindel
Smoke
Sub-Zero
Tanya
Kameo
Cyrax
Darrius
Frost
Goro
Jax
Janet Cage
Kano
Khameleon
Kung Lao
Mavado
Motaro
Sareena
Scorpion
Sektor
Shujinko
Sonya
Stryker
Sub-Zero
Tremor
Roster Data
Ermac
Geras
Havik
Rain
Reiko
Smoke
Kameo Data
Cyrax
Frost
Goro
Jax
Kano
Sonya