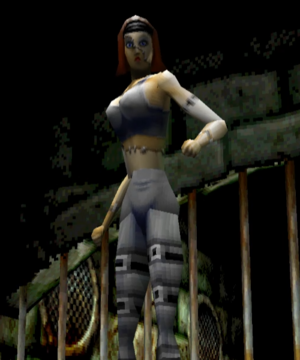
Thrill Kill/Violet

From SuperCombo Wiki


 Violet is considered to be the worst character in Thrill Kill. Her movement is bad, her best buttons don't lead to much damage, and while she has the potential to deal significant damage with combos involving Dislocating Stun, Cherry Picker, and Super Flex Float juggles, players who know how to play against Violet will simply counter out or punish you for going for it.

 You are going to have to rely on single hit, low damage buttons such as Front Kick to mid crouching players as well as your crouching strings to mind-game your opponent and win through lots of staggers and 50/50s. The only thing making Violet usable is the incredibly fast mixup of L2PlusSquare (Low counterable)TK-input-comma.pngL2PlusTriangle (High counterable), as well as Flex Float being a great move to attack players attempting to dash in against you, but unless you're willing to take great risk most of your options won't lead to much damage.

At a glance:
Pros Cons
  • High Damage Potential: Violet has the potential do to massive damage thanks stringing together moves like Dislocating Stun, Cherry Picker, and Super Foot Waltz if you're willing to gamble on not being countered by your opponent.
  • Bad Movement: Violet is very slow, with terrible dash distance and below average walk speed.
  • Bad Normals: A lot of Violet's buttons don't give you much advantage to continue pressuring opponents with and often get beaten or crushed by your opponent's attacks.
  • No Punish Damage: None of Violets useful buttons to punish opponents lead to much damage.


Violet
TK Violet Ingame.png
Hitbox Diameter 4.4u⌀ (Small)
Movement Speed 4.9u/s (4th worst)
Dash Distance 9.9u (5th best)

Move List

Square Front Punch
Slap
Square
Hit Startup Active Recovery Adv. (Block / Hit) Damage Range Property Stance
High.png 5f 3f 8f -4 / +4 2 2.8u - -


Punish starter and stagger poke against standing opponents.

Straight Elbow
ForwardTK-input-comma.pngSquare
Hit Startup Active Recovery Adv. (Block / Hit) Damage Range Property Stance
High.png 6f 2f 9f -3 / +3 3 3.1u - -


Not useful in neutral as her Front Kick and Hyper Heel are better buttons.


Cancels:
Quarter CircleTK-input-comma.pngTriangle - Super Flex Float

Wind Punch
BackTK-input-comma.pngForwardTK-input-comma.pngSquare
Hit Startup Active Recovery Adv. (Block / Hit) Damage Range Property Stance
Mid.png 9f 3f 14f -9 / +2 4 32.9u - -


Short range, slow, useless in combos and followup (Footwaltz) is counter bait. Not useful in any situation.


Cancels:
Quarter CircleTK-input-comma.pngSquare - Limp Limb
Half CircleTK-input-comma.pngCross/Circle - Super Foot Waltz

Limp Limb
Quarter CircleTK-input-comma.pngSquare
Hit Startup Active Recovery Adv. (Block / Hit) Damage Range Property Stance
Mid.png 9f 1f 16f -10 / -2 5 3.7u Knockdown.png Switch


Not useful as a move by itself.

Straight Jab From Crouch
L2PlusSquare
Hit Startup Active Recovery Adv. (Block / Hit) Damage Range Property Stance
Low.png 5f 2f 8f -3 / +4 2 2.2u - -


One of the buttons you will be using a lot against most characters to interrupt string gaps. Not as useful against Mammoth and to a lesser extent Oddball and Imp since they have commonly used moves that crush this button.


Triangle Back Punch
Back Hand Slap
Triangle
Hit Startup Active Recovery Adv. (Block / Hit) Damage Range Property Stance
High.png 7f 1f 13f -7 / +2 3 2.6u - Switch


Punish starter. Not useful by itself.


Cancels:
ForwardTK-input-comma.pngSquare - Straight Elbow

Corkscrew
ForwardTK-input-comma.pngTriangle
Hit Startup Active Recovery Adv. (Block / Hit) Damage Range Property Stance
High.png 8f 2f 26f -20 / -8 3 3.8u - -


The combo you can follow up with this move whiffs at the range it would be useful so it is not recommended to use this move at all.

Flex Float
BackTK-input-comma.pngForwardTK-input-comma.pngTriangle
Hit Startup Active Recovery Adv. (Block / Hit) Damage Range Property Stance
Mid.png 6f 3f 17f -13 / +23 4 3.9u Launch.png -


Launcher with good range. Good move against whiffed strings and habitual crouchers.

Super Flex Float
Quarter CircleTK-input-comma.pngTriangle
Hit Startup Active Recovery Adv. (Block / Hit) Damage Range Property Stance
Mid.png 12f 2f 14f -9 / +32 5 7.9u Launch.png Switch


Launcher used mostly in combos. Has really good range and can sometimes be useful to catch the opponent by surprise.

Uppercut From Crouch
L2PlusTriangle
Hit Startup Active Recovery Adv. (Block / Hit) Damage Range Property Stance
Mid.png 7f 3f 17f -13 / +23 3 4.0u Launch.png -


One of your best get-off-me moves, but has an issue with random launch knockback speed making it random if you're able to follow up with a combo or not.

Pretzel Stance
Half CircleTK-input-comma.pngSquare/Triangle
Hit Startup Active Recovery Adv. (Block / Hit) Damage Range Property Stance
Stance - 26f - - - - - - Pretzel
Triangle Flip Kick Mid.png 8f 9f 16f -17 / +22 15 5.4u Launch.png -
Cross Grab High.png 0f - 78f - / +2 24 1.4u Knockdown.png -


Hold a direction+block to leave the stance. You can also cancel into any neutral button if you press it right before the stance animation completes.

Running Hip Rush
ForwardTK-input-comma.pngForwardTK-input-comma.pngSquare/Triangle
Hit Startup Active Recovery Adv. (Block / Hit) Damage Range Property Stance
Mid.png 10f 13f 18f / +18 9 10.3u Hardknockdown.png -


Although it hits mid, the hitbox is all in Violet's elbow which is lifted quite high. This causes the move to have significantly less range against a crouching player.


Cross Front Kick
Front Kick
Cross
Hit Startup Active Recovery Adv. (Block / Hit) Damage Range Property Stance
Mid.png 7f 1f 11f -5 / +2 3 5.5u - Switch


Best and longest range poke. Only active for 1 frame so don't overuse this button by itself.


Cancels:
BackTK-input-comma.pngForwardTK-input-comma.pngCross - Thrust Float
Half CircleTK-input-comma.pngCross - Split Kick
L2PlusCross - Crouch Kick

Fierce Knee
ForwardTK-input-comma.pngCross
Hit Startup Active Recovery Adv. (Block / Hit) Damage Range Property Stance
Mid.png 7f 1f 18f -12 / +27 5 2.6u Launch.png Switch


Mostly used in combos and not by itself. Can cancel back and forth infinitely into Dislocating stun.


Cancels:
BackTK-input-comma.pngForwardTK-input-comma.pngCircle - Dislocating Stun
Quarter CircleTK-input-comma.pngCircle - Flex Fury

Thrust Float
BackTK-input-comma.pngForwardTK-input-comma.pngCross
Hit Startup Active Recovery Adv. (Block / Hit) Damage Range Property Stance
Mid.png 11f 2f 16f -11 / +27 4 3.7u Launch.png Switch


Launcher used in combos. Not useful by itself.

Chiropractor
Quarter CircleTK-input-comma.pngCross
Hit Startup Active Recovery Adv. (Block / Hit) Damage Range Property Stance
Mid.png 24f 8f 17f -18 / +24 15 17.0u Hardknockdown.png -


Troll roll. Gimmick move that is unsafe on block and highly choreographed. Can cancel the end of the move into Cherry Picker.


Cancels:
Quarter CircleTK-input-comma.pngCircle - Cherry Picker

Split Kick
Half CircleTK-input-comma.pngCross
Hit Startup Active Recovery Adv. (Block / Hit) Damage Range Property Stance
Low.png 8f 1f 17f -11 / +17 2 3.3u Launch.png -


Low launcher, low damage. Decent move if you need a 10% combo (Split kick > Flex Fury) to take the round.


Cancels:
Half CircleTK-input-comma.pngCircle - Flex Fury

Crouch Kick
L2PlusCross
Hit Startup Active Recovery Adv. (Block / Hit) Damage Range Property Stance
Low.png 6f 1f 14f -8 / +2 2 2.3u - -


Low combo starter. Terrible range and recovery making it useless as a low poke by itself.


Cancels:
Half CircleTK-input-comma.pngCross - Split Kick


Circle Back Kick
Hyper Heel
Circle
Hit Startup Active Recovery Adv. (Block / Hit) Damage Range Property Stance
Mid.png 6f 2f 13f -8 / 0 3 4.7u - -


Good poke and stagger button to get crouchers to stand up.


Cancels:
BackTK-input-comma.pngForwardTK-input-comma.pngCircle - Dislocating Stun
Half CircleTK-input-comma.pngCircle - Flex Fury

Foot Loose
ForwardTK-input-comma.pngCircle
Hit Startup Active Recovery Adv. (Block / Hit) Damage Range Property Stance
Mid.png 13f 1f 17f -11 / 0 4 4.7u - -


Very slow mid that leads to another bad button (Corkscrew) or a move that is easily punished on hit, block, and whiff (Flex Fury). Don't use.


Cancels:
ForwardTK-input-comma.pngTriangle - Corkscrew
Half CircleTK-input-comma.pngCircle - Flex Fury

Dislocating Stun
BackTK-input-comma.pngForwardTK-input-comma.pngCircle
Hit Startup Active Recovery Adv. (Block / Hit) Damage Range Property Stance
Mid.png 10f 2f 14f / +46 (+4) 5 4.8u Dzzy.png Switch


Used in high damage combos. Can cancel back and forth infinitely into Fierce Knee.


Cancels:
Quarter CircleTK-input-comma.pngTriangle - Super Flex Float
ForwardTK-input-comma.pngCross - Fierce Knee
Quarter CircleTK-input-comma.pngCircle - Cherry Picker

Cherry Picker
Quarter CircleTK-input-comma.pngCircle
Hit Startup Active Recovery Adv. (Block / Hit) Damage Range Property Stance
Mid.png 14f 1f 16f -10 / -2 13 4.3u Knockdown.png -


Violet's best damage ender; deals 26 damage when linked into from a Dislocating Stun. Rarely used on its own.

Flex Fury
Half CircleTK-input-comma.pngCircle
Hit Startup Active Recovery Adv. (Block / Hit) Damage Range Property Stance
Low.png 8f 8f 41f -42 / -17 2/hit 3.4u Knockdown.png -


Kill combo ender. Only use as a combo ender if it's going to kill. VERY unsafe on whiff, block, and hit.

Tweaked Crouch Sweep
L2PlusCircle
Hit Startup Active Recovery Adv. (Block / Hit) Damage Range Property Stance
Low.png 9f 4f 15f -12 / -5 3 2.7u - -


Good in combos, but avoid poking with its terrible frame data at all costs.


Cancels:
Half CircleTK-input-comma.pngCross - Split Kick
BackTK-input-comma.pngForwardTK-input-comma.pngCircle - Dislocating Stun

Super Foot Waltz
Full CircleTK-input-comma.pngCross/Circle
Hit Startup Active Recovery Adv. (Block / Hit) Damage Range Property Stance
Mid.png 6f 15f 14f -8 / -3 2 x 4 hits 5.9u - -


Combo ender. Move by itself or in the middle of combos is counter bait against anybody who knows how to play against Violet.

Running Ball Roll
ForwardTK-input-comma.pngForwardTK-input-comma.pngCross/Circle
Hit Startup Active Recovery Adv. (Block / Hit) Damage Range Property Stance
Low.png 12f 8f 35f -36 / -22 7 18.9u Knockdown.png -


A very useful long ranged low attack. It bounces back a fair bit after the roll, but its long recovery leads to a neutral reset at best and your opponent punishing it on hit at worst.


Grabs / Misc Moves

Violet's whiffed grab animation is 18f long.

Private Pounder
CrossPlusSquare
Hit Startup Active Recovery Adv. (Block / Hit) Damage Range Property Stance
High.png 0f - 151f - / -23 14 0.9u Knockdown.png Switch


A very bad grab. Low damage, and Violet back flips so slowly away that anybody's wake-up attack will land free-of-charge. Avoid at all costs.

Violet Hold
CirclePlusTriangle/CirclePlusSquare
Hit Startup Active Recovery Adv. (Block / Hit) Damage Range Property Stance
Grab High.png 0f - - - - 0.9u - Violet Hold
Square / Circle Switch Sides - - - 31f - - - - Violet Hold
Triangle / Cross Release - - - 21f - / 0 - - - -
Front Grab - - - 108f - / -27 17 - Knockdown.png -
Rear Grab - - - 101f - / +8 10 - Knockdown.png Grounded


Every single one of Violet's grabs are bad.

Violet does not have a rear grapple. Private Pounder is used instead.

Twister
CrossPlusTriangle
Hit Startup Active Recovery Adv. (Block / Hit) Damage Range Property Stance
- - - 125f - - - - -


Right foot blue.


Thrill Kills

Thrill Kill 1 - No Inputs
Thrill Kill 2 - Square + Triangle + Cross
Combo Kill - Square + Circle + L1 + Down
Dance - Square + Triangle + Circle + L1 + Up

TK Navigation

General
Controls and Notation
System
Tier List
FAQ
Characters
TormentorOddballBelladonnaDr. FaustusThe ImpVioletMammothCleetusCainJudasMarukka