Introduction
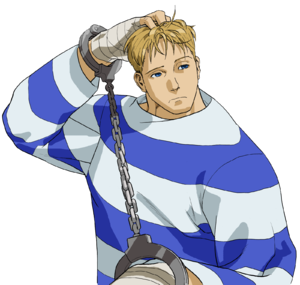
Cody now returns from Final Fight as a playable character and the hero of Metro City has drastically changed for the worst, now being incarcerated as his addiction of fighting has spiraled out of control, surprising the likes of even Guy and Rolento. Bored of the monotony of jailhouse life, Cody breaks out of prison as he wonders back to the outside world looking for a decent fight.
| Pros | Cons |
|
|
Introduction
Moves List
Moves List
Normals
Ground Normals
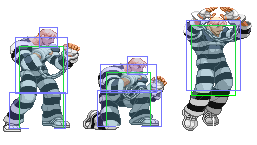
- Standing Jab:
| Damage | 6 | 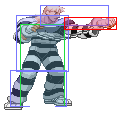
|
| Stun | 2 | |
| Chain Cancel | Yes | |
| Special Cancel | Yes | |
| Super Cancel | Yes | |
| Meter on whiff/hit | 0/1 | |
| Frame Count | 3/4/7 | |
| Block Stun | +3 | |
| Hit Stun/Counter Hit | +4/+9 |
- A quick, high priority, rapid chaining jab. Can be used for stuffing a variety of attacks or jumps from a distance.
- Standing Strong
| Damage | 11 | 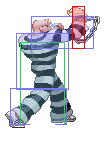
|
| Stun | 4 | |
| Chain Cancel | No | |
| Special Cancel | Yes | |
| Super Cancel | Yes | |
| Meter on whiff/hit | 1/3(A)4(XV) | |
| Frame Count | 7/3/17 | |
| Block Stun | -1 | |
| Hit Stun/Counter Hit | 0/+4 |
- A straight vertical punch. Can be used as anti-air closer up, but generally won't see much use.
- Standing Fierce:
| Damage | 16 | 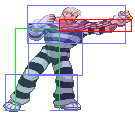
|
| Stun | 8 | |
| Chain Cancel | No | |
| Special Cancel | Yes | |
| Super Cancel | Yes | |
| Meter on whiff/hit | 1/4(A)6(XV) | |
| Frame Count | 7/6/13 | |
| Block Stun | +4 | |
| Hit Stun/Counter Hit | +5/Launch |
- A great high priority poke. Can be used anti-air and will stuff a great number of other attacks.
- Standing Short:
| Damage | 7 | 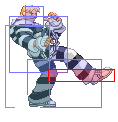
|
| Stun | 2 | |
| Chain Cancel | No | |
| Special Cancel | Yes | |
| Super Cancel | Yes | |
| Meter on whiff/hit | 0/1 | |
| Frame Count | 5/3/12 | |
| Block Stun | +1 | |
| Hit Stun/Counter Hit | 0/+5 |
- A surprisingly long range poke. Does not hit low as the hitbox might indicate, but it is cancellable and rather quick. One of your best counter pokes.
- Standing Forward:
| Damage | 16 | 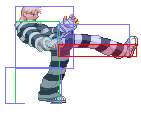
|
| Stun | 8 | |
| Chain Cancel | No | |
| Special Cancel | No | |
| Super Cancel | No | |
| Meter on whiff/hit | 1/3(A)4(XV) | |
| Frame Count | 9/4/15 | |
| Block Stun | 0 | |
| Hit Stun/Counter Hit | +1/+5 |
- His main poke and footsies tool. With the proper spacing, this is extremely useful. Will stuff or go over a large number of lows as well.
- Standing Roundhouse:
| Damage | 16 | 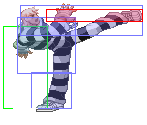
|
| Stun | 8 | |
| Chain Cancel | No | |
| Special Cancel | No | |
| Super Cancel | No | |
| Meter on whiff/hit | 1/4(A)6(XV) | |
| Frame Count | 7/6/18 | |
| Block Stun | -1 | |
| Hit Stun/Counter Hit | -0/Launch |
- His main long distance anti-air. The priority on it isn't as great as it is on his HP however.
- Crouching Jab:
| Damage | 4 | 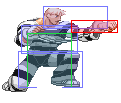
|
| Stun | 2 | |
| Chain Cancel | Yes | |
| Special Cancel | Yes | |
| Super Cancel | Yes | |
| Meter on whiff/hit | 0/1 | |
| Frame Count | 4/6/12 | |
| Block Stun | -1 | |
| Hit Stun/Counter Hit | 0/+5 |
- You're basic crouching mid-level attack. Has relatively high priority, is very quick, and can be chained in rapid succession. Useful for stuffing certain moves/normals.
- Crouching Strong:
| Damage | 10 | 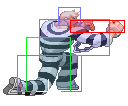
|
| Stun | 4 | |
| Chain Cancel | No | |
| Special Cancel | Yes | |
| Super Cancel | Yes | |
| Meter on whiff/hit | 1/3(A)4(XV) | |
| Frame Count | 4/6/12 | |
| Block Stun | +1 | |
| Hit Stun/Counter Hit | +2/+6 |
- A nice high priority cancellable attack. Range isn't great, but it has a very meaty hit box. Can be used as anti-air from certain distances.
- Crouching Fierce:
| Damage | 12,13 | 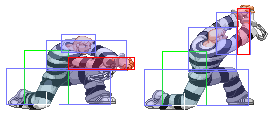
|
| Stun | 4 | |
| Chain Cancel | No | |
| Special Cancel | Yes (first hitbox) | |
| Super Cancel | Yes (first hitbox) | |
| Meter on whiff/hit | 1/1(A)3(XV) | |
| Frame Count | 6/4/23 | |
| Block Stun | -4 | |
| Hit Stun/Counter Hit | -3/Launch |
- Great for getting counter hits, and good as an anti-air from the right distance. Hits a jumping opponent earlier than his 2MP.
- Crouching Short:
| Damage | 5 | 
|
| Stun | 2 | |
| Chain Cancel | No | |
| Special Cancel | Yes | |
| Super Cancel | Yes | |
| Meter on whiff/hit | 0/1 | |
| Frame Count | 3/4/10 | |
| Block Stun | 0 | |
| Hit Stun/Counter Hit | +1/+6 |
- His best low poke. Is cancellable, and comes out quickly. Cannot be chained rapidly like his 2LP however.
- Crouching Forward:
| Damage | 13 | 
|
| Stun | 4 | |
| Chain Cancel | No | |
| Special Cancel | No | |
| Super Cancel | No | |
| Meter on whiff/hit | 1/3(A)4(XV) | |
| Frame Count | 8/1/30 | |
| Block Stun | -12 | |
| Hit Stun/Counter Hit | -11/-7 |
- A slow slide that is easily punished. Very situational. Can be used to combat Dhalsim's limbs or ranged standing attacks however, and will go under close jump-ins and counter certain jump-ins with small hitboxes.
- Crouching Roundhouse:
| Damage | 16 | 
|
| Stun | 8 | |
| Chain Cancel | No | |
| Special Cancel | No | |
| Super Cancel | No | |
| Meter on whiff/hit | 1/4(A)6(XV) | |
| Frame Count | 9/6/23 | |
| Block Stun | -6 | |
| Hit Stun/Counter Hit | - |
- The common misconception is that this is useless. It is useless with regards to the fact that it sucks as a tool for knocking someone down. It does however have great priority, and because it's raised, it will beat out a surprising number of other attacks. Use this as a counter-hit tool, not as a sweep.
Air Normals
- Neutral/Diagonal Jump Jab:
| Damage | 8 | 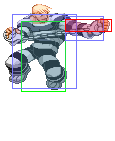
|
| Stun | 2 | |
| Meter on whiff/hit | 0/1 | |
| Frame Count | 3/10/6 |
- Probably his best straight air-air. Has very little start-up and good priority. Lacks range though.
- Neutral/Diagonal Jump Strong:
| Damage | 13 | 
|
| Stun | 4 | |
| Meter on whiff/hit | 1/3(A)4(XV) | |
| Frame Count | 7/10/6 |
- Will beat out certain attacks that jumping RH won't because of the angle of the punch. Has less priority however.
- Neutral/Diagonal Jump Fierce:
| Damage | 18 | 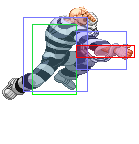
|
| Stun | 8 | |
| Meter on whiff/hit | 1/4(A)6(XV) | |
| Frame Count | 6/8/10 |
- Not exceptionally fast, but high priority and a good long distance air to air, and can hit standing opponents.
- Neutral/Diagonal Jump Short:
| Damage | 7 | 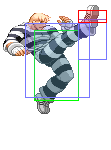
|
| Stun | 2 | |
| Meter on whiff/hit | 0/1 | |
| Frame Count | 4/10/10 |
- Can be useful to counter jump attacks late or when directly under someone. Also useful for punishing air recoveries.
- Neutral Jump Forward:
| Damage | 12 | 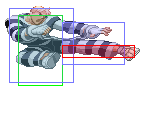
|
| Stun | 4 | |
| Meter on whiff/hit | 1/3(A)4(XV) | |
| Frame Count | 5/8/14 |
- Another good air-air. Has less priority than the others, but comes out relatively quick and is very horizontal. Works very well when jumping straight up.
- Diagonal Jump Forward:
| Damage | 10,13 | 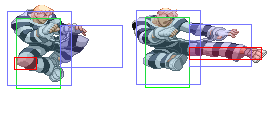
|
| Stun | 2,4 | |
| Meter on whiff/hit | 1/1,3(A)1,4(XV) | |
| Frame Count | 5/8/12 |
- Another good air-air. Has less priority than the others, but comes out relatively quick and is very horizontal. Works very well when jumping straight up.
- Neutral/Diagonal Jump Roundhouse:
| Damage | 17 | 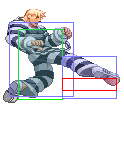
|
| Stun | 8 | |
| Meter on whiff/hit | 1/4(A)6(XV) | |
| Frame Count | 7/5/12 |
- Extremely high priority, but lousy air-air, so be sure you're going to hit someone on the ground before you use this.
Command Normals
| Damage | 14 | 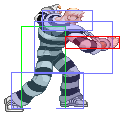
|
| Stun | 4 | |
| Chain Cancel | No | |
| Special Cancel | Yes(V-ism) | |
| Super Cancel | Yes | |
| Meter on whiff/hit | 1/4+1(A)6+3(XV) | |
| Frame Count | 8/6/17 | |
| Block Stun | -4 | |
| Hit Stun/Counter Hit | -3/+1 |
- A straight body blow with fairly high priority, but is rather slow. Situational at best.
| Damage | 19 | 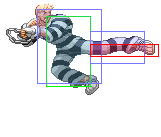
|
| Stun | 8 | |
| Chain Cancel | No | |
| Special Cancel | No | |
| Super Cancel | No | |
| Meter on whiff/hit | 1/4(A)6(XV) | |
| Frame Count | 11/3/16 | |
| Block Stun | +4 | |
| Hit Stun/Counter Hit | -/Launch |
- Quick and high priority, but not entirely un-punishable. Raised sweeps and other raised lows or long distance pokes (Vega) can make it difficult to utilize this to its full extent. See hopkick section for more details.
- Standing Jab:
| Damage | 5 | 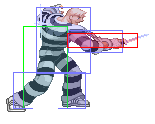
|
| Stun | 2 | |
| Chain Cancel | Yes | |
| Special Cancel | Yes | |
| Super Cancel | Yes | |
| Meter on whiff/hit | 0/1 | |
| Frame Count | 3/4/7 | |
| Block Stun | +3 | |
| Hit Stun/Counter Hit | +4/+9 |
- Standing Strong
| Damage | 13 | 
|
| Stun | 4 | |
| Chain Cancel | No | |
| Special Cancel | Yes | |
| Super Cancel | Yes | |
| Meter on whiff/hit | 1/1(A)3(XV) | |
| Frame Count | 5/4/11 | |
| Block Stun | +4 | |
| Hit Stun/Counter Hit | +5/+9 |
- Standing Fierce:
| Damage | 18 | 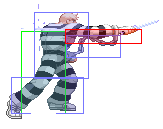
|
| Stun | 8 | |
| Chain Cancel | No | |
| Special Cancel | No | |
| Super Cancel | Yes | |
| Meter on whiff/hit | 1/4(A)6(XV) | |
| Frame Count | 8/4/16 | |
| Block Stun | -1 | |
| Hit Stun/Counter Hit | 0/Launch |
- Standing Short:
| Damage | 7 | 
|
| Stun | 2 | |
| Chain Cancel | No | |
| Special Cancel | Yes | |
| Super Cancel | Yes | |
| Meter on whiff/hit | 0/1 | |
| Frame Count | 5/3/12 | |
| Block Stun | +1 | |
| Hit Stun/Counter Hit | 0/+5 |
- A surprisingly long range poke. Does not hit low as the hitbox might indicate, but it is cancellable and rather quick. One of your best counter pokes.
- Standing Forward:
| Damage | 16 | 
|
| Stun | 8 | |
| Chain Cancel | No | |
| Special Cancel | No | |
| Super Cancel | No | |
| Meter on whiff/hit | 1/1(A)3(XV) | |
| Frame Count | 9/4/15 | |
| Block Stun | 0 | |
| Hit Stun/Counter Hit | +1/+5 |
- His main poke and footsies tool. With the proper spacing, this is extremely useful. Will stuff or go over a large number of lows as well.
- Standing Roundhouse:
| Damage | 16 | 
|
| Stun | 8 | |
| Chain Cancel | No | |
| Special Cancel | No | |
| Super Cancel | No | |
| Meter on whiff/hit | 1/4(A)6(XV) | |
| Frame Count | 7/6/18 | |
| Block Stun | -1 | |
| Hit Stun/Counter Hit | -0/Launch |
- His main long distance anti-air. The priority on it isn't as great as it is on his HP however.
- Crouching Jab:
| Damage | 4 | 
|
| Stun | 2 | |
| Chain Cancel | Yes | |
| Special Cancel | Yes | |
| Super Cancel | Yes | |
| Meter on whiff/hit | 0/1 | |
| Frame Count | 3/4/10 | |
| Block Stun | 0 | |
| Hit Stun/Counter Hit | +1/+6 |
- Crouching Strong:
| Damage | 11 | 
|
| Stun | 4 | |
| Chain Cancel | No | |
| Special Cancel | Yes | |
| Super Cancel | Yes | |
| Meter on whiff/hit | 1/3(A)4(XV) | |
| Frame Count | 5/4/16 | |
| Block Stun | -1 | |
| Hit Stun/Counter Hit | 0/+4 |
- Crouching Fierce:
| Damage | 16 | 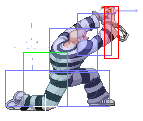
|
| Stun | 8 | |
| Chain Cancel | No | |
| Special Cancel | Yes | |
| Super Cancel | Yes | |
| Meter on whiff/hit | 1/4(A)6(XV) | |
| Frame Count | 9/2/22 | |
| Block Stun | -1 | |
| Hit Stun/Counter Hit | 0/Launch |
- Crouching Short:
| Damage | 5 | 
|
| Stun | 2 | |
| Chain Cancel | No | |
| Special Cancel | Yes | |
| Super Cancel | Yes | |
| Meter on whiff/hit | 0/1 | |
| Frame Count | 3/4/10 | |
| Block Stun | 0 | |
| Hit Stun/Counter Hit | +1/+6 |
- His best low poke. Is cancellable, and comes out quickly. Cannot be chained rapidly like his LP however.
- Crouching Forward:
| Damage | 13 | 
|
| Stun | 4 | |
| Chain Cancel | No | |
| Special Cancel | No | |
| Super Cancel | No | |
| Meter on whiff/hit | 1/3(A)4(XV) | |
| Frame Count | 8/1/30 | |
| Block Stun | -12 | |
| Hit Stun/Counter Hit | -11/-7 |
- A slow slide that is easily punished. Very situational. Can be used to combat Dhalsim's limbs or ranged standing attacks however, and will go under close jump-ins and counter certain jump-ins with small hitboxes.
- Crouching Roundhouse:
| Damage | 16 | 
|
| Stun | 8 | |
| Chain Cancel | No | |
| Special Cancel | No | |
| Super Cancel | No | |
| Meter on whiff/hit | 1/4(A)6(XV) | |
| Frame Count | 9/6/23 | |
| Block Stun | -6 | |
| Hit Stun/Counter Hit | - |
- The common misconception is that this is useless. It is useless with regards to the fact that it sucks as a tool for knocking someone down. It does however have great priority, and because it's raised, it will beat out a surprising number of other attacks. Use this as a counter-hit tool, not as a sweep.
Air Normals
- Neutral/Diagonal Jump Jab:
| Damage | 9 | 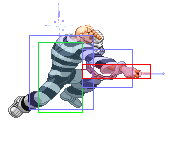
|
| Stun | 2 | |
| Meter on whiff/hit | 0/1 | |
| Frame Count | 6/10/- |
- Neutral/Diagonal Jump Strong:
| Damage | 12 | 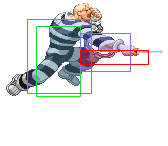
|
| Stun | 4 | |
| Meter on whiff/hit | 1/3(A)4(XV) | |
| Frame Count | 8/8/- |
- Neutral/Diagonal Jump Fierce:
| Damage | 17 | 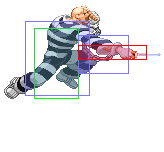
|
| Stun | 8 | |
| Meter on whiff/hit | 1/4(A)6(XV) | |
| Frame Count | 10/6/- |
- Neutral/Diagonal Jump Short:
| Damage | 7 | 
|
| Stun | 2 | |
| Meter on whiff/hit | 0/1 | |
| Frame Count | 4/10/10 |
- Can be useful to counter jump attacks late or when directly under someone. Also useful for punishing air recoveries.
- Neutral Jump Forward:
| Damage | 12 | 
|
| Stun | 4 | |
| Meter on whiff/hit | 1/3(A)4(XV) | |
| Frame Count | 5/8/14 |
- Another good air-air. Has less priority than the others, but comes out relatively quick and is very horizontal. Works very well when jumping straight up.
- Diagonal Jump Forward:
| Damage | 10,13 | 
|
| Stun | 2,4 | |
| Meter on whiff/hit | 1/1,3(A)1,4(XV) | |
| Frame Count | 5/8/12 |
- Another good air-air. Has less priority than the others, but comes out relatively quick and is very horizontal. Works very well when jumping straight up.
- Neutral/Diagonal Jump Roundhouse:
| Damage | 14 | 
|
| Stun | 8 | |
| Meter on whiff/hit | 1/6(A)9(XV) | |
| Frame Count | 6/8/6 |
- Extremely high priority, but lousy air-air, so be sure you're going to hit someone on the ground before you use this.
Command Normals
| Damage | 14 | 
|
| Stun | 4 | |
| Chain Cancel | No | |
| Special Cancel | Yes(V-ism) | |
| Super Cancel | Yes | |
| Meter on whiff/hit | 1/4+1(A)6+3(XV) | |
| Frame Count | 8/6/17 | |
| Block Stun | -4 | |
| Hit Stun/Counter Hit | -3/+1 |
- A straight body blow with fairly high priority, but is rather slow. Situational at best.
| Damage | 19 | 
|
| Stun | 8 | |
| Chain Cancel | No | |
| Special Cancel | No | |
| Super Cancel | No | |
| Meter on whiff/hit | 1/4(A)6(XV) | |
| Frame Count | 11/3/16 | |
| Block Stun | +4 | |
| Hit Stun/Counter Hit | -/Launch |
- Quick and high priority, but not entirely un-punishable. Raised sweeps and other raised lows or long distance pokes (Vega) can make it difficult to utilize this to its full extent. See hopkick section for more details.
Special Moves
Criminal Upper
- Quarter Circle Back + Punch
Ruffian Kick
- Quarter Circle Forward + Kick
Bad Stone
- Quarter Circle Forward + Punch
Fake Stone
- Quarter Circle Forward + Start
Knife Pick-up
- Down + All three Punches
Knife Throw
- Quarter Circle Forward + Punch
Fake Knife Throw
- Quarter Circle Forward + Start
Bad Spray
- Back, Down-Back, Down + Punch (Reversal only)
- Becomes strike invincible if done late off a reset state
Crack Kick
- Forward + RH
Yoke
- Hold back on V-ISM (Only works on mid-level attacks)
Super Combos
Final Destruction
- Double Quarter Circle Forward + Punch
Dead End Irony
- Double Quarter Circle Forward + Kick
The Basics
ISMs
If you're playing Cody, chances are, it's in V, because without his dodge he loses a lot of his punish potential and without his customs, he's forced to rely on his relatively mediocre neutral.
A-Ism
Some okay supers, and changes some of his match-ups by giving him a normal guard bar but generally makes him a much weaker character overall.
V-Ism
Cody is at his best with access to his dodge and incredible customs
X-Ism
He gains a gimmicky super that can offer huge damage off crouch cancels near the corner, but other than that, not a good option.
General
Learning to zone properly with bad stones is key to any good Cody. Varying the timing and distance of the stones will keep most people on their toes, and helps you build meter and slowly close the distance. Dodge oncoming projectiles and then throw your own to keep them in a defensive position. Watch out for fast walkers like Chun' and Karin though.
Cody's low ruffian kick will be his primary method of getting knockdowns and closing the distance. s. MK is essentially his only real footsies tool, but is shutdown by people with slides.
Without meter, Cody is highly dependent on maintaining his momentum. His tiny guard meter means that a single knockdown can lead to him getting into a 2-hit guard crush situation which can often mean the end of the match.
Bad Spray
Will make people hesitant about attacking you on wake-up, even if you don't actually use it. Can be easily punished by jump-ins or sweeps however. Experiment and find out when it's safe to use, but only use it sparingly. You can get punished really badly if you get too predictable with it.
Yoke/Dodge
Another one of Cody's lifelines. This allows him to bypass projectiles and the otherwise deadly zoning games of characters like Charlie. It will not work on overheads/jump-ins or low attacks, but will bypass almost anything else. It stops working however, if the attacks are strung together in a combo. So you can't block properly timed jump-in combos for instance. Flying attacks like Blanka's ball and Honda's headbutt can not be dodged either.
The dodge can be cancelled with a special/activation. This is especially important against people like Boxer and Akuma who can easily glitch his dodge.
Keep in mind that because of this dodge, he has the smallest guard meter in the game (3 squares instead of 4, which means he can only be guard crushed twice before he's stuck in a 2-hit GC situation). A single knockdown can often spell disaster for Cody, especially against characters like Blanka who can easily GC him in 4 good hits.
Hopkick/Crack Kick
Utilizing this properly is absolutely essential to doing well with Cody. Without it, he has difficulty applying any real pressure. It can go over lows and recovers immediately so he can use it to move in and then block, or as a way to advance and immediately counter what ever they do. It's also great for stuffing normals and landing random hits since it comes out very quickly.
If your opponent is knocked down, hopkick over the body and start his 50-50 game which consists mostly of his throw and c. LK > Criminal Upper, although there are other variants depending on whether the opponent can reverse it or escape somehow.
Cody's dependence on this and his low ruffian kick for mobility is the reason why he struggles against people with slides and raised sweeps or quick long range pokes that can easily knock him out of them.
Against opponents like Vega who shut out both his rock zoning and hopkick/ruffian game, he has to struggle to both do damage and maintain his positioning.
The Knife
More of a liability than anything. Will do chip, has high priority and can be chained extremely quickly with LP/c.LP, but gets dropped after one hit or after a throw attempt, and seriously messes with his air normals.
Possibly useful for mind-games, finishing an opponent or counter poking against someone like Vega
Combos
A-ISM combos
V-ISM combos
Advanced Strategy
Criminal Upper follow-ups
After any successful criminal upper hit, you can either jump after them if you think they're going to try and recover/attack, or walk forward and use a ground normal if you think they're going to recover/block. Different attacks work better depending on the character/angle/distance. There also other variants depending on the situation, and some hold opportunities for additional follow-ups using crouch cancels. Especially once you get near the corner.
Corner Trap
Cody has what is probably the best corner trap in the game to make up for his weaknesses mid-screen, although others like Sakura have strong ones as well.
His criminal upper follow-ups and large knockback of the crack kick ensure that it's relatively easy to get somebody in there as well.
Once they're there, the trap consists mostly of c. LK > Criminal Uppers from just the right distance so that the tornado hits the blocking opponent, but his arm does not so he isn't pushed back. This involves walking forward very slightly, and the distance varies from character to character. Guy and Karin are especially easy to practice on since they seem to have large horizontal hitboxes.
You can mix it up with throws, jump-ins, hopkicks and c. FP > Bad Stone/Ruffian Kicks to keep the opponent guessing and land counter hits. Be wary of wall jumps from characters like Guy and Chun-li, and also of rush attacks like rolls/headbutts, because they will either hit you out of your hopkick or they will go under you essentially freeing them from the corner.
The trap is done until they are hit or GC'ed, which case there are any number of follow-ups that are possible depending on whether they flip or not.
Cross-up Data
Compiled a list of who Cody's FK cross-up works on since people seemed confused about it. You might be surprised at some of the people it's useful for. Generally you have to do it earlier on the taller characters, but it should be combo-able for all these people. For characters like Sodom and Rolento, aim for where their shoulder is.
Works on (Standing)
Zangief, Blanka, Birdie, Boxer, Dhalsim, Claw, Rolento, Gen (Have to do it really late, but it works from almost anywhere), R. Mika (Have to do it really late, but it works from almost anywhere), Sodom (Easier from farther away), Sagat (Easier close-up), Honda, Cody (Too spacing dependant to be useful), Guy (Too spacing dependant to be useful)
Works on (Crouching) (Gotta do it really late and from farther away. Not as practical for most, but at least you know it works.)
Zangief, Birdie, Claw, Dhalsim, Dictator, Honda, Cody, Sagat, Blanka (Max distance only), Gen (Only from a very specific distance), Sodom (Not practical at all. He's really tiny crouching it seems)
Works on (On wake-up) (Gotta be deep in, so it's only semi-practical. Might be useful after a hopkick hit that knocks them too far away for hopkick shenanigans) (Would've been more useful if everyone got up at the same speed)
(All characters listed in the first category) Rose, Charlie, Ryu, Ken, Akuma, Dan, Adon, Cammy, Juni, Juli, Dictator
Works on (If they block the wrong way/walk back when you do it) (Not practical)
Dictator, Dan, Ryu, Ken, Akuma, Cammy, Juli, Juni, Rose, Charlie, Adon
Characters it doesn't work on at all
Chun-li, Karin, Sakura
Also, Cody's hopkick misses on these people even when they're standing:
Chun-li, Karin, Honda
Cody's RH misses on these people even when they're standing:
Chun-li, Karin, Sakura, Honda, Gen, R. Mika
Also, as a side note. Cody's hitbox in the air is pretty small. Certain moves will hit him a fewer number of times when you have VC1 on. Birdie and Zangief are the same way. This may also be because they bounce differently. Zangief and Cody react the same way, Birdie seems to bounce straight up. However, Cody will also bounce straight up if you hit him from exactly one space away.
For example, Cody's c. MP QCF FK only hits 3 times close-up on VC1 instead of 4, and if you do c. MP, QCF FK from exactly one space away with VC1 on, watch how Cody bounces.
Match-ups
Vs Akuma
Vs Balrog (Boxer)
Dash straight and s. FP are both dodge counter fodder. Shouldn't be a problem on V-ISM.
Vs Birdie
Birdie has no good response to rock zoning and Cody's strong anti-airs. Watch out for his kick super, but fake rocks can blow it up.
Vs Blanka
A surprisingly difficult match-up for Cody. One of the kings of guard crush VS the character with the smallest guard meter in the game makes for an awkward situation. You have no way to reliably punish rolls besides activate so things can go south rather quickly, because they can whittle down your guard meter down to nothing. c. MP/LP's will work to stuff it early, but if you trade, you end up taking a lot more damage than him. Hang on to your meter here, because it will be your life. Most Blanka players will be on A-ISM, so anti-air VC him when you get the chance and don't drop him once you start the inf'. Also be sure to VC him off any blocked hop back rolls.
A good way to counter the rolls is to jump back and RH/activate when they do one. You either hit them out of it or land close enough to them to punish. Also if you jump back and air block it, sometimes you will be in range to s. RH them as they bounce up and away.
Throwing rocks is sort of a bad idea since the roll goes under it most of the time. LP rocks will beat it, but it's still too slow a lot of the time and then you risk getting jumped on. Fake rocks can be useful for baiting a roll/jump though.
Try not to get knocked down since having to block FP electricity can put you in a bad spot guard-wise. If you get him in the corner, don't try to add hopkick pressure like you might with others, because the roll will go through it, and it's easy for him to use it since he's already holding back to block. Be careful with the criminal uppers (his large horizontal/short vertical hitbox makes it difficult to do the trap consistently) and remember that if he rolls that close to the corner, you can punish after with a VC/RH/ruffian kick.
c. RH and standing FP will stuff most of his ground normals. A hopkick can beat out his roll from a distance.
Your cross-up does work here, so use it if you can.
Vs Cammy
Vs Charlie
Vs Chun Li
Another tough match for Cody. Her c. RH easily stuffs his hopkick and sets him up for wake-up shenanigans making it dangerous to use. If that wasn't enough, his hopkick misses completely on her whether she's standing or not. As does his s. RH. Her own s. RH's and c. FK's will also stuff his low ruffian kick from long distance making it difficult to advance, so spacing/timing is 'extremely' important here. Use c. MP to stuff her s. RH's, and c. FK's for her s. FP. Use c. RH to stuff her c. FK/RH. You can anti-air her godly jump FK by using c. RH or c. FP from max distance. Any closer and she'll stuff you. Cody's c. FK will beat out her jump FP though since it's got a pretty small hitbox. Again, most Chun' players are on A, so anti-air VC's are your best friend here. You may have to do some hit and run, since she out prioritizes/out ranges you on most fronts. You can't really throw rocks on her either since she can just walk under them and sweep you most of the time. If you throw any, make sure she's not in range to counter, and you're probably better off using a close one. Again, fake rocks can be useful in baiting walk-ins/jumps.
The only up-side to this match-up is that his dodge allows him to avoid her wake-up FP crap. He can simply dodge it and throw her.
Vs Cody
Vs Dan
Vs Dhalsim
Still a tough match-up, but not nearly as difficult as it is for some other characters. The dodge helps you immensely here. c. FP and c. RH can be used to stuff many of 'Sim's normals including his annoying c. FP/LP. You can also use the otherwise useless slide to safely counter s.FK/RH's. Learn to anticipate and punish his teleports, so that he can't just play hit and run on you all day. Also learn to reset your VC so that he can't escape from them because you're going to need it to have any kind of damage output against him. Patience is the key since you don't have to worry as much about being guard crushed as everyone else. If he tries to use multiple low drills on you, s. LP him quickly in between each one.
Vs E. Honda
Vs Gen
Vs Guy
Vs Juli
Vs Juni
Vs Karin
Probably his worst match-up. She's one of the few characters who can punish his LP Criminal Upper, can VC him in a dozen different ways and she walks too fast for proper rock zoning. This in tandem with her quick, long range sweep means she can score easy knockdowns on Cody, and because one or two of her rekka strings is almost enough to guard crush Cody, that means if you're knocked down once, you're in serious trouble. Especially once you get near the corner, since she can essentially keep you locked down in there for as long as she wants.
My advice is stay in the air to try and bait an activation and fake rocks from a distance.
Vs Ken
Vs M.Bison (Dictator)
VS R.Mika
Vs Rolento
VS Rose
She has one of the longest sweeps in the game, and it's a huge problem, as she'll slowly whittle Cody's guard bar down from outside of a range where he can easily punish. She's also tough for him to consistently anti-air.
Vs Ryu
Vs Sagat
Vs Sakura
A deceptively awful match-up. One or two sweeps can easily put you in a horrible guard crush scenario.
Vs Sodom
Vs Vega (Claw)
One of his worst match-ups. Vega's long range slide, c. MP and s./c.FP's totally shut out Cody's ruffian kick/hopkick game and his guard crush VC means you can't be reckless with your meter. The Vega player can essentially do hit and run on you all day and you'll have a hell of a time catching him. This also means you're in constant danger of being guard crushed if you don't find a way to retaliate. c. FP is useful as an anti-air, but Vega's jump FP has exceedingly high priority, so it must be timed perfectly. Use c. FP/MP and jump LK/LP/FP to stuff dives and VC him off any blocked horizontal wall claw. You absolutely have to save your meter here. If you blow it, you're getting corner VC'ed for a ton of damage since it'll blow through Cody's guard almost immediately and may GC him a second time if you try to block again. You can take the sweeps and avoid some guard damage/being pushed in, but if he catches on, he can start pushing you in with rolls.
Use c. MP/LP to combat his standing claw attacks, and c. RH/s. LK to counter his slide. Don't try to air throw him. His jump arc will make it so it misses most of the time. It's also difficult to rock zone him because of his fast walk speed/jump speed. Again, fake rocks are helpful here.
Vs Zangief
He can easily exploit your dodge to force damage, but you have decent tools for zoning him out. Watch out for kattobi when throwing rocks.
Notable Players
Japan
D44Bas (V-Cody)
Eipacchi (V-Cody)
Hassy / Hasshi (V-Cody)
Hisashi Patch (V-Cody)
Hosshi (V-Cody)
Jun (V-Cody)
Kisaku (V-Cody)
N2 (V-Cody)
Nagapacchi (V-Cody)
Sugaimaki (V-Cody)
VER (A/V Cody)
Versus (V-Cody)
North America
Haqq (A-Cody)
Kyokuji (V-Cody)
Nibor (V-Cody)
SabreAZ (V-Cody)
Europe
eishi (V-Cody)
V-Ryu (X-Cody)
