Introduction
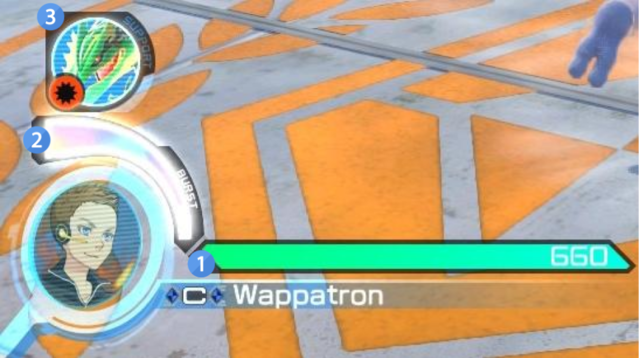
One core element of Pokken's gameplay is the management of its various resources. There are three resources the player must keep track of during a match: Health, Synergy, and Support Gauge. The Synergy and Support Gauges each have one use, only accessible when the meter is full, so the single relevant decision is when to spend that use. However, wisely choosing the right time to activate Burst Mode or call your Support Pokemon can be the difference between victory and defeat. Health, by contrast, is managed much more like a fluctuating pool. Beyond living and dying by one's HP, many characters have ways of either healing themselves or spending HP. In the latter case, players of these self-destructive characters must carefully consider exactly how much they want to cash out. Pokken's various gauges are positioned as follows.
1. Health Gauge
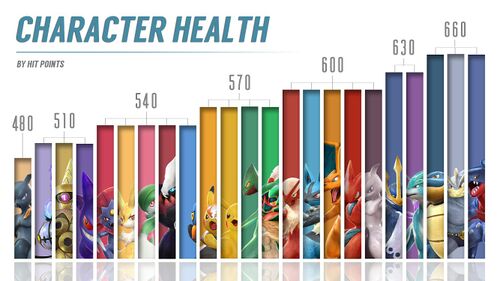
Of all Pokken's resources, HP is probably the most important. As in other fighting games, the primary way to lose a round is to have your HP reduced to 0. Each character has different amounts of HP, as pictured below.
Whenever you take damage in Pokken, a portion of that damage can be recovered via Recoverable HP. Many supports and a few characters can regenerate Recoverable HP, but universally, 50% of Recoverable HP is regenerated when shifting from Field Phase into Duel Phase, and Recoverable HP regenerates slowly while in Burst Mode.
Rage
![]()
"Rage" is the state a player enters when their HP is 1/4 or below. Recovering HP to an amount higher than this brings the player out of Rage.
Rage increases the amount of damage dealt by 20%, while decreasing the amount of damage received by 30%.
If both players are in Rage, the increased damage is effectively canceled out and the amount of damage received is decreased by 10%.
2. Synergy Gauge
Bordering each player icon is a gauge that fills up periodically throughout the match - this is the Synergy Gauge. As you collect Synergy Power, this gauge will periodically fill up. Each character’s gauge has a different size, meaning that a variable amount of Synergy Power is required to reach max capacity depending on the character. Synergy Power can be measured in “CC”, a measurement system that Pokken players have adopted in order to accurately measure Synergy Power. Furthermore, once activated, each character's Synergy Burst mode lasts for a different period of time. The values given here are a vacuum measurement in seconds, as certain factors can extend or shorten the time you spend in Burst.
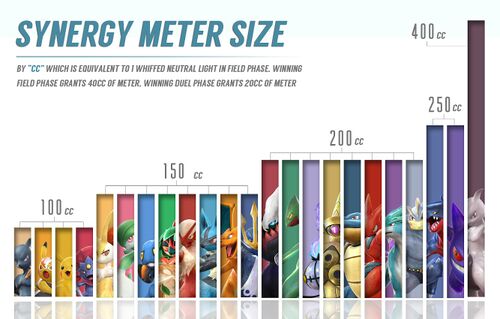
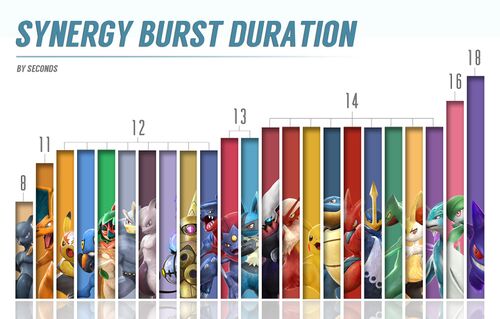
Synergy Burst
Once the Synergy Gauge has been filled, Synergy Burst can be activated. By pressing L+R, the screen briefly flashes, and the character is powered up. The activation of Burst Mode generates a wave which pushes opponents back and Destroys Projectiles. Burst Mode will slowly consume the gauge until all its Synergy Power has been depleted, at which point it will end. Universally, Burst Mode grants the following benefits while active.
- Damage dealt is increased by 10%.
- Damage received is decreased by 10%.
- Increased walking speed.
- 4F of recovery is reduced from all Dashes.
- Heals recoverable HP.
- Burst Armor.
Burst Armor
Unless enhanced with an Attack Up buff, Weak Attacks will not inflict any hitstun on an opponent in Burst. This means that options with which to pressure or defend against an opponent in Burst are limited, making it all the more formidable.
Burst Armor has some rules to it:
- Weak Attacks can still go through Burst Armor if it was a critical hit.
- Weak Attacks that do not go through Burst Armor can still be used in a combo as long as the move that started the combo goes through Burst Armor.
- Hitting the opponent with nine attacks that don't deal hitstun to Burst Armor causes them to lose their Burst Armor for the next hit.
- This nine hit mechanic resets at the end of a combo, when the opponent is knocked down, does an air-tech, or if the Phase Shifts.
The full list of every attack subject to burst armor can be found here.
Burst Attack
While still in Synergy Burst, pressing L+R again will result in another screen flash, followed up by a special attack known as a Burst Attack (BA). These attacks are treated like Pokemon Moves, meaning that they can be canceled into from certain normal attacks. Most BA's become invincible a few frames after activation. However, some BA's are completely invincible, and some have armor. These attacks do a lot of damage on their own. They can also counter pierce, making them powerful tools for hit confirms or neutral.
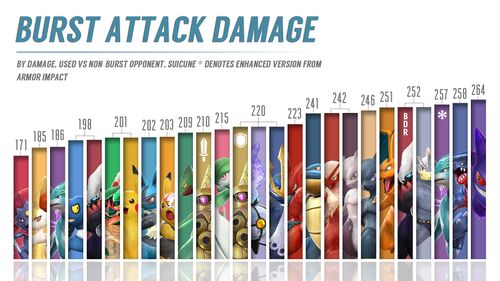
3. Support Gauge
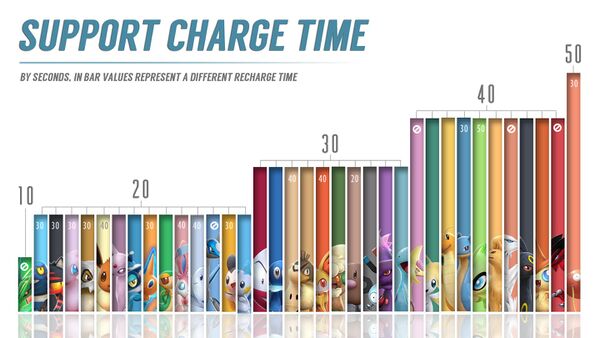
Each Support Pokemon requires time to charge before they can be called. These charge times vary for each Support Pokemon and range from 20 to 50 seconds. Charge times for certain Support Pokemon change after the first use. For example, Litten requires 20 seconds to fully charge for Its first call. Afterwards, it now requires 30 seconds to charge any further calls.
