Introduction
A core part of Pokemon's appeal has always been the interaction of its systems, and while it lacks the type matchups found in main series games, Pokken Tournament DX retains the feeling of those type matchups in the way attacks interact. Armoring through a Normal, ducking a High, or Overblasting a low Priority Strike in Pokken gives a very similar satisfaction to correctly guessing the type of your opponent's next Pokemon and letting them switch in to a devastating super effective surprise. Pokken uses 3 main systems to handle attack interactions: The Attack Triangle, Move Heights, and Priority.
The Attack Triangle

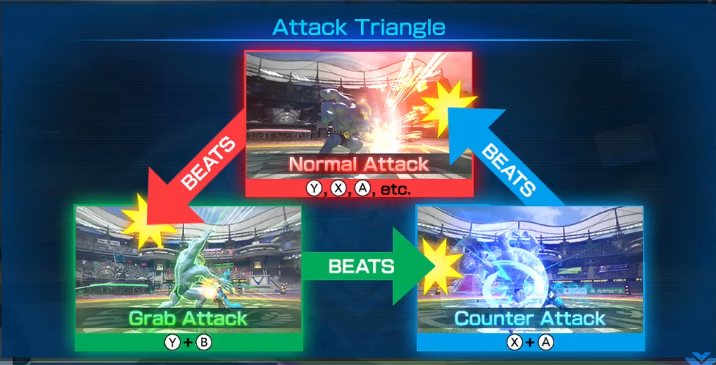
Every attack in Pokken Tournament DX can be divided into one of three types: Normal Attacks, Counter Attacks, and Grab Attacks. In the event of a collision between two attacks of different types, each attack has a type that it beats and a type that it loses to. The image above displays which attack types beat and lose to each other in what is known as the Attack Triangle. Though this system seems easy to compare to a volatile game of Rock-Paper-Scissors, the use of each attack type carries different amounts of inherent risk. Below are descriptions of each attack type and the specifics of their interactions with other types.
The way one chooses to interact with the Attack Triangle is the source of a great deal of emergent gameplay and player expression. Some players, like Wingtide, lean into the Attack Triangle's volatility, picking characters like Machamp or Garchomp with supports like Mew or Victini in order to maximize their reward for each correct guess. Others seek to maximize consistency, players like Wise or Shadowcat who use the tools of characters like Sceptile, Braixen and Darkrai with supports such as Yveltal and Mimikyu to create situations that are impossible to escape, eliminating variance and guaranteeing victory. Most players fit somewhere between these two extremes, but one must learn the rules in order to decide if and how to break them.
Critical Hit
When an attack collides with another attack that it beats according to the Attack Triangle, that attack will cause what is known as a Critical Hit. Universally, a Critical Hit increases the damage of the initial hit by 20%, and all hits afterwards in a combo by 10%. Additionally, some attacks have additional hitstun or alternate hit effects, such as launching the opponent, when those attacks are used to score a Critical Hit.
Normal Attacks
Normal Attacks are by far the most common of the three attack types. While some characters have only one Counter Attack and one Grab, everyone has a wealth of different normals across both phases. A character's normals can serve vastly different functions, but some normals have universal traits. For example, every character's 5Y can cancel into any of their Pokemon Moves, every 8Y serves as a universal anti-air, and every 8X Throw Blasts. Every character can also convert a hit from at least a few of their Normal Attacks into a damaging combo, something not guaranteed for the other types. Normal Attacks lose to Counter Attacks by getting armored, and beat Grab Attacks by Throw Teching or Throw Crushing them(see Grab Attacks).
Counter Attacks
A Counter Attack is any attack that has Counter Armor during a portion of its duration, usually during the startup. Each character has a universal Counter Attack that can be charged to deal additional damage and Pierce, a special trait that lets some attacks break through Counter Armor. Universal Counter Attacks can also be cancelled with a dash in any direction by tapping in that direction and pressing R. The Counter Attack Dash Cancel (or CADC for short) is a cornerstone of the neutral game and has a number of uses, from getting a better punish on Normal Attacks to assessing and then escaping a bad situation. Combos from Counter Attacks are rarely possible all of the time, and usually require the attack to be charged or a Critical Hit. Counter Attacks lose to Grab Attacks by getting grabbed, and beat Normal Attacks by armoring through them.
Grab Attacks
Grab Attacks normally net the least reward of the three attack types. Universal Grab Attacks are either i11 or i15, generally ranking among a character's fastest options, but do relatively low damage and immediately Phase Shift. Command grabs attached to Pokemon Moves with unique effects are present on a few characters, but command grabs that can convert into combos are reserved for characters designed to have especially potent offense. Grab Attacks beat Counter Attacks by grabbing them, but the way Grab Attacks interact with Normal Attacks is a bit more complicated.
Throw Tech, Throw Crush, and Throw Blast
When a player attempts to grab an opponent performing a Normal Attack, the opponent will flash red and one of two things will happen:
- A Throw Tech- Both players are sent reeling backward in an animation similar to a clash. While this animation lasts 30F for both players, the one who attempted the grab is usually at disadvantage.
- A Throw Crush- The grabbed player's Normal Attack keeps going, landing a Critical Hit. Most Normal Attacks have a Throw Crush Frame, which refers to the first frame of the attack's startup where it will Throw Crush when Grabbed. Grabbing a Normal Attack before this frame will cause a Throw Tech. If a Normal Attack can Throw Crush on Frame 1, then that attack Throw Blasts. A Normal Attack without a Throw Crush Frame, such as most normal Burst Attacks and followup normals, can be grabbed freely at any point during its startup.
Height
Every attack in Pokken is assigned one of eight possible heights. The six most common ones consist of Lows, Mid Lows, Mids, Special Mids, Mid Highs, and Highs. There are also two rarer heights: Ground Only and Air Only. Some attack heights can be avoided by universal options, such as jumping, and many attacks have invulnerability against certain heights. Because Pokken's blocking covers both High and Low attacks, this height system is used mostly for balancing. For example, both of Machamp's Special Cancelable normals in Duel Phase are Highs. While he has fast Lows and Mid Lows available, 2X is his fastest attack of either height that converts into a combo, and 2X has great range in return for being unsafe on block. This means that Machamp's pressure is susceptible to being ducked up close, and susceptible to being jumped from farther away, which is a weakness he couldn't have if he were in another game. Below is a description of each height.
Lows
Moves that hit low to the ground.
Jumping grants invulnerability against Lows on Frame 1.
Mid Lows
Moves that hit a bit higher than Lows and are even able to hit opponents in the air.
Jumping grants invulnerability against Mid Lows on Frame 5. The invuln. wears off at the apex of your jump or when you do an aerial action.
Mids
Moves that are not affected by height properties.
The only way to avoid these moves is to be outside of their hitbox.
Special Mids
Moves that hit mid, but narrowly.
Can be evaded with either Mid-High or Mid-Low invulnerability, i.e. can be both anti-aired as well as jumped over starting on frame 5.
Mid Highs
Moves that hit high, but can still hit crouching opponents.
Most Anti-air attacks have Mid High invuln. The universal anti-air option every character has is 8Y.
Highs
Moves that hit high, but can be crouched or low profiled.
Many characters' Low Stance avoids Highs on Frame 1.
Ground Only
Moves that can only hit a grounded target.
All universal grabs and most command grabs are Ground Only.
Air Only
Moves that can only hit an airborne target.
Priority
While the all-important Attack Triangle determines the interactions between attacks of different types, a system of priority determines the interactions between attacks of the same type. Two different kinds of attacks, projectiles and strikes, abide by their own system of priority that works a bit differently. These are separate systems, and in most cases, strikes and projectiles do not interact.
Projectile Priority
Each of the game's projectiles have a priority value from 1-9. If two projectiles clash, they will destroy eachother if they have the same priority, and if they don't, the projectile with the higher priority will destroy the weaker one. Projectiles can also have 3 special priority values. If their priority is listed as "None", they pass through and do not interact with other projectiles. Projectiles with "S" priority will destroy projectiles with a number value, and pass through other "S" and "None" projectiles. The most powerful projectiles have a priority of "S+". "S+" projectiles work similarly to "S" projectiles, except for the fact that the latter can be destroyed by projectile clearing assists such as Pachirisu and Whimsicott, but "S+" projectiles ignore such effects.
Strike Priority
Each strike has a priority value from 1-6. When two strikes clash and have equal priorities or priorities within 1 of eachother (i.e. two priority 4 strikes or a 4 strike and a 5 strike), both players will be sent reeling back. However, in the latter case, the player who used the higher priority strike will recover from this animation 10 frames faster than their opponent. If two strikes clash and one has a priority of at least 2 more than the other, the strike with the higher priority will win outright. Strikes can also have a special kind of priority, labeled "BA". Strikes with this priority will never clash, always beating out whatever strike is in their way.
There are some strikes that destroy projectiles during their active frames. Regardless of their own priority, these strikes will delete all projectiles with priorities from 1-9, but will have no effect on projectiles with "None", "S", or "S+" priority.
Other instances such as Scizor's Hover Dash, Pachirisu, and Whimsicott are also capable of destroying projectiles.
