Marvel vs Capcom 3/Amaterasu

From SuperCombo Wiki
Marvel vs Capcom 3MvC3Logo.png
Marvel vs Capcom 3/System GuideMarvel vs Capcom 3#Game ElementsMarvel vs Capcom 3#CharactersMarvel vs Capcom 3/SystemsMarvel vs Capcom 3#Fun Stuff.21Marvel vs Capcom 3/StrategyMvC3HeaderButtons.png


Amaterasu

Amaterasuface.jpg

In a nutshell

To master Amaterasu, you'll need to learn how to use all three of her weapons and their techniques, and seamlessly transition to the correct weapon for the situation at hand. Amaterasu is one of the most versatile characters in the game. She can play any situation; rush down, run away, keep away, punishing, and has some of the best assists in the game as well. Much of the game's keepaway doesn't work on her, because she can simply crouch underneath any threat. Players looking for a jack of all trades, master of all trades character will be at home with Amaterasu, so long as they can handle having a very Low.png amount of health.


Video Walkthrough

Move List

Assist Types

Name
Type
Damage
Special Properties
Cross-Over Combination
Alpha.png Solar Flare
{{ Extra.png Instant.png }}
Reflects projectiles
Okami Shuffle
Beta.png Cold Star
{{ Shot.png Tiltdown.png }}
20,000 per hit
Okami Shuffle
Gamma.png Bloom
{{ Extra.png Instant.png }}
Grants 25% Hyper Meter
Okami Shuffle

Normal Moves

Name
Command
Damage
Special Properties (glossary)
Magic Vine
Air {{ Uf.png , F.png or Df.png + Atk.png + Atk.png }}
Air Dash
Standing Light
{{ L.png }}
30,000
Crouching Light
{{ D.png + L.png }}
28,000
Low.png
Standing Medium
{{ M.png }}
50,000
Crouching Medium
{{ D.png + M.png }}
50,000
Low.png
Standing Special
{{ S.png }}
70,000
Launch.png
Jumping Light
{{ air L.png }}
35,000
High.png
Jumping Medium
{{ air M.png }}
48,000
High.png
Jumping Special
{{ air S.png }}
70,000
High.png
Reflector: Standing Heavy
{{ H.png }}
60,000
Jcancel.png
Reflector: Crouching Heavy
{{d + H.png }}
60,000
Low.png jcancel
Reflector: Disc Combo
{{f + H.png , tap H.png repeatedly }}
60,000 per hit
Reflector: Jumping Heavy
{{ air H.png }}
60,000
High.png
Glaive: Standing Heavy
{{ H.png }}
80,000
Glaive: Crouching Heavy
{{d + H.png }}
80,000
Low.png
Glaive: Heavy Slash
{{f + H.png }}
80,000
Glaive: Charged Heavy Slash
{{f + hold H.png }}
100,000
Stagger.png Cannot Chain Combo into this move
Glaive: Jumping Heavy
{{ air H.png }}
90,000
High.png
Glaive: Charged Jumping Heavy
{{ air hold H.png }}
110,000
High.png Chipdamage.png Groundbounce.png
Glaive: Dive
{{ air Df.png + H.png }}
90,000
Chipdamage.png Otg.png Groundbounce.png airborn opponents
Glaive: Charged Dive
{{ air Df.png + hold H.png }}
120,000
Chipdamage.png Stagger.png Otg.png Groundbounce.png airborn opponents
Rosary: Standing Heavy
{{ H.png }}
4 Hits for 79,500 total
Rosary: Crouching Heavy
{{d + H.png }}
4 Hits for 79,500 total
Low.png
Rosary: Whip Combo
{{f + H.png , tap H repeatedly }}
20 Hits for 163,900 Total
Nocancel.png
Rosary: Jumping Heavy
{{ air H.png }}
4 Hits for 79,500 total
High.png

Special Moves

Name
Command
Damage
Special Properties (glossary)
Head Charge
{{ Air Qcf.png + Atk.png }}
70,000
{{ L.png goes Uf.png High.png
M.png goes F.png High.png
H.png goes D.png Groundbounce.png High.png }}
Power Slash
{{ Qcb.png + Atk.png }}
80,000
Weapon Change
{{ D.png , D.png + Atk.png }}
{{ L.png for Reflector , M.png for Glaive , H.png for Rosary}}
With Reflector (Disc)
    Solar Flare
{{ Dp.png + Atk.png }}
150,000
{{l counters high/mid
M.png counters low/mid
H.png reflects }}
With Glaive (Sword)
    Thunder Edge
{{ Qcf.png + Atk.png }}
100,000
{{Hold Atk.png for +50,000 damage}}
    Glaive Chop
{{ Air Qcf.png + s}}
88,600
With Rosary (Whip)
    Cold Star
{{ Qcf.png + Atk.png }}
20,000 per hit
{{Mash Atk.png for more hits
L.png goes F.png
M.png goes Uf.png
H.png goes df}}

Hyper Moves

Name
Command
Damage
Special Properties (glossary)
Okami Shuffle
{{ Qcf.png + Atk.png + atk}}
316,500
airok
Value of Mist
{{ Qcb.png + Atk.png + atk}}
Airok.png Slows opponent for 5 seconds
Cannot build meter while active
Divine Instruments
{{ Dp.png + Atk.png + atk}}
400,000
Startupinv.png
High.png

Mission Mode Combos


Apprentice Combos

Strategy

Tips and Tricks

  • While learning Amaterasu, do not be afraid to lose. Take your time learning each weapon separately before trying to combine all of her techniques into one gameplan. Remember to experiment and find out what you can crouch under as one of the shortest characters in the game. The knowledge will add up to a much deadlier character in the future.
  • Play the matchup when using Amaterasu. If your opponent's character is weak to rush down, then rush him down. If he is weak to keep away, keep him out!
  • Be ready for a quick, nearly full screen punish using the Okami Shuffle super.
  • Don't be afraid to slow your opponent's down with the Vale of Mist. Meter gain stops during this, but the damage you get or the escape you make can be invaluable. Try DHCing into this super for a safe switch.
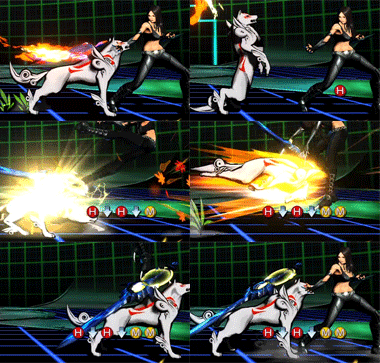
  • The ideal way to switch weapons midcombo is to connect a Down+Heavy then quickly Down+(weapon change button), as opposed to Down+Heavy then Down+Down+(Weapon Change Button). Doing this allows you to continue the combo easier as you are performing one less command input, using the Down+Heavy as one of the Down commands for the weapon change. Here are animated GIFs to visually describe to perform this.

1- Quick Weapon change done at the end of a 3-hit combo at this link here

Media:AmmyEzWepChange.gif (Practice this first)

2- Quick Weapon change in the middle of a 3-hit combo here

AmmyEzWepChange2.gif (Practice this second)

(Note: These animated gifs are best viewed in Mozilla Firefox browser, as Internet Explorer animates gifs slowly).

Basic Strategy

Advanced Strategy