| Line 95: | Line 95: | ||
'''''Zen''''' | '''''Zen''''' | ||
[[File:Zen.png]] | |||
Revision as of 05:52, 15 May 2019
Introduction
The Rumble Fish 2 (ザ・ランブルフィッシュ2) is a 2D fighting game for the Atomiswave arcade platform. It was produced by Dimps and published by Sammy. It is the sequel to The Rumble Fish, bringing in several new additions. A re-release on Taito's NESiCAxLive arcade digital delivery service was made available in 2012.
Controls
F = forward, D = down, B = backward, J = Jump, C = Crouch QCF = Quarter-Circle Forward QCB = Quarter-Circle Backward HCF = Half Circle Forward HCB = Half Circle Backward SC = Super Cancel (requires no additional bar though)
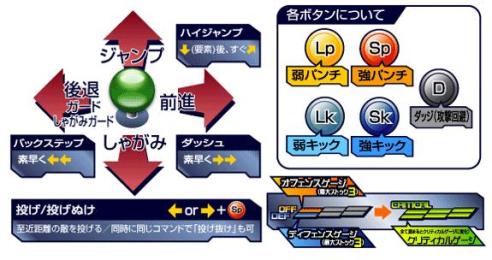
The attack buttons are pretty self-explanatory. The Dodge button is a little more complicated. It can of course, dodge through simple attacks such as projectiles by pressing forward D to move forward and avoid the projectile with a correct timing. While on the ground, pressing anything with a downward direction and D will result in a small jump (with shadow effects). It can also be pressed while in air but it’ll leave quite an opening if misused. I dont really use this much for dodging since I’m not at that level yet. There’s still more to the functions of this button. Another use for it is the ability to perform Impact Break while guarding an attack from opponent. It uses up 1 Defensive bar (I’ll come to that later) but it will allow you to recover earlier from the block stance to have a chance in inflicting a damaging counterattack on your opponent. But of course with with caution to avoid wasting of precious Defensive bar and possibly providing an opening while trying to perform your counterattack. Next, while on the ground and before u get up on your feet, pressing left or right and D will allow you to roll in that direction and recover. However, if your opponent manages to predict your movement, you’ll probably get whacked a little once again since there seems to be some opening while recovering this way. One last use for it is to recover from certain air attacks that u normally can’t recover from by pressing D while in the air. It uses 1 Defensive bar but when used correctly, it’ll save you from eating more damage from your opponent’s juggling. Performing air recovery is simply pressing any of the attack buttons while in the air but there are some restrictions. Basic grab/throw for all characters: while being close to opponent, press forward/backward SP. Pretty standard for most 2D fighting games.
Health Bar/Guard Bar
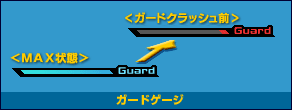
It’s placed below your health bar and it looks like what’s shown in the picture above. Do monitor your guard bar status as you really dont have to experience one, where you’ll be “stunned” for a significant period of time and your opponent will be able to happily perform his/her most deadly combo.
Offensive Meter
Shown as OFF in the very first picture at the top. Quite obviously, it’s the one that’ll allow you to perform your Offensive Arts (OA). As far as I know, OAs use 1 offensive bar.
Defensive Meter
Shown as DEF in the very first picture. Allows you to perform your Defensive Arts (DA). The number of bar/s required to perform a DA varies with the character you use, and conditions to perform a DA may vary from character to character.
Critical
As shown in the picture. Will appear to be like that when all 3 Offensive bars and 3 Defensive bars are charged. Allows to perfom your Critical Art (CA), which of course has different effects for each character. Though CAs generally do a huge damage at 1 go, it is usually not very advisable to rely heavily on it as it requires much time to charge all that and OAs & DAs can be performed appropriately to improve your gameplay.
Game Mechanics
Jolt Attack (JA)
Done by pressing LP & LK together. Able to perform in air. Basically, it’s an unblockable move that will launch your opponent into the air, allowing you to juggle in hits to perform a damaging combo. The jolt attack itself isn’t deadly, it’s the juggle combo after that that’s painful. From what I observe, seems that the opponent wont be launched into the air if he/she isn’t on the ground.
Advanced Attack (AA)
Done by pressing SP & SK together. Uses 1 Offensive bar. Allows you to continue with more basic attacks (those 4 buttons) after performing this attack. Rather decent damage and doesnt require any movement from the joystick, hence it’s easy to link it in once you get the timing. Can be used to pressurise/play mind games with opponents too (more suitable for VS humans).
Boost Dive
Done by pressing alternate attack buttons, meaning LP&SK or LK&SP. Uses 1 Offensive bar and 1 Defensive bar. Properties of each character’s boost dive is different. Will try my best to include those that I know at the characters FAQ&Guide part.
Final part
Basic Attack combinations: In RF2, basic attack combinations are achieved by pressing the attack buttons in sequences that the character allows for “combo-ing”. But anyhow, the system is such that you can perform basic attacks (whether they link or not) as long as your basic attacks follow in a light attack->light attack, light-> strong attack or strong->strong attack. Pretty essential as it’s the starting of your combos and also useful in “poking” opponents are trying to counter their certain actions.
Damage system
This game, like Marvel fighting games, is somewhat similar whereby the longer your combo, the less damage each of the moves deal as compared to the damage inflicted when done individually. Example: A basic attack combination then an advanced attack followed by a DM combo will see noticably less damage coming from the DM as compared to when it hits the opponent directly from the start. Havent really figured a good way to perform reset combos. Will be good if you’re able to trick your opponent and perform some “resets”
Basic Strategy
Advanced Strategy
Game Versions
The Characters
Zen
F + SP - Overhead elbow attack move.
F + SK - Longer reach than Standing SK
QCF + LP/SP - Projectile. A little more than half screen distance.
QCB + LP/SP An attack similar’s to Terry’s (KOF) QCB+A/C.
F,D,DF + LP/SP uppercut. anti-air move. short range. SP version can be followed up with SP for extra hit & damage.
QCB + LK/SK Zen leaps into the air and kicks downwards.
D,D + LK/SK Powers up his next special move. Read details @ Boost Dive
F,HCF + LP/SP Offensive Art. Cancellable after QCB+LP/SP for a combo. Once it hits, Zen will do a string of attacks. After it ends, u can follow up with either LK/SK/QCF + LP most of the time.
QCBx2 + SP/SP Defensive Art. Uses 2 Defensive bars. Blue energy appears around him. Knocks away attacking opponents. High priority, low damage as with all DAs.
QCF,HCB + LP/SP Critical Art 1. Initial frames are for preparation and you’re vulnerable during this period of time. After that a HUGE projectile-like graphic appears and does decent damage as all CA do.
HCB,F + LK/SK -> SK -> SP -> LK -> LP -> LP -> LK -> SP -> QCB + LP/SP - Critical art 2. Similar mechanics to Rock’s (MOTW) F,HCF C special. Never pulled this off before. XD
Boost Dive - For a limited time all his special moves will have the effect of D,D LK/SK. Affected moves include projectile (full screen & a few hits), uppercut (now a big whirlwind of energy), QCB+LP/SP (more damage I think)
& QCB+LK/SK (does more damage and launches opponent into air if it hits)
Combos
– (powered-up, opponent at other end of screen) QCF+LP, run forward, J. LK, J. SK (or other combo if it works; it’s 2 hits done together in 1 jump, not 2 jumps), LP, LK, SP, SK, AA, LP, LK, SP, SK, QCB + LP, (SC) F,HCF + LP/SP (or CA1 if your opponent at corner and you can reach him/her). or you could replace HK, QCB+LP as F,D,DF +LP/SP then super cancelling into OA.
– JA, then you can follow up with any combinations of attacks as you deem fit, depending on the opponent’s positioning wrt yours. Usually, J.SP, J.SK, then some “juggle” done on ground (eg, LP, SP, SK, F,D,DF + LP, (SC) OA) – Of course, I haven’t researched this game enough. Do take a look at youtube videos to get a better idea on how to play Zen well. (the Japanese are good. lol)
Tips/Further Comments
– Easy character to use, though some of his moves have some not so desirable recovery time (like QCB + LP/SP) so do make sure you don’t naively do any special move as you like. On the bright side, his basic damage for individual moves are quite damaging, though as with the game’s engine, as the combo gets longer, the real damage a subsequent move does is gonna be less than its full damage (if it were to connect alone separately) – His anti-air move is rather painful and has really good priority if timed right. While you should try to take advantage of this move, don’t make it such that opponent will be able to predict when you’ll do this move as its recovery time isn’t all that fast either. – His AA has a decent range and distance covered, so you could use it after a BLOCKED basic attack string to play mind games with your opponent, or simply harrass him further. It’s okay to use AA like this because Zen is able to charge his offensive bar pretty fast. – You can add in an extra c.HK (for eg) after his OA ends, or even a QCF + LP – Punish whenever your opponent makes a major blunder and let him/her feel the wrath of Zen. =D


